<?xml version="1.0" encoding="UTF-8"?>
<eml:eml packageId="df35d.442.6" system="knb"
    xmlns:eml="eml://ecoinformatics.org/eml-2.1.1">
    <dataset>
        <title>Improving Preseason Forecasts of Sockeye Salmon Runs through
            Salmon Smolt Monitoring in Kenai River, Alaska: 2005 - 2007</title>
        <creator id="1385594069457">
            <individualName>
                <givenName>Mark</givenName>
                <surName>Willette</surName>
            </individualName>
            <organizationName>Alaska Department of Fish and Game</organizationName>
            <positionName>Fishery Biologist</positionName>
            <address>
                <city>Soldotna</city>
                <administrativeArea>Alaska</administrativeArea>
                <country>USA</country>
            </address>
            <phone phonetype="voice">(907)260-2911</phone>
            <electronicMailAddress>mark.willette@alaska.gov</electronicMailAddress>
        </creator>
        ...
    </dataset>
</eml:eml>5 Documenting and Publishing Data
5.1 Learning Objectives
- Become familiar with the submission process
- Understand what constitutes as “large data”
- Know when to reach out to support team for help
- Lean how data & code can be documented and published in open data archives
5.2 Introduction
A data repository is a database infrastructure that collects, manages, and stores data. In addition to the Arctic Data Center, there are many other repositories dedicated to archiving data, code, and creating rich metadata. The Knowledge Network for Biocomplexity (KNB), the Digital Archaeological Record (tDAR), Environmental Data Initiative (EDI), and Zenodo are all examples of dedicated data repositories.

5.3 Metadata
Metadata are documentation describing the content, context, and structure of data to enable future interpretation and reuse of the data. Generally, metadata describe who collected the data, what data were collected, when and where they were collected, and why they were collected.
For consistency, metadata are typically structured following metadata content standards such as the Ecological Metadata Language (EML). For example, here’s an excerpt of the machine-readable version of the metadata for a sockeye salmon dataset:
Alternatively, the same metadata document can be converted to HTML format and displayed in a more readable form on the web:
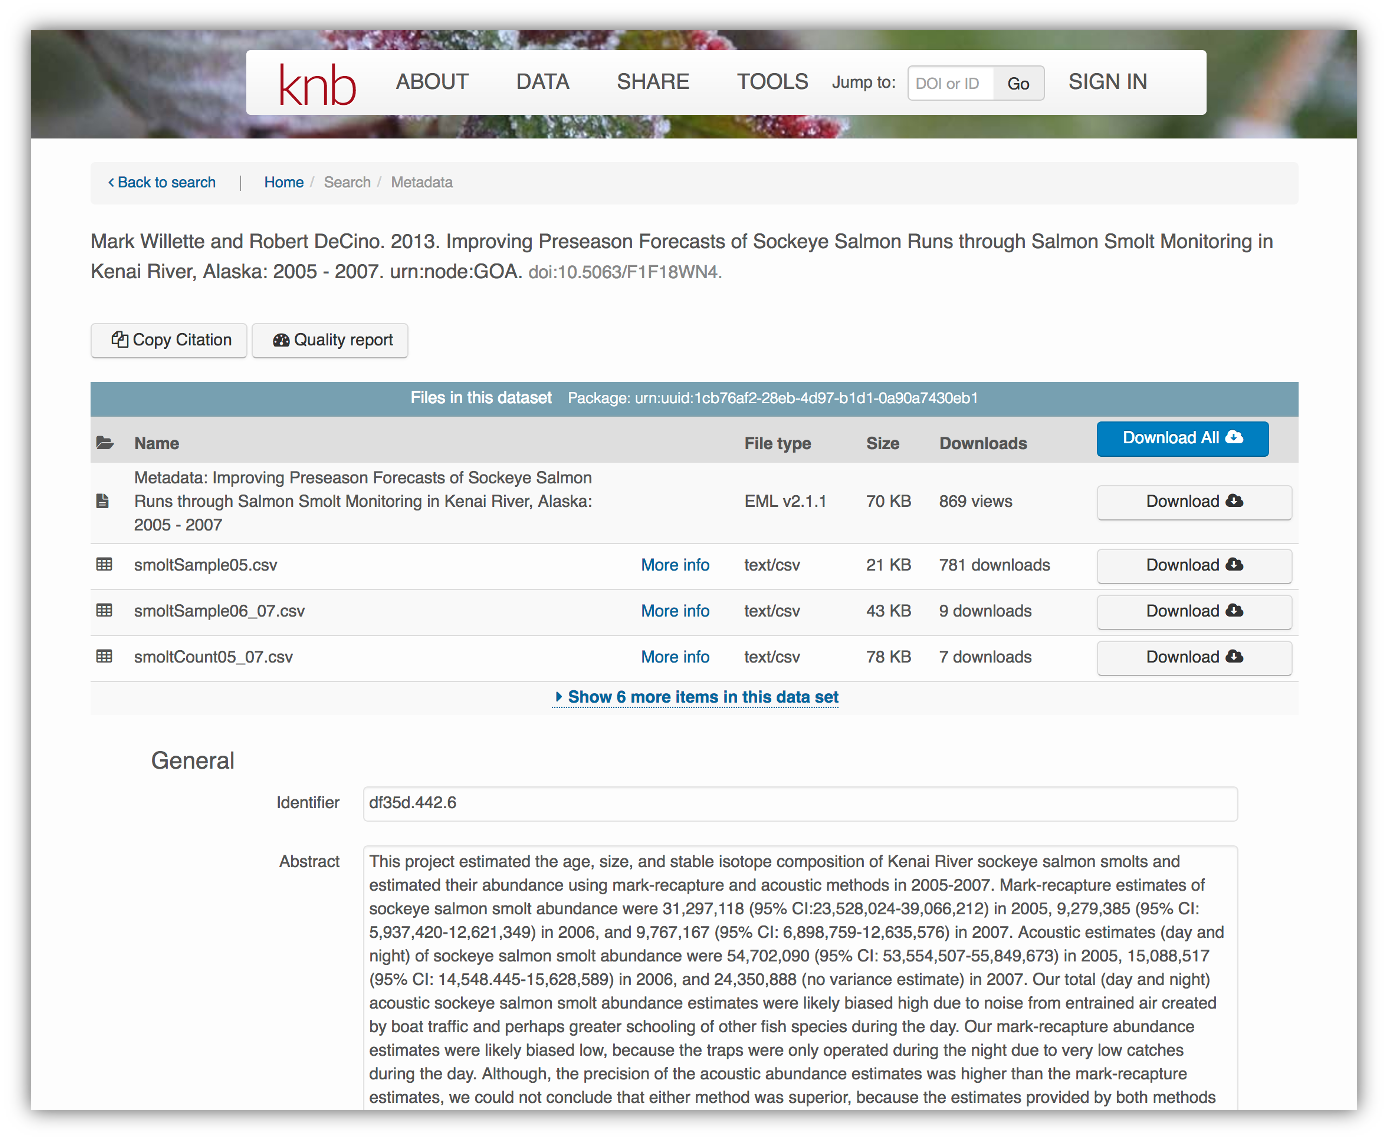
As you can see from the picture above, users can download either the whole dataset or its individual components. This makes the dataset and its associated data resuable.
Additionally, the repository tracks how many times each file has been downloaded, which gives great feedback to researchers on the activity for their published data.
5.4 Data Package Structure
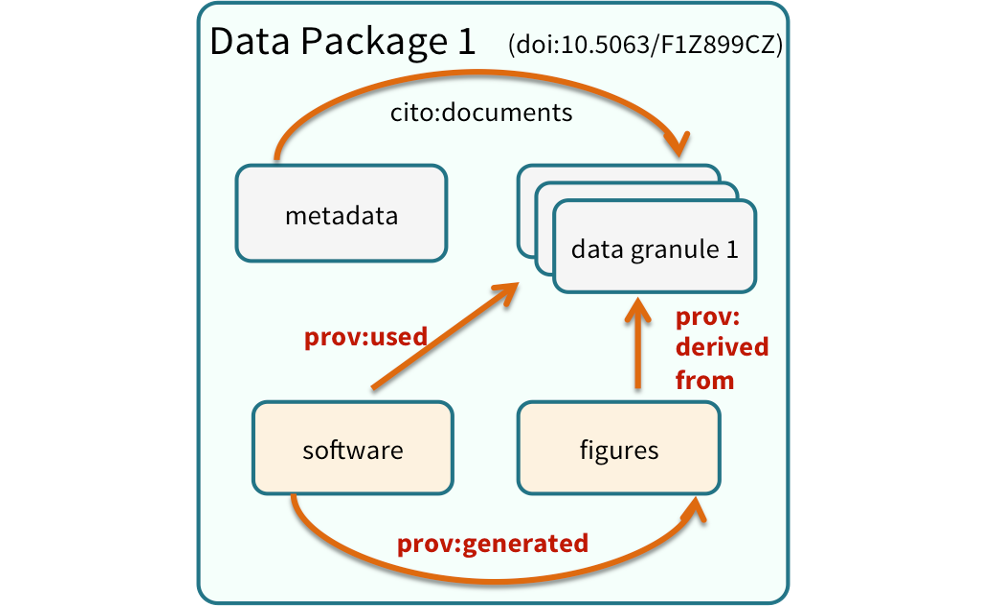
Note that the dataset above lists a collection of files that are contained within the dataset. We define a data package as a scientifically useful collection of data and metadata that a researcher wants to preserve. Sometimes a data package represents all of the data from a particular experiment, while at other times it might be all of the data from a grant, or on a topic, or associated with a paper. Whatever the extent, we define a data package as having one or more data files, software files, and other scientific products such as graphs and images, all tied together with a descriptive metadata document.
These data repositories all assign a unique identifier to every version of every data file, similarly to how it works with source code commits in GitHub. Those identifiers usually take one of two forms. A DOI (digital object identifier) identifier is often assigned to the metadata and becomes the publicly citable identifier for the package. Each of the other files gets a global identifier, often a UUID (universally unique identifier) that is globally unique. In the example above, the package can be cited with the DOI doi:10.5063/F1F18WN4, and each of the individual files have their own identifiers as well.
5.5 Archiving Data: The Large Data Perspective
There are two components to any data package archived with the Arctic Data Center: the metadata & the data themselves. Data can be images, plain text documents, tabular data, spatial data, scripts used to analyze the data, a readme file, and more. To the best of your ability, please make sure that the data uploaded are in an open format, rather than proprietary format. We strongly recommend using open, self-documenting binary formats for large data archival. NetCDF, HDF, .mat (v7.3) and Parquet files are all examples of “self-documenting” files. In the case of a NetCDF file, users can input the attribute name, attribute description, missing value codes, units, and more into the file itself. When these data are well-documented within themselves, it can save the time when users submit their data to us, since the documentation for variable level information is already mostly complete. We’ll discuss NetCDF and metadata more in Session 8. For geospatial data, we recommend using geotiff for raster files, and geopackage files for vector files.
This section provides an overview of some highlights within the data submission process, and will specifically address issues related to datasets with large amounts of data, whether that be in number of files or cumulative file size.
First we’ll go over the metadata submission; then learn how to upload the data using a secure File Transfer Protocol; and finally how to add attribute information to the data.
5.5.1 Step 1: The Narrative Metadata Submission
5.5.1.1 ORCiDs
In order to archive data with the Arctic Data Center, you must log in with your ORCID account. If you do not have one, you can create at https://orcid.org/. ORCID is a non-profit organization made up of research institutions, funders, publishers and other stakeholders in the research space. ORCID stands for Open Researcher and Contributor ID. The purpose of ORCID is to give researchers a unique identifier which then helps highlight and give credit to researchers for their work. If you click on someone’s ORCID, their work and research contributions will show up (as long as the researcher used ORCID to publish or post their work).
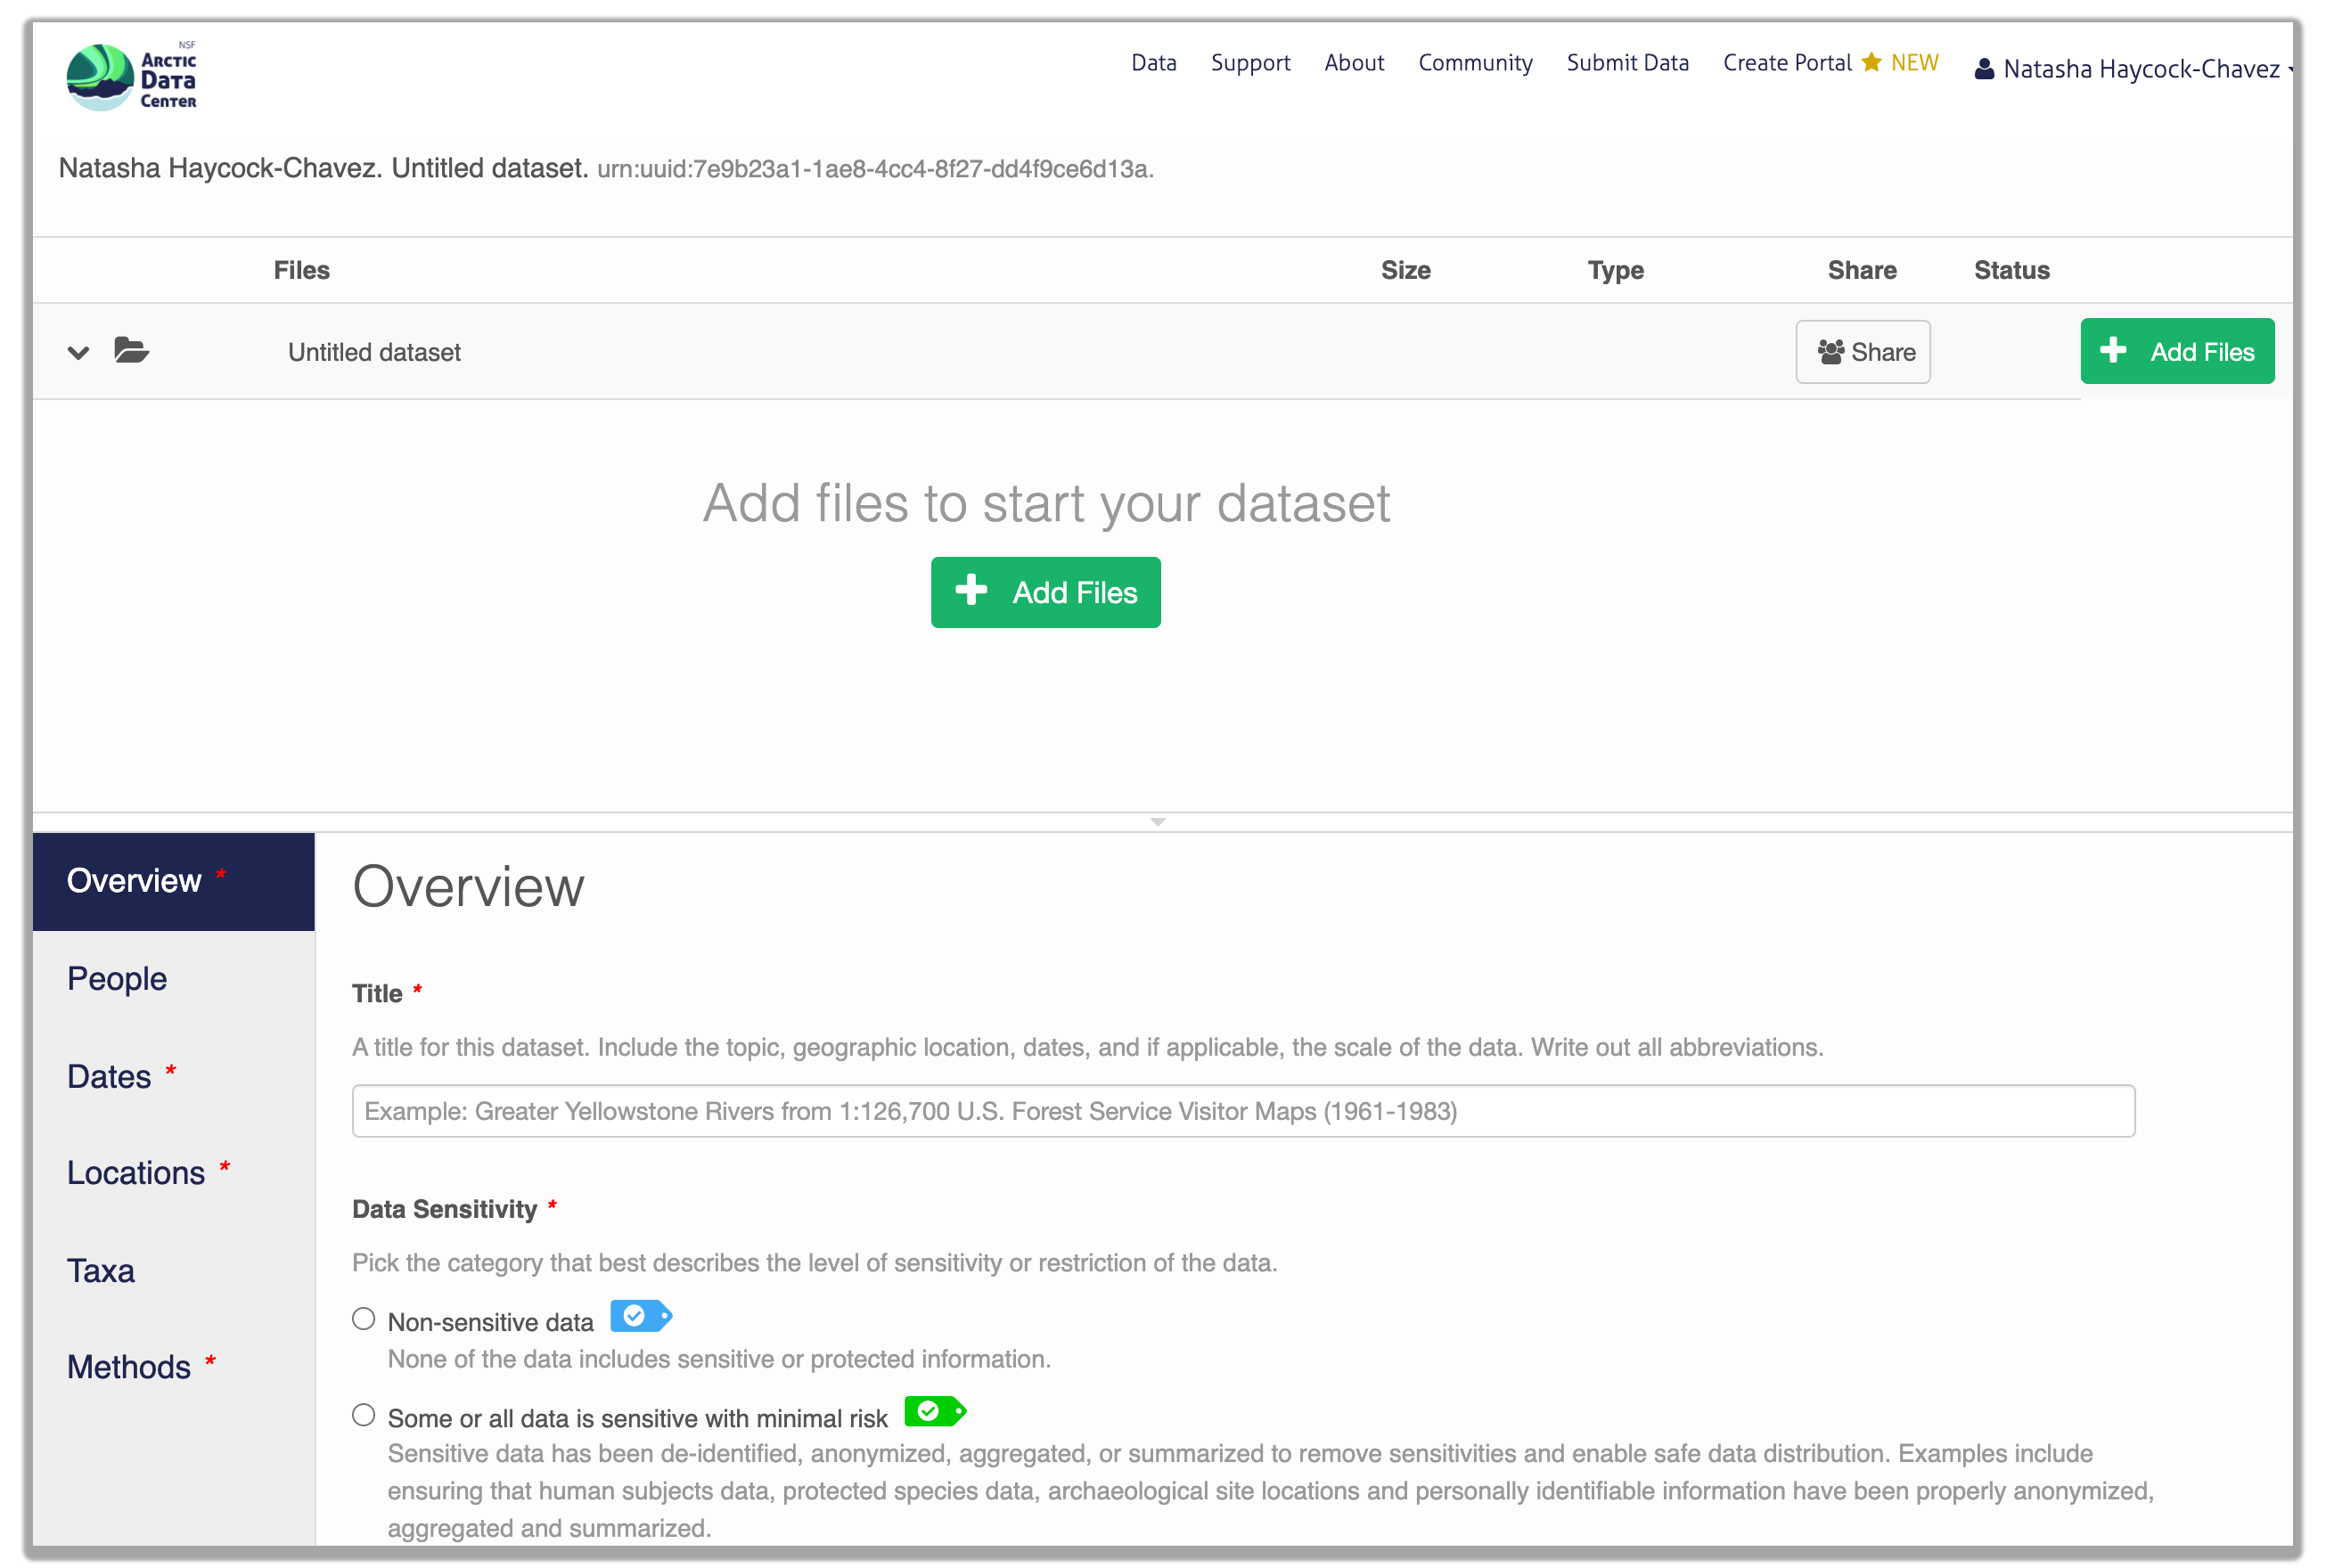
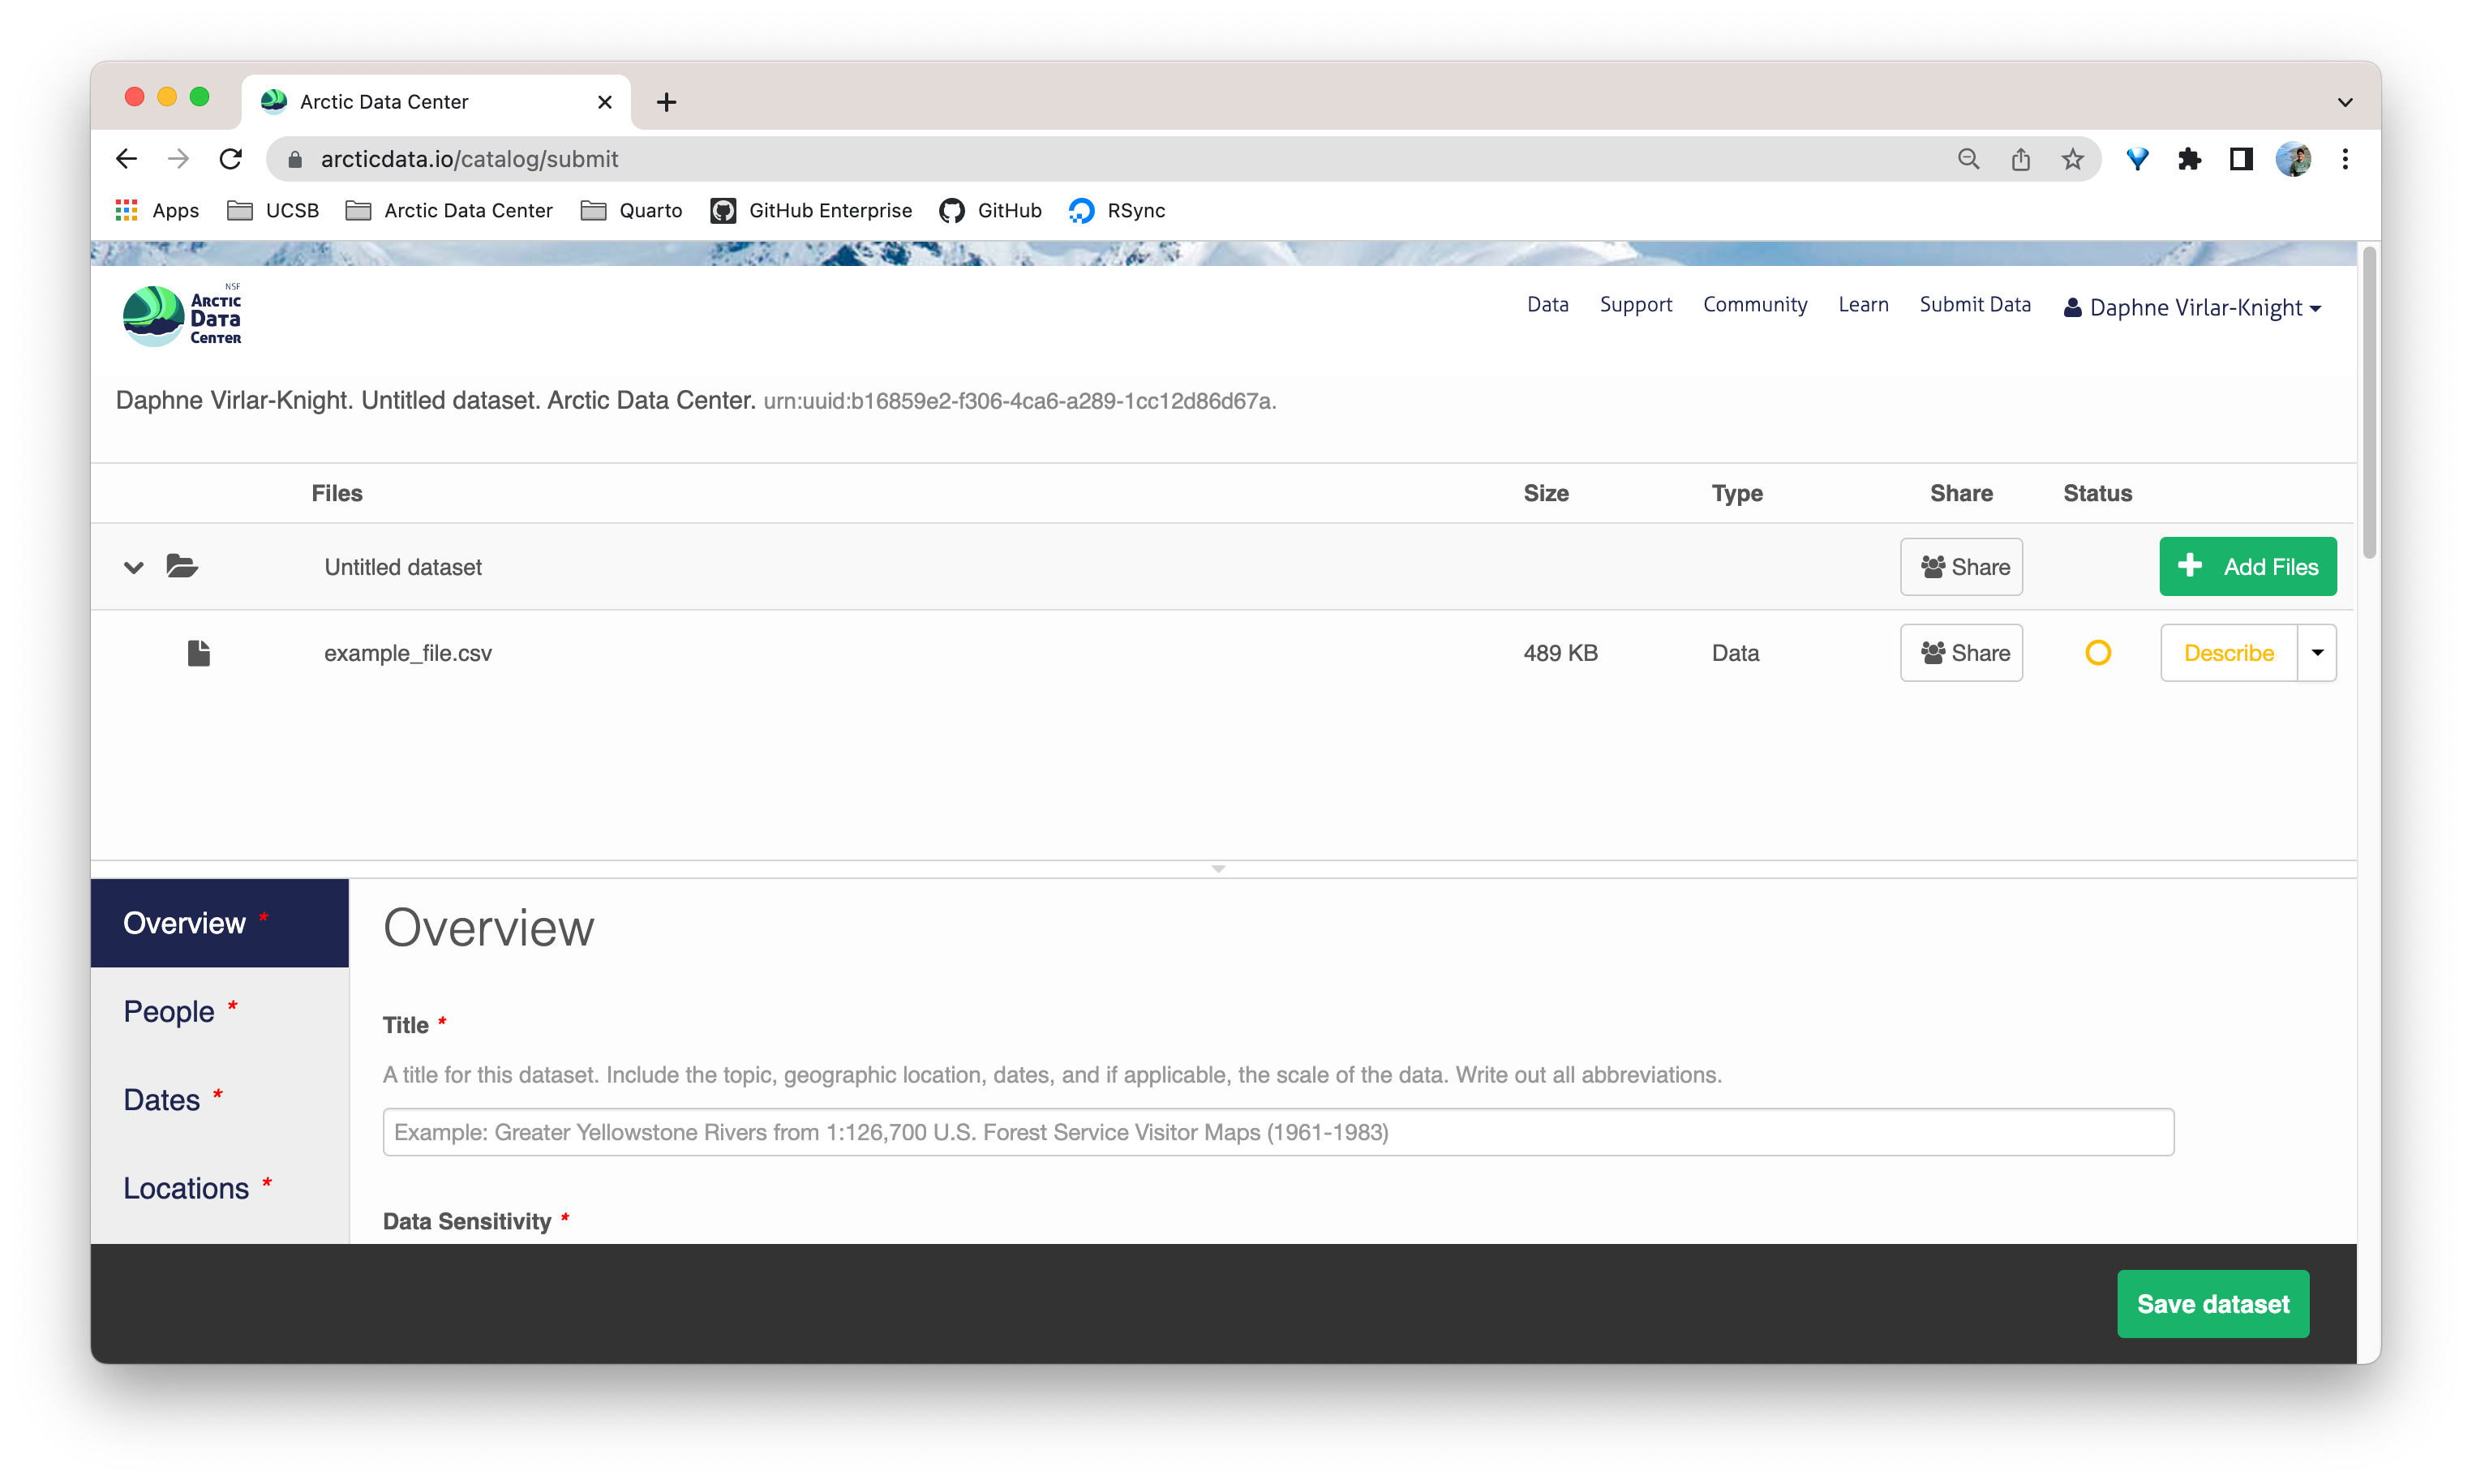
Once you’re logged into the Arctic Data Center with your ORCID, you can access the data submission form by clicking “Submit Data” in the navigation bar. For most dataset submissions, you would submit your data and metadata at the same using the “Add Files” buttons seen in the image below. However, when you know you have a large quantity of files or large cumulative file size, you should focus only on submitting metadata through the web form. We’ll discuss how to submit large quantities of data in the next section.
5.5.1.2 Overview Section
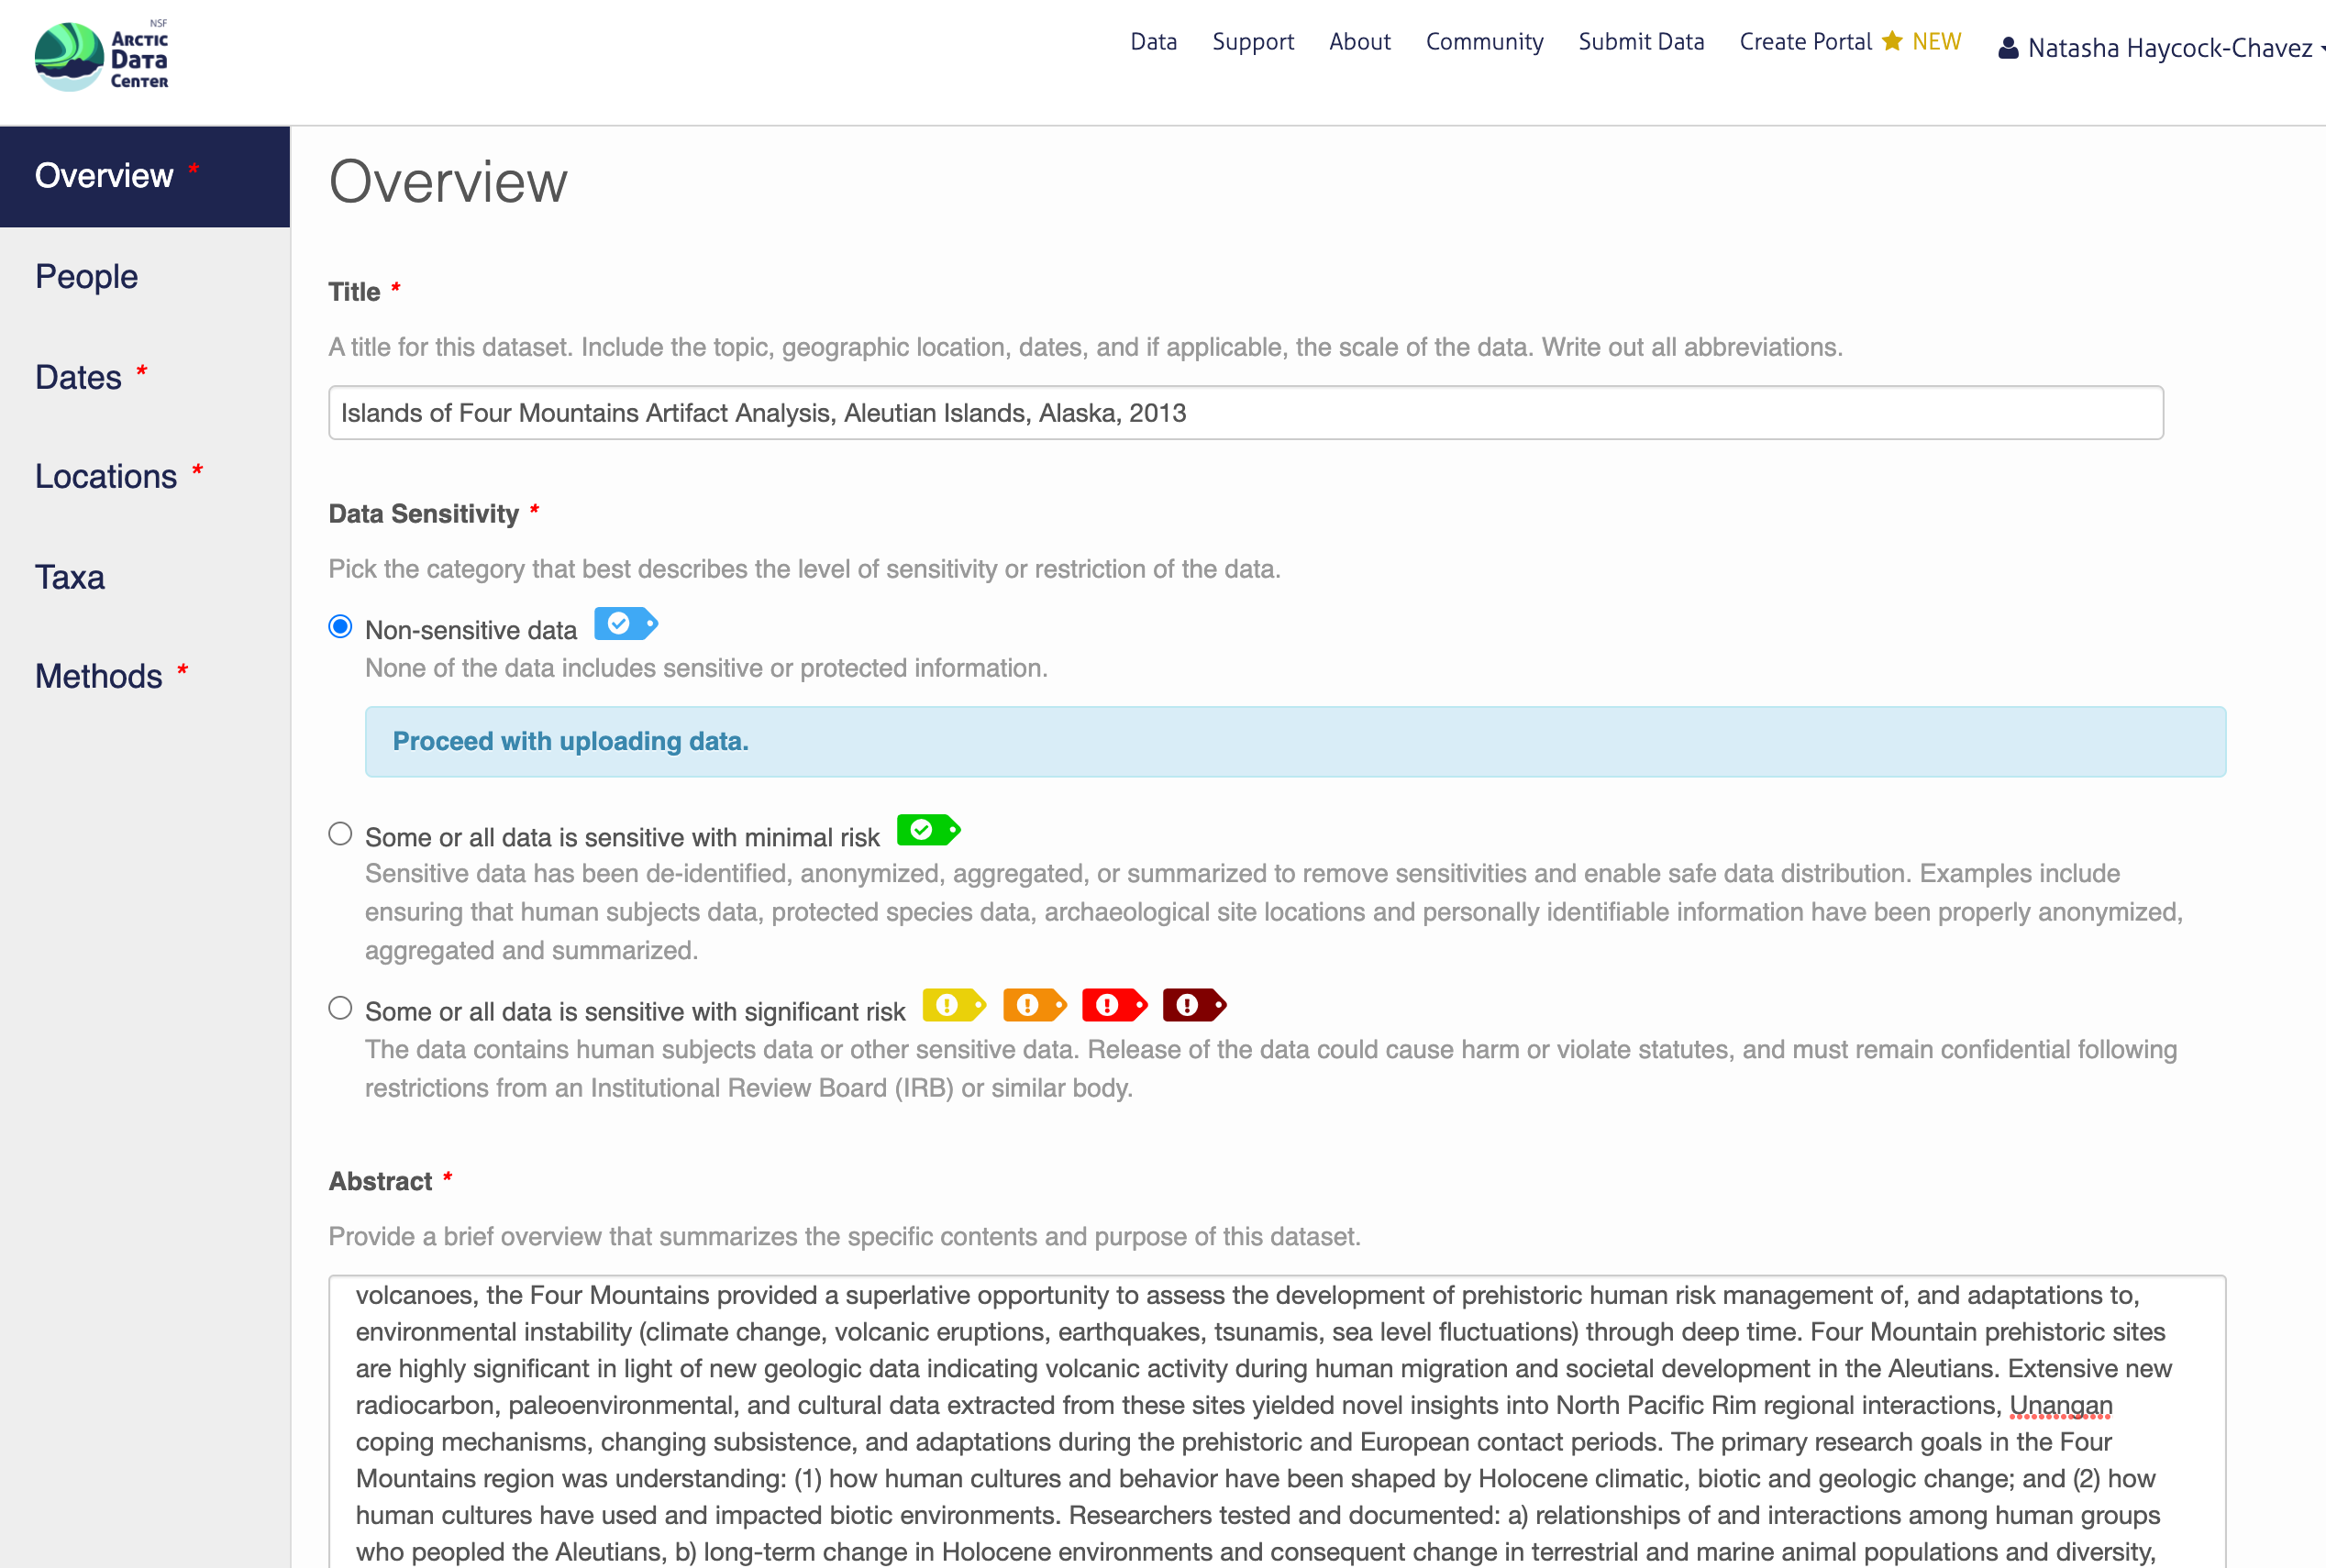
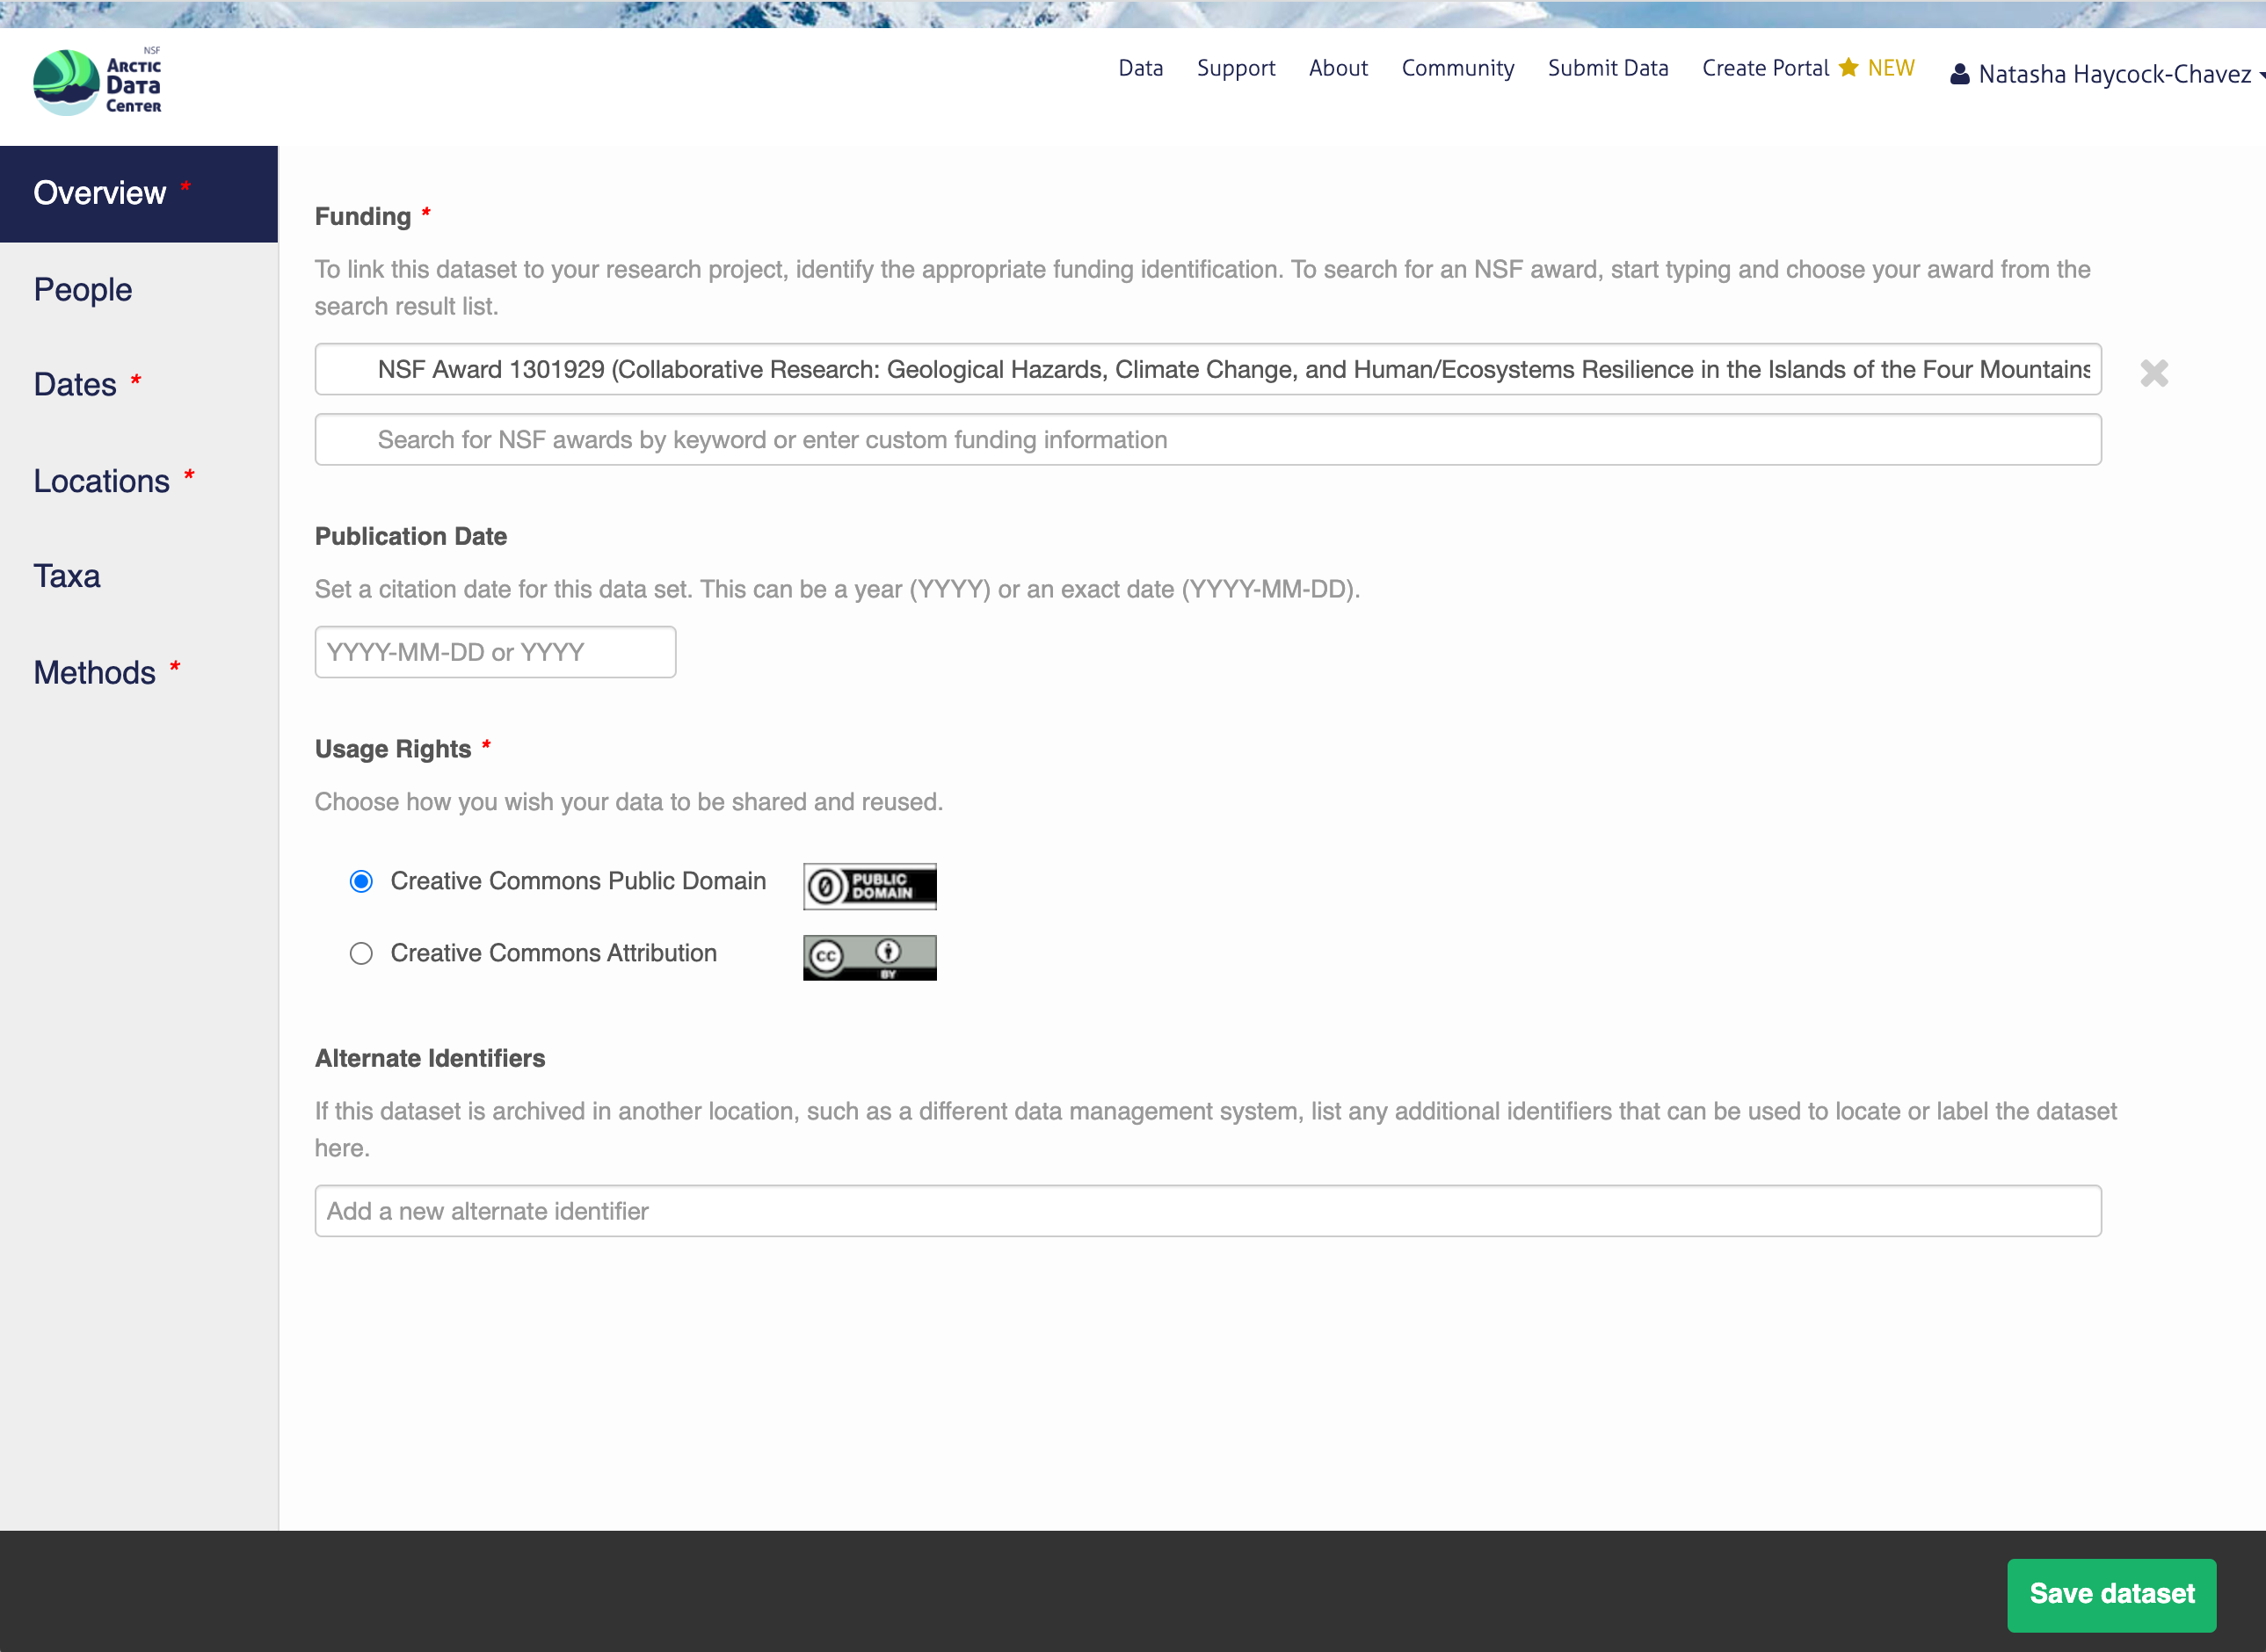
In the overview section, you will include a descriptive title of your data set, select the appropriate data sensitivity tag, an abstract of the data set, keywords, funding information, and a license.
In general, if your data has been anonymized or de-identified in any way, your submission is no longer considered to have “Non-sensitive data”. If you have not had to de-identify your data or through an Instituional Review Board process, you should select the “Non-sensitive data” tag. You can find a more in-depth review of the data sensitivity tag in Chapter 12 of our Fundamentals in Data Management coursebook.
You also must enter a funding award number and choose a license. The funding field will search for an NSF award identifier based on words in its title or the number itself. When including funding information not from an NSF award, please make sure to add an award number, title, and organization if possible.
The licensing options are CC-0 and CC-BY, both of which allow your data to be downloaded and re-used by other researchers.
CC-0 Public Domain Dedication: “…can copy, modify, distribute and perform the work, even for commercial purposes, all without asking permission.”
CC-BY: Attribution 4.0 International License: “…free to…copy,…redistribute,…remix, transform, and build upon the material for any purpose, even commercially,…[but] must give appropriate credit, provide a link to the license, and indicate if changes were made.”
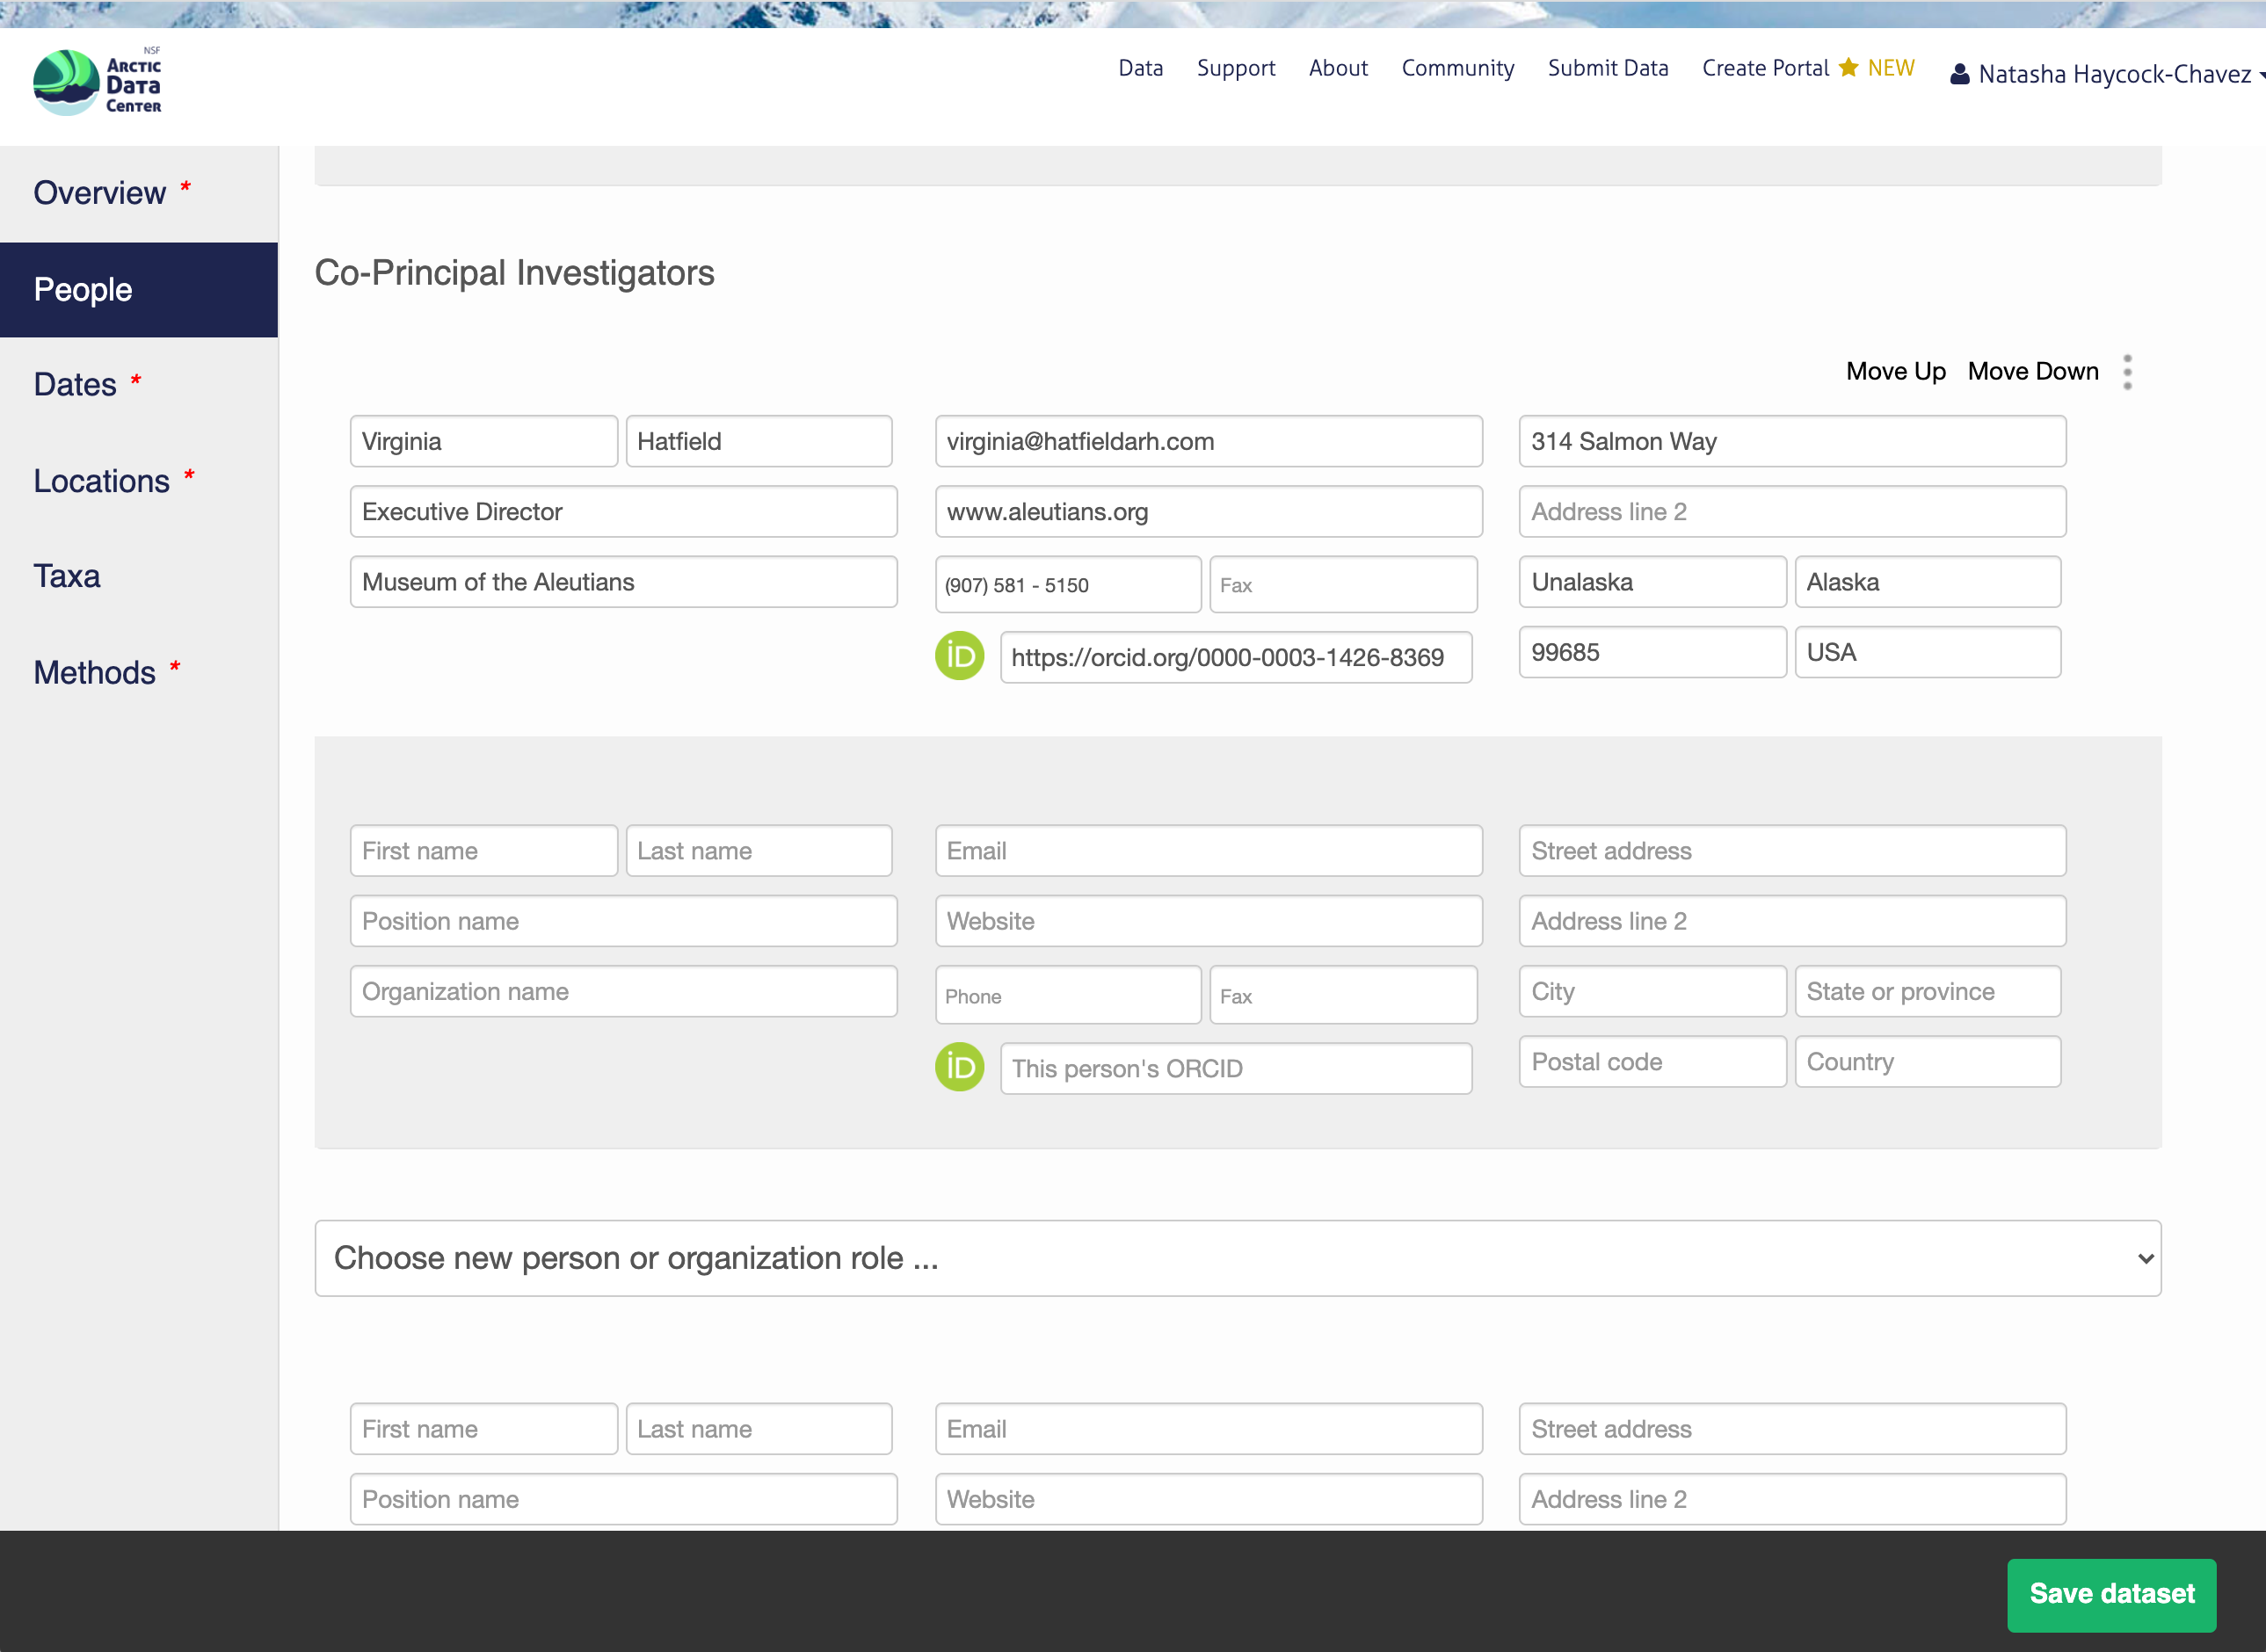
5.5.1.3 People Information
Information about the people associated with the dataset is essential to provide credit through citation and to help people understand who made contributions to the product. Enter information for the following people:
Creators - all the people who should be in the citation for the dataset
Contacts - one is required, but defaults to the dataset submitter if omitted
Principal Investigators
Any others that are relevant
For each, please provide their ORCID identifier, which helps link this dataset to their other scholarly works.
5.5.1.4 Temporal Information
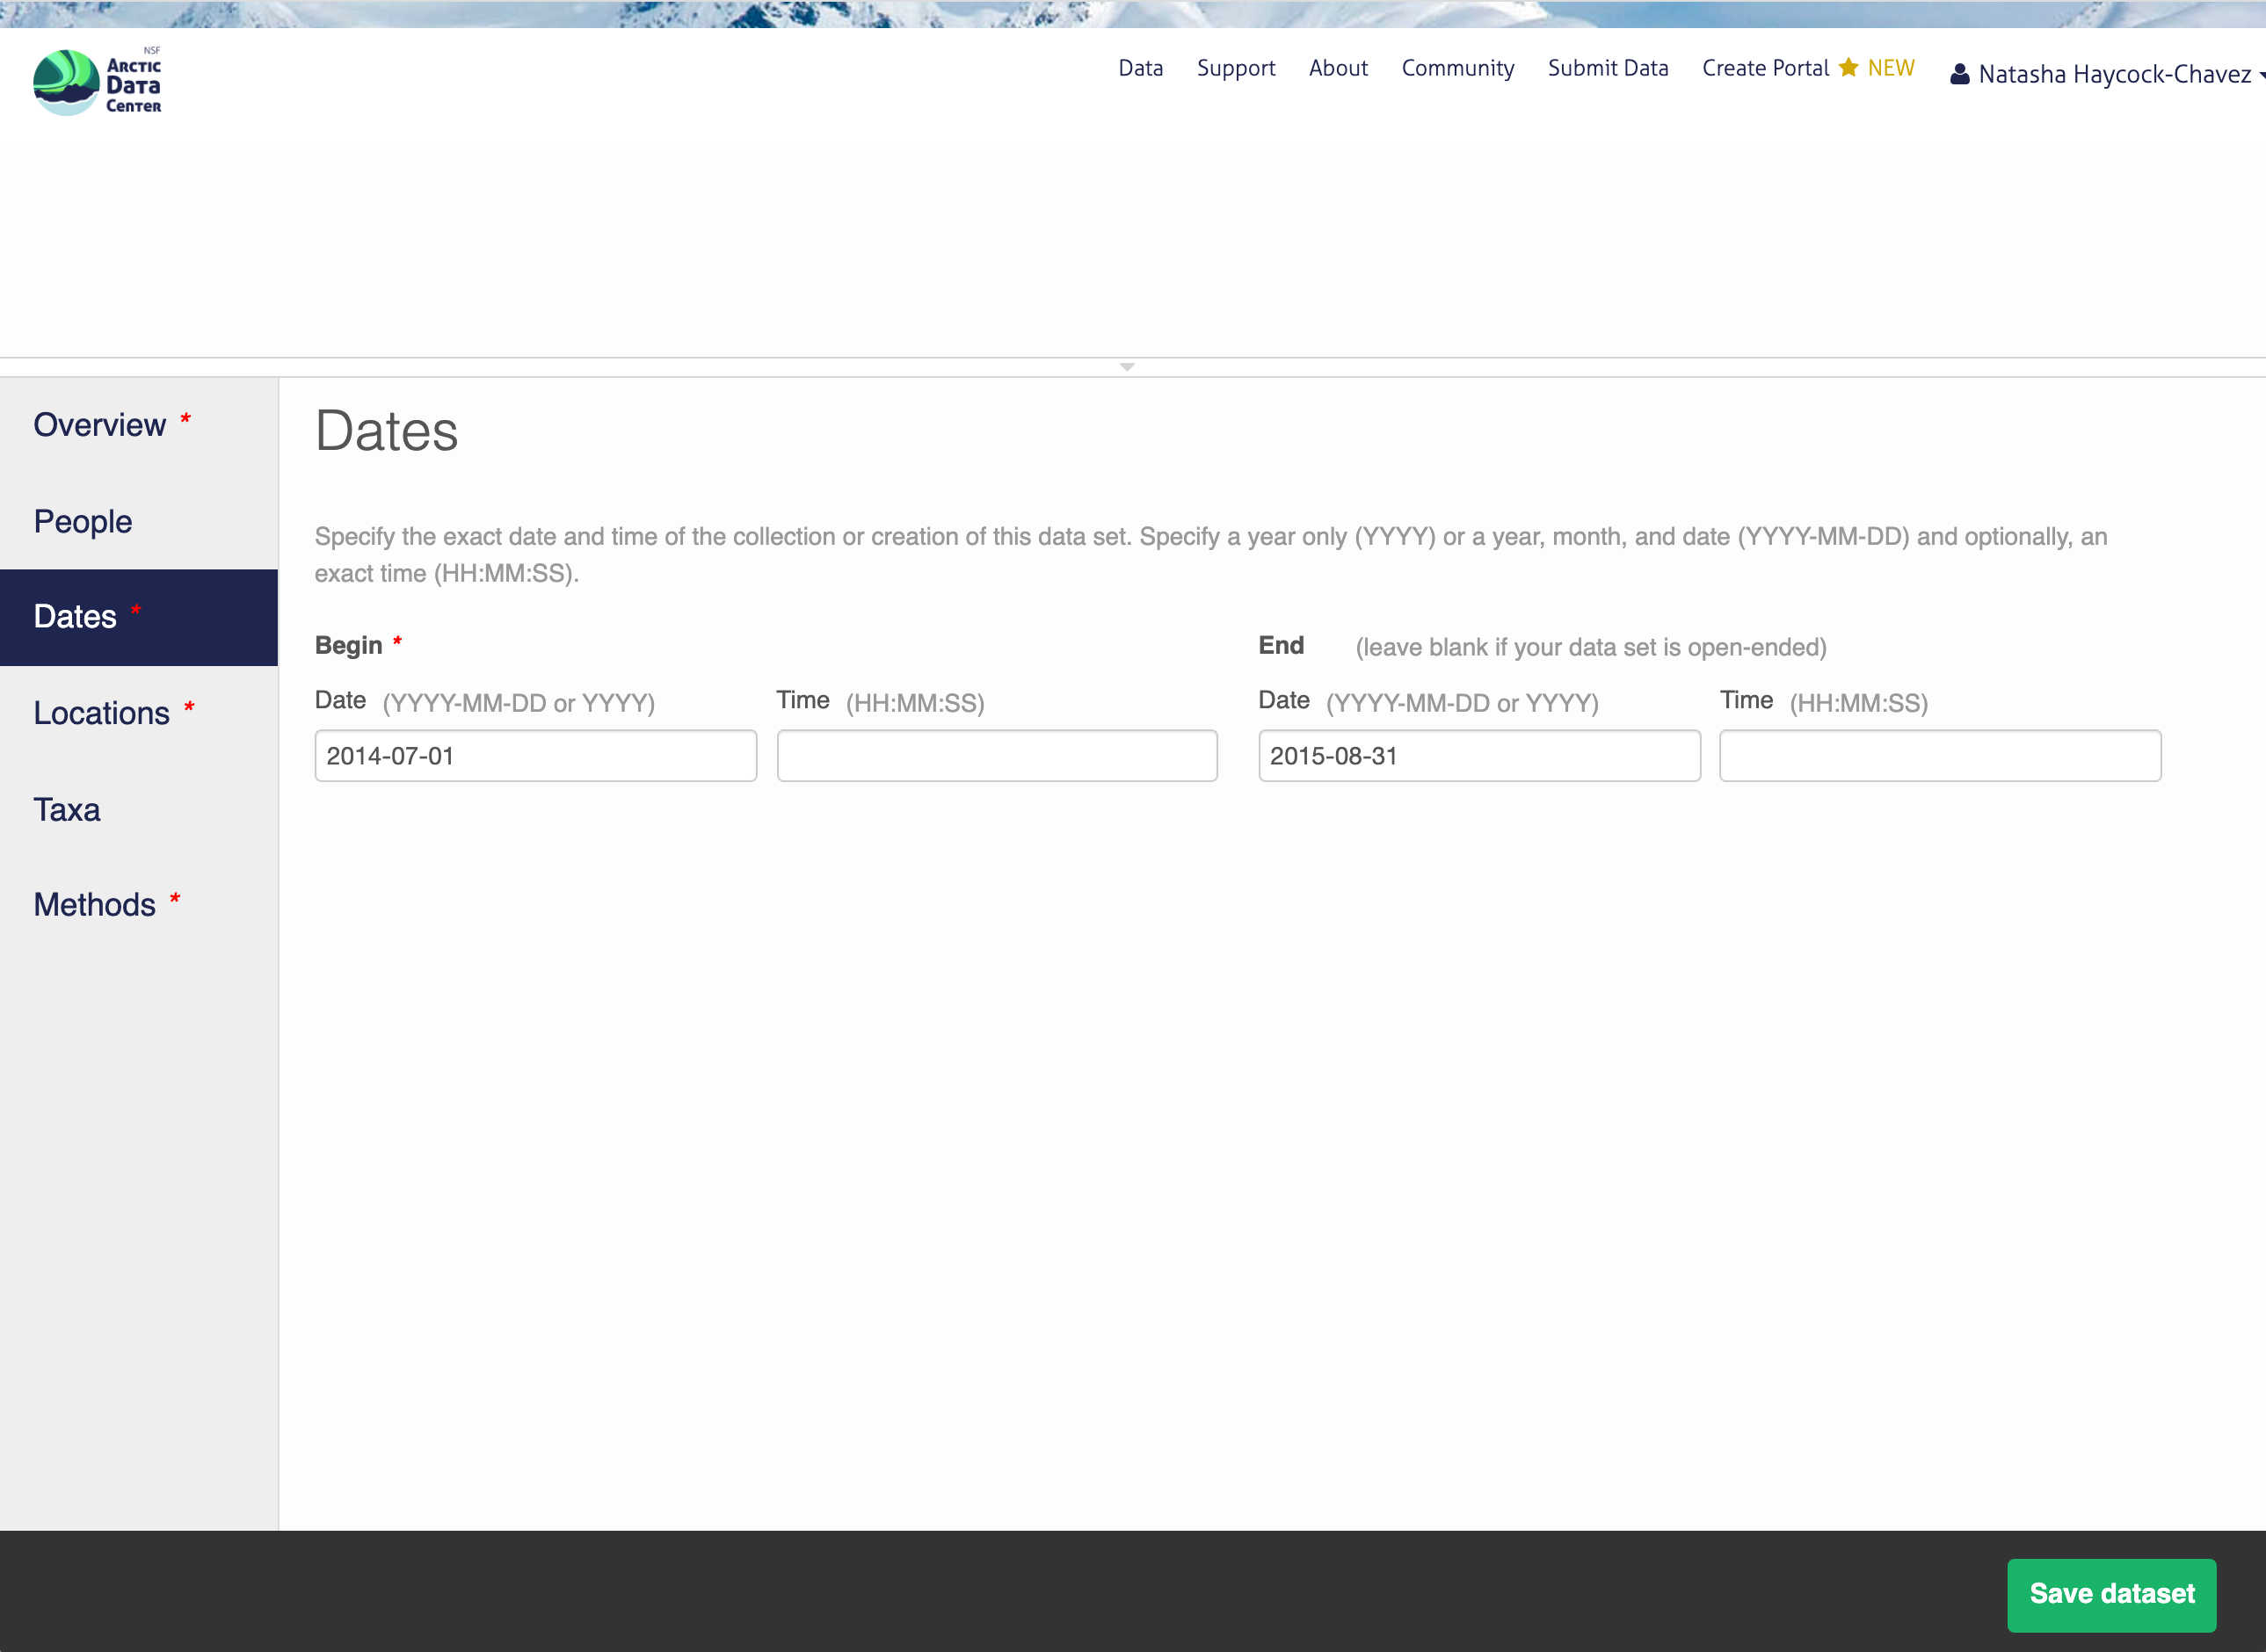
Add the temporal coverage of the data, which represents the time period when data was collected. If your sampling over time was discontinuous and you require multiple date ranges to represent your data, please email us the date ranges and we will add that to the submission on the back-end.
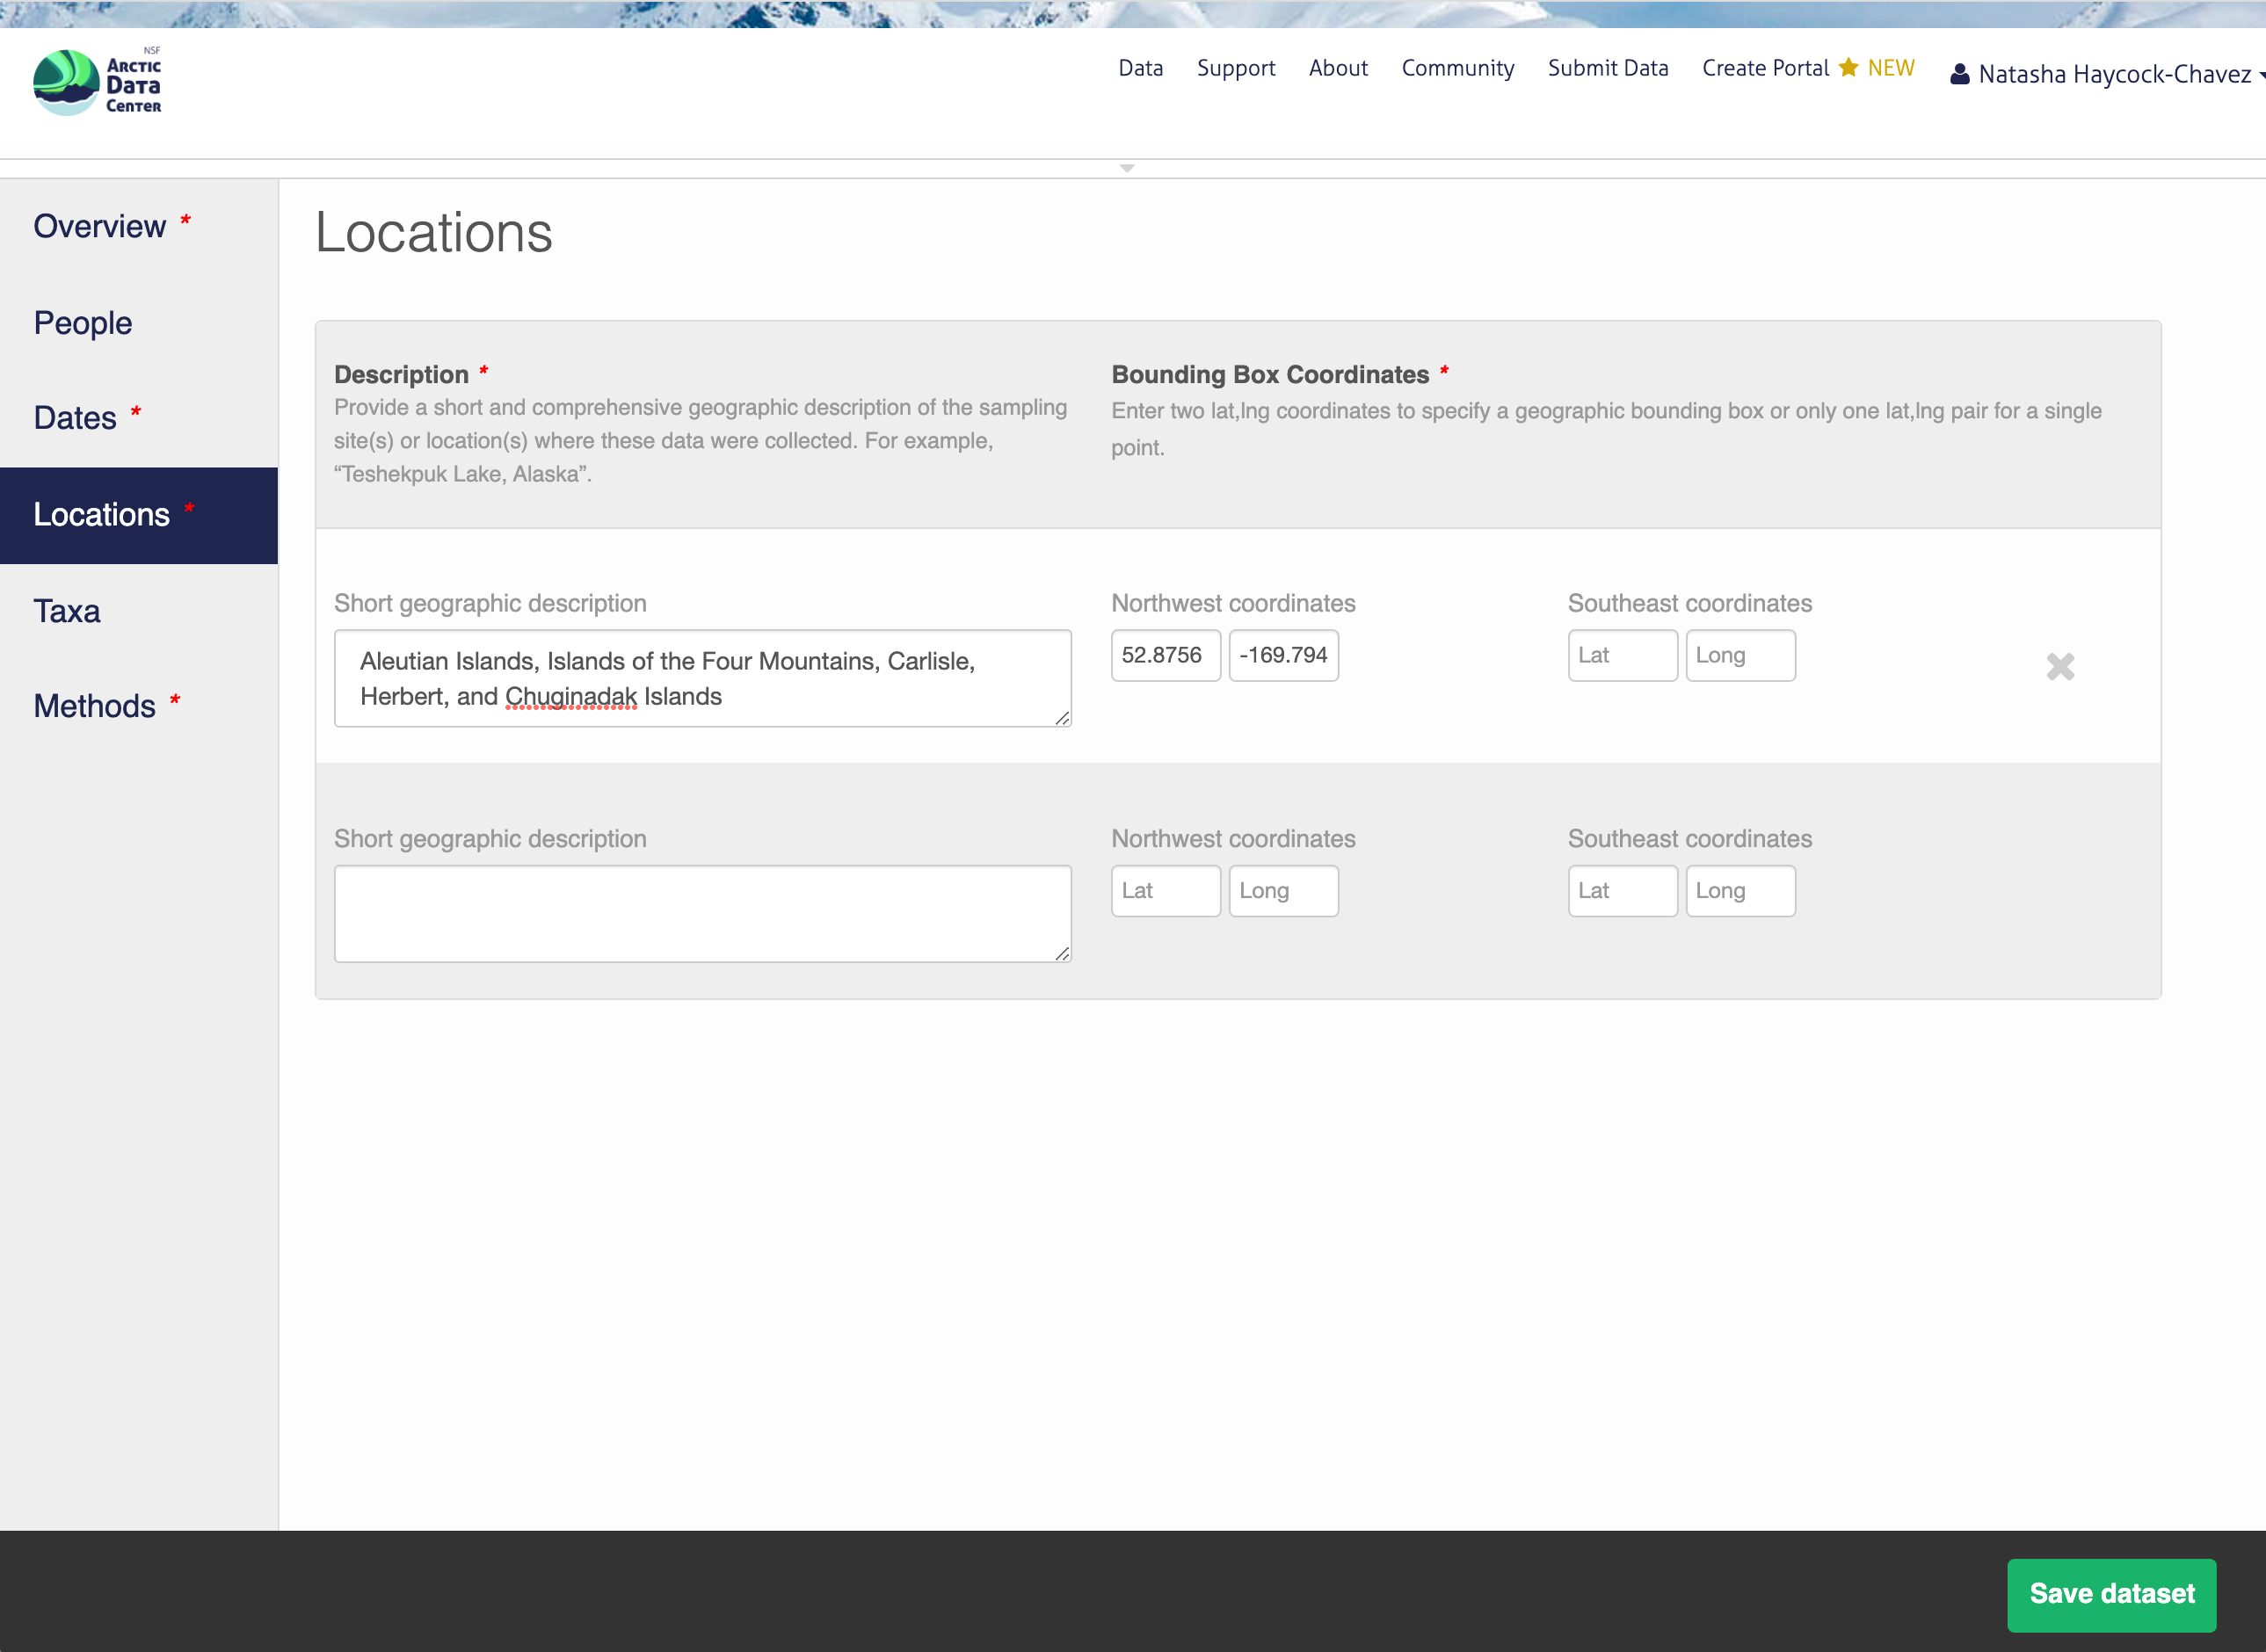
5.5.1.5 Location Information
The geospatial location that the data were collected is critical for discovery and interpretation of the data. Coordinates are entered in decimal degrees, and be sure to use negative values for West longitudes. The editor allows you to enter multiple locations, which you should do if you had noncontiguous sampling locations. This is particularly important if your sites are separated by large distances, so that spatial search will be more precise.
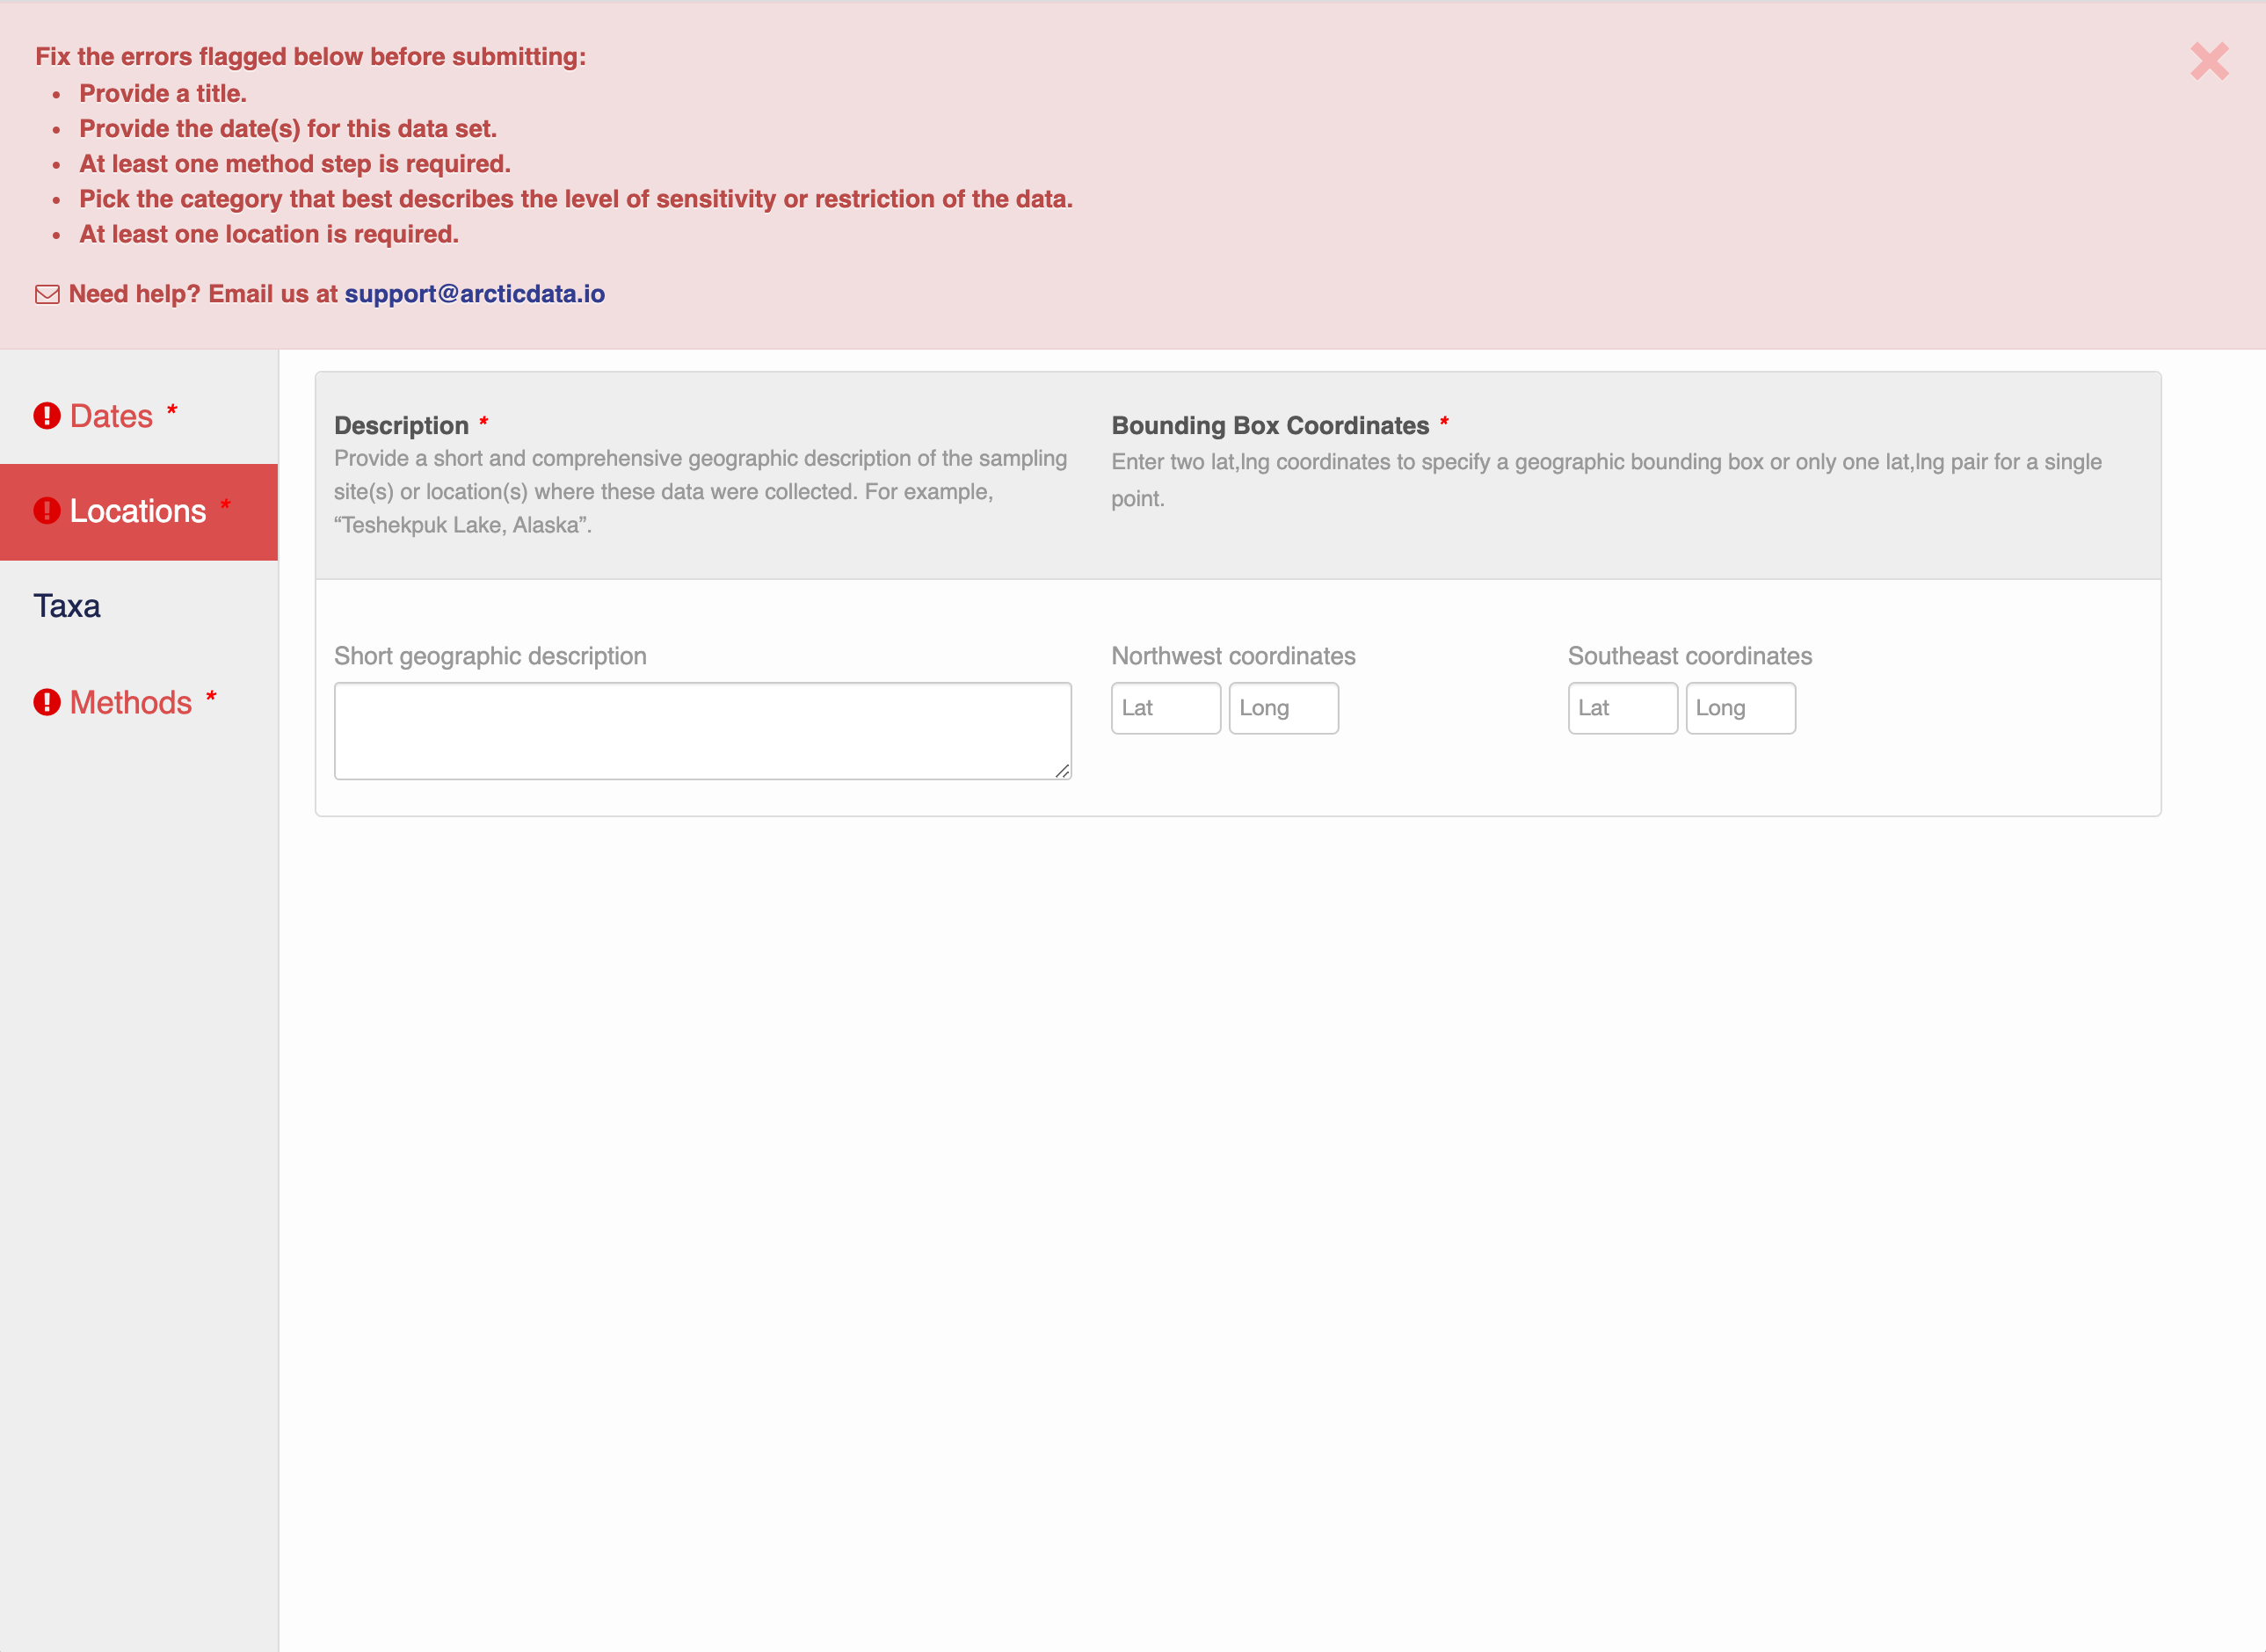
Note that, if you miss fields that are required, they will be highlighted in red to draw your attention. In this case, for the description, provide a comma-separated place name, ordered from the local to global:
- Mission Canyon, Santa Barbara, California, USA
5.5.1.6 Methods
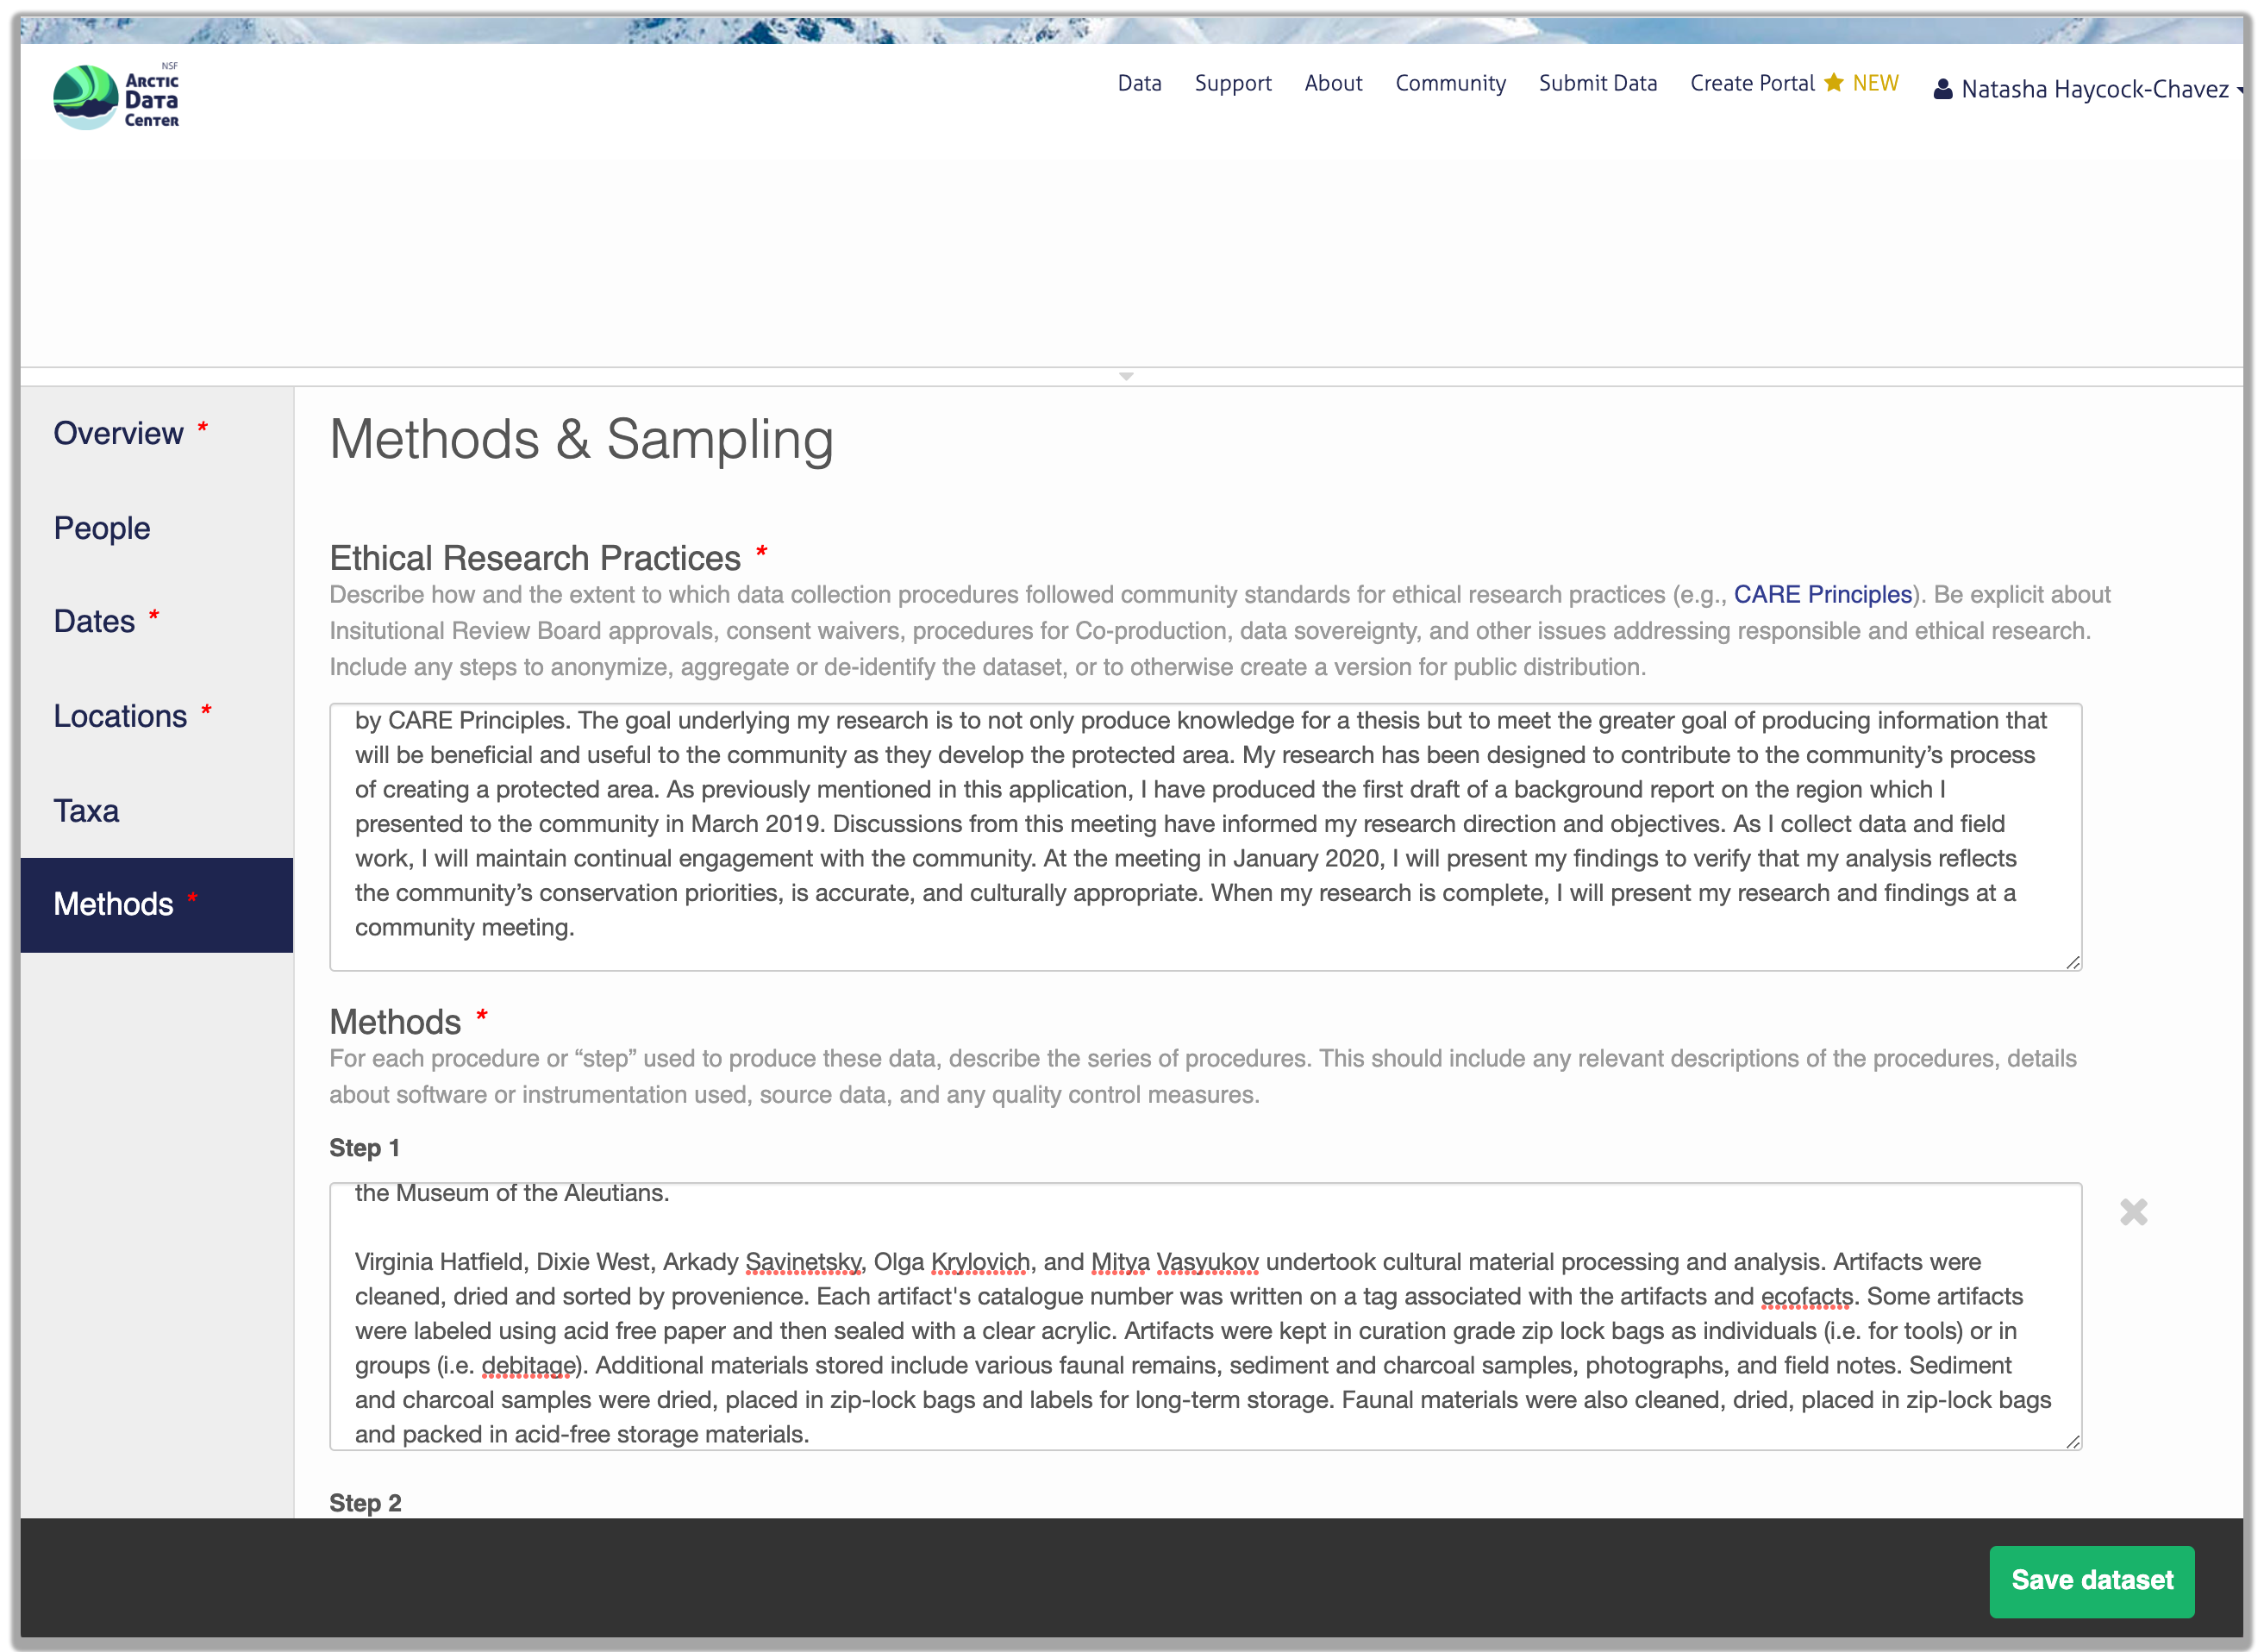
Methods are critical to the accurate interpretation and reuse of your data. The editor allows you to add multiple different methods sections, so that you can include details of sampling methods, experimental design, quality assurance procedures, and/or computational techniques and software. Please be complete with your methods sections, as they are fundamentally important to reuse of the data. Ideally, enough detail should be provided such that a reasonable scientist could interpret the study and data for reuse without needing to consult the researchers or any other resources.
Included in the methods section is a question that asks users about the ethical research practices that may or may not have been considered throughout the research process. You will learn more about this in Chapter 14, and can find more in-depth information on our website’s data ethics page.
The ethical research practices response box must be filled out in order to save your dataset. If users feel as though this question is not applicable to their research, we encourage them to discuss why that is rather than simply stating “Not Applicable,” or some variation thereof. For example, say a researcher has compiled satellite imagery of weather patterns over the open ocean. Rather than respond with “N/A”, a user should instead include something to the effect of “Dataset contains satellite imagery of weather patterns over the Atlantic Ocean. Imagery was downloaded from NASA and NOAA, and does not contain any individual’s identifiable information.” When in doubt, you can always email the support team at support@arcticdata.io.
5.5.1.7 Save Metadata Submission
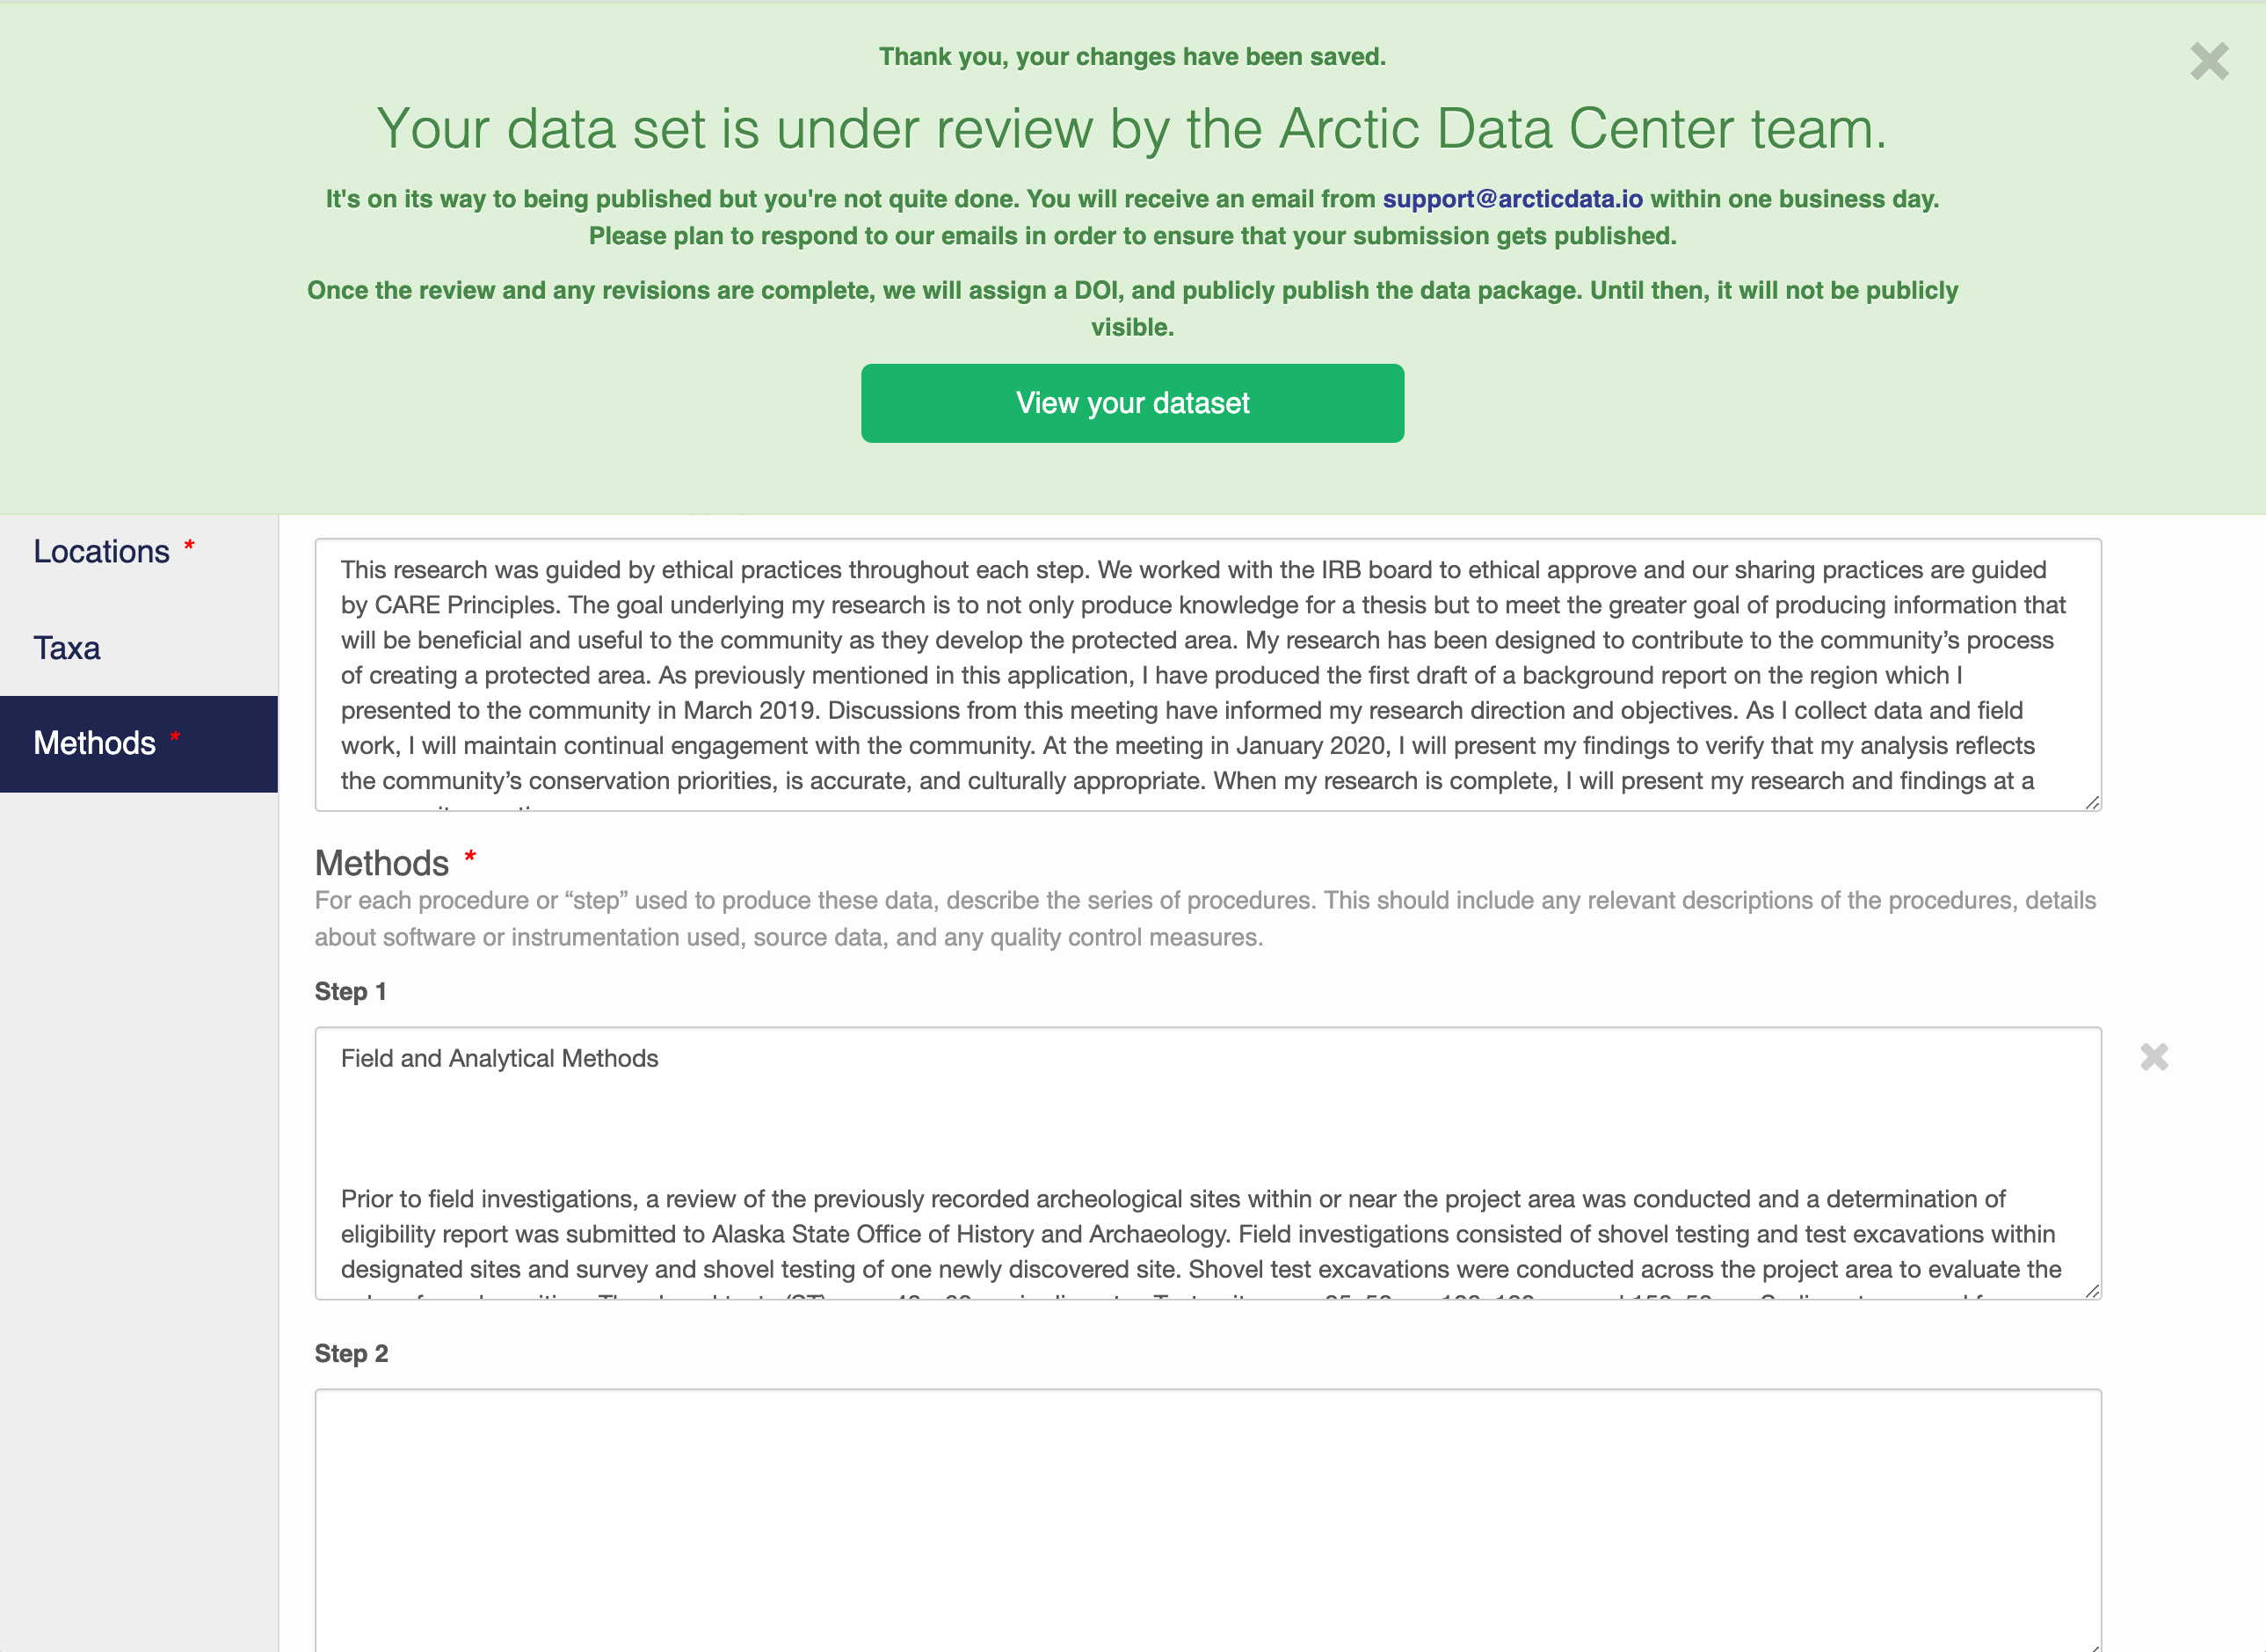
When you’re finished editing the narrative metadata, click the Save Dataset button at the bottom right of your screen.
If there are errors or missing fields, they will be highlighted with a red banner as seen earlier. Correct those, and then try submitting again. If the save button disappears after making corrections, add a space in the abstract and the save button should reappear. If not, please reach out to the support team for assistance.
When you are successful, you should see a large green banner with a link to the current dataset view. Click the X to close that banner if you want to continue editing metadata.
5.5.2 Step 2: Adding File & Variable Level Metadata
The final major section of metadata concerns the structure and content of your data files. Assuming there are many files (and not a few very large ones), it would be unreasonable for users to input file and variable level metadata for each file. When this situation occurs, we encourage users to fill out as much information as possible for each unique type of file. Once that is completed, usually with some assistance from the Data Team, we will then programmatically carry over the information to other relevant files.
When you’re data are associated with your metadata submission, they will appear in the data section at the top of the page when you go to edit your dataset. Choose which file you would like to begin editing by selecting the “Describe” button to the right of the file name.
Once there, you will see the following screen. In the Overview section, we recommend not editing the file name, and instead add a descriptive overview of the file. Once done, click the Attributes tab.

The Attributes tab is where you enter variable (aka attribute) information, including:
attribute name (for programs)
attribute label (for display)
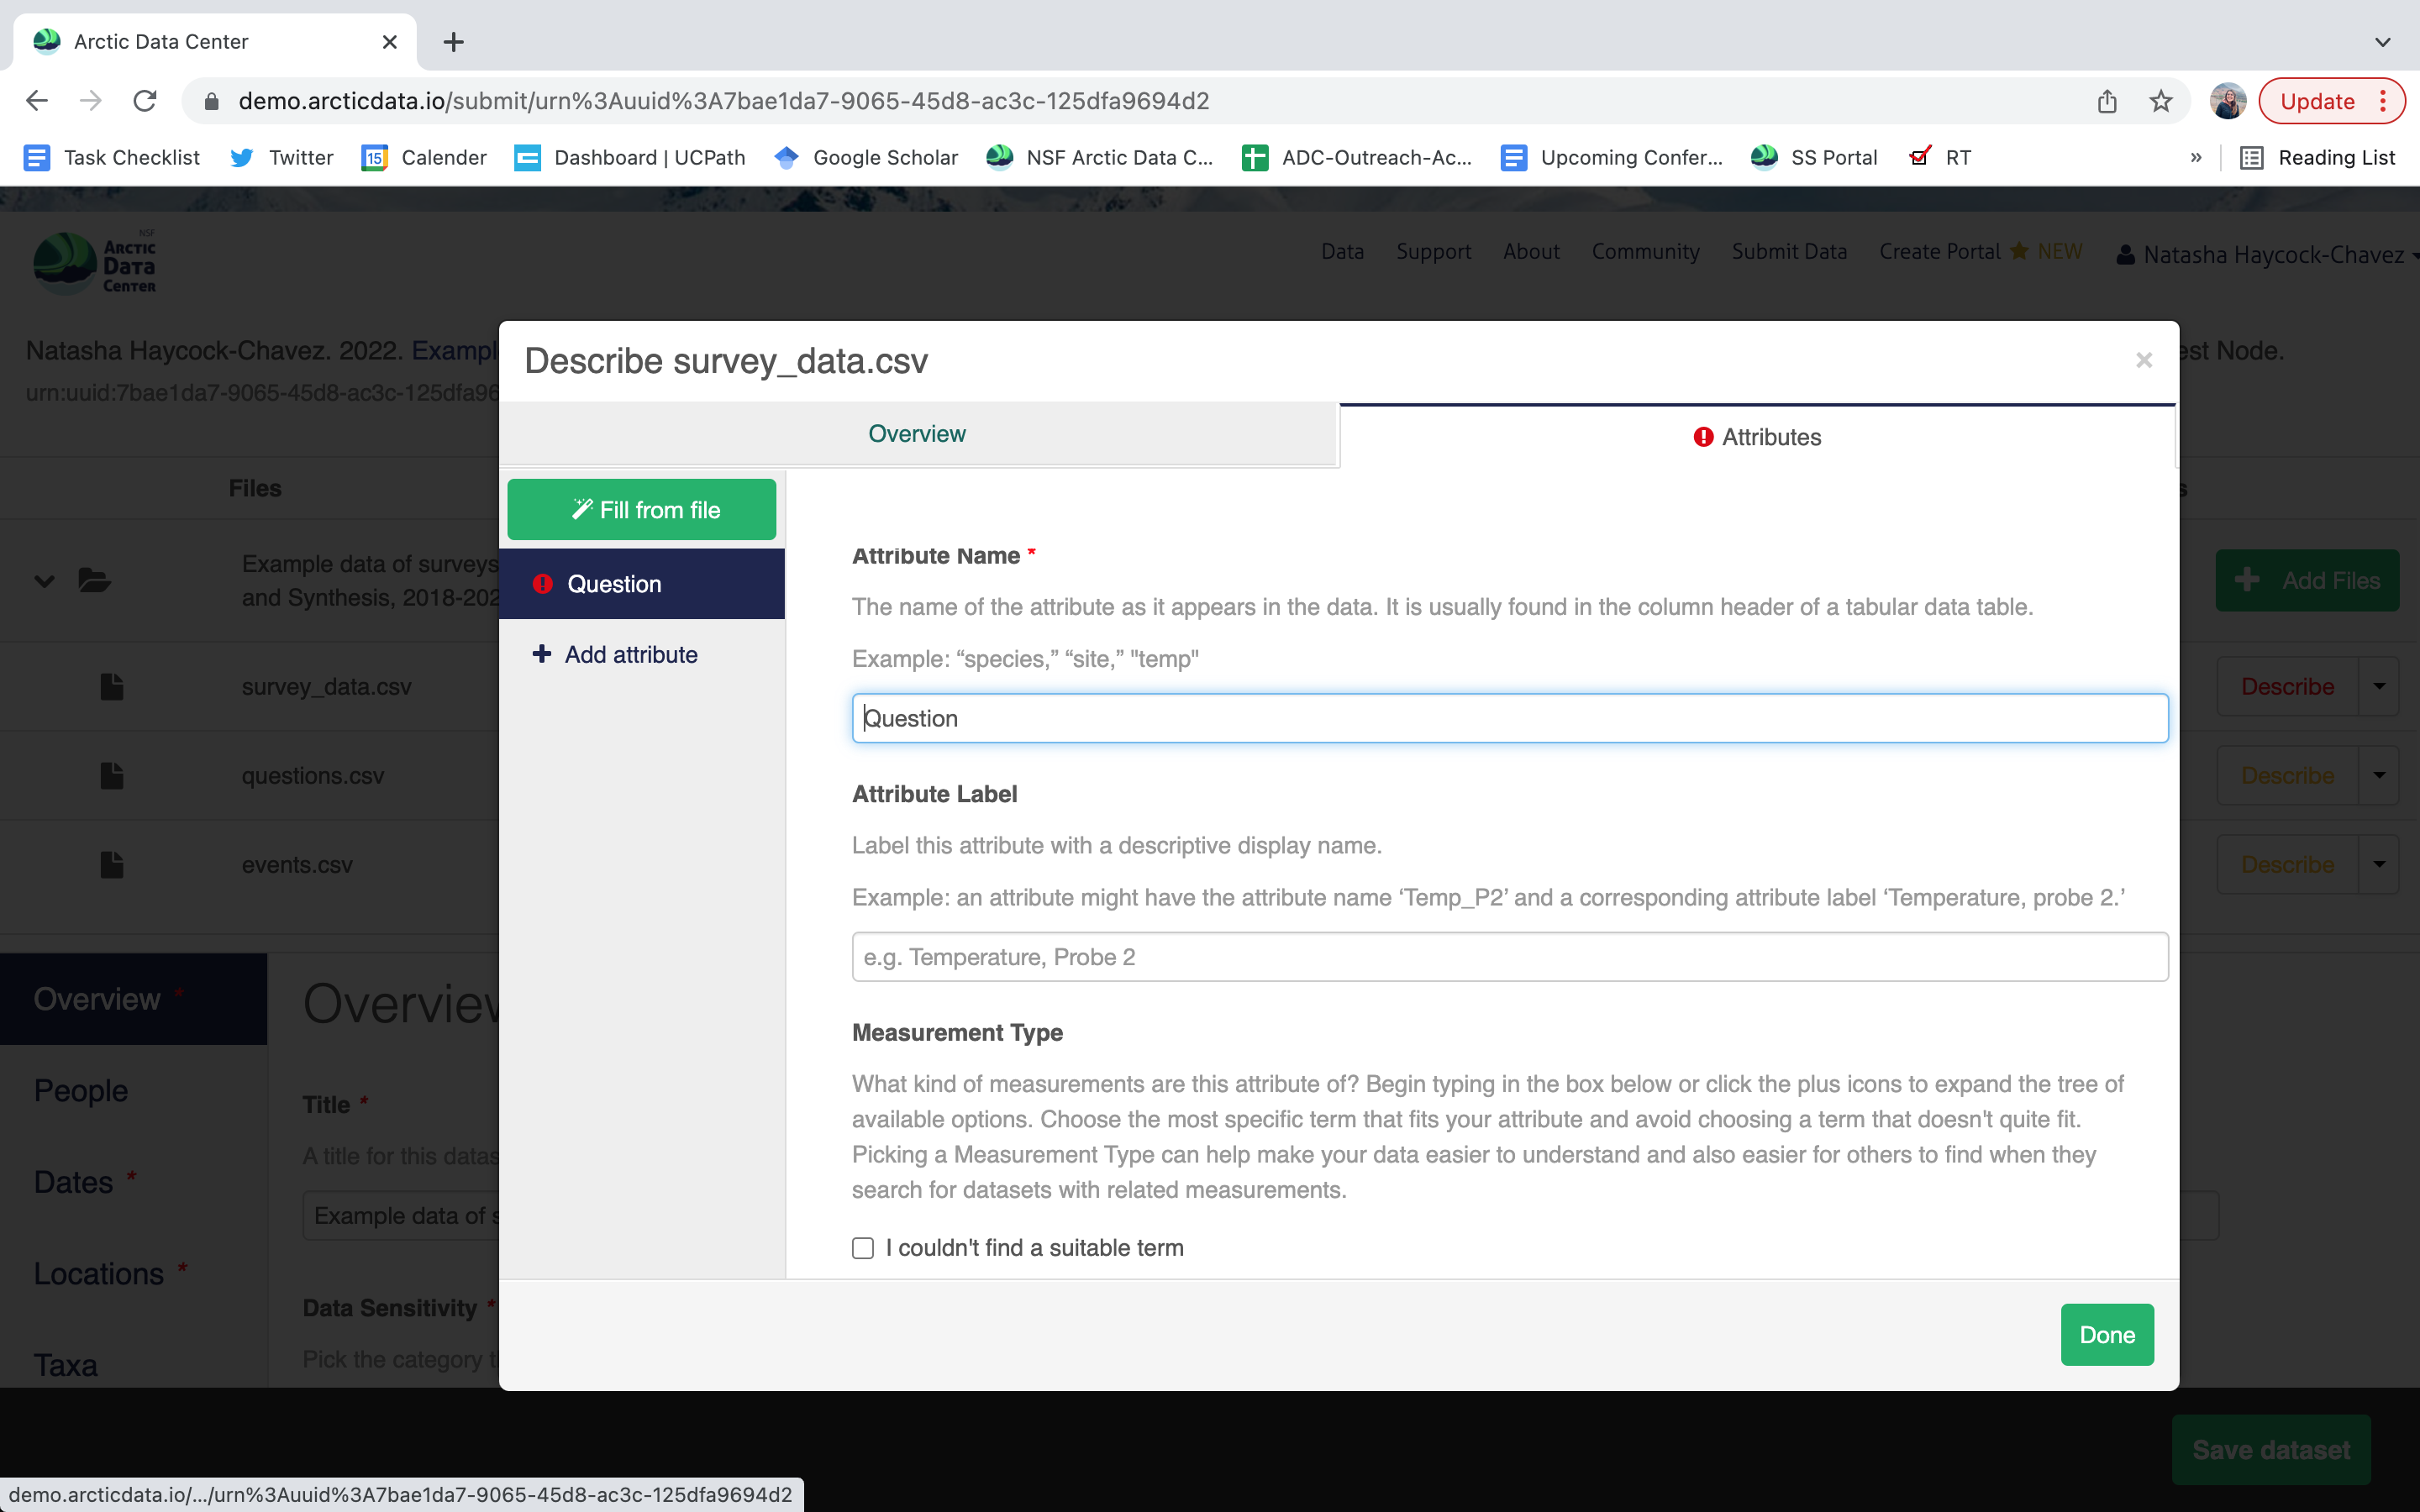
variable definition (be specific)
type of measurement

- units & code definitions
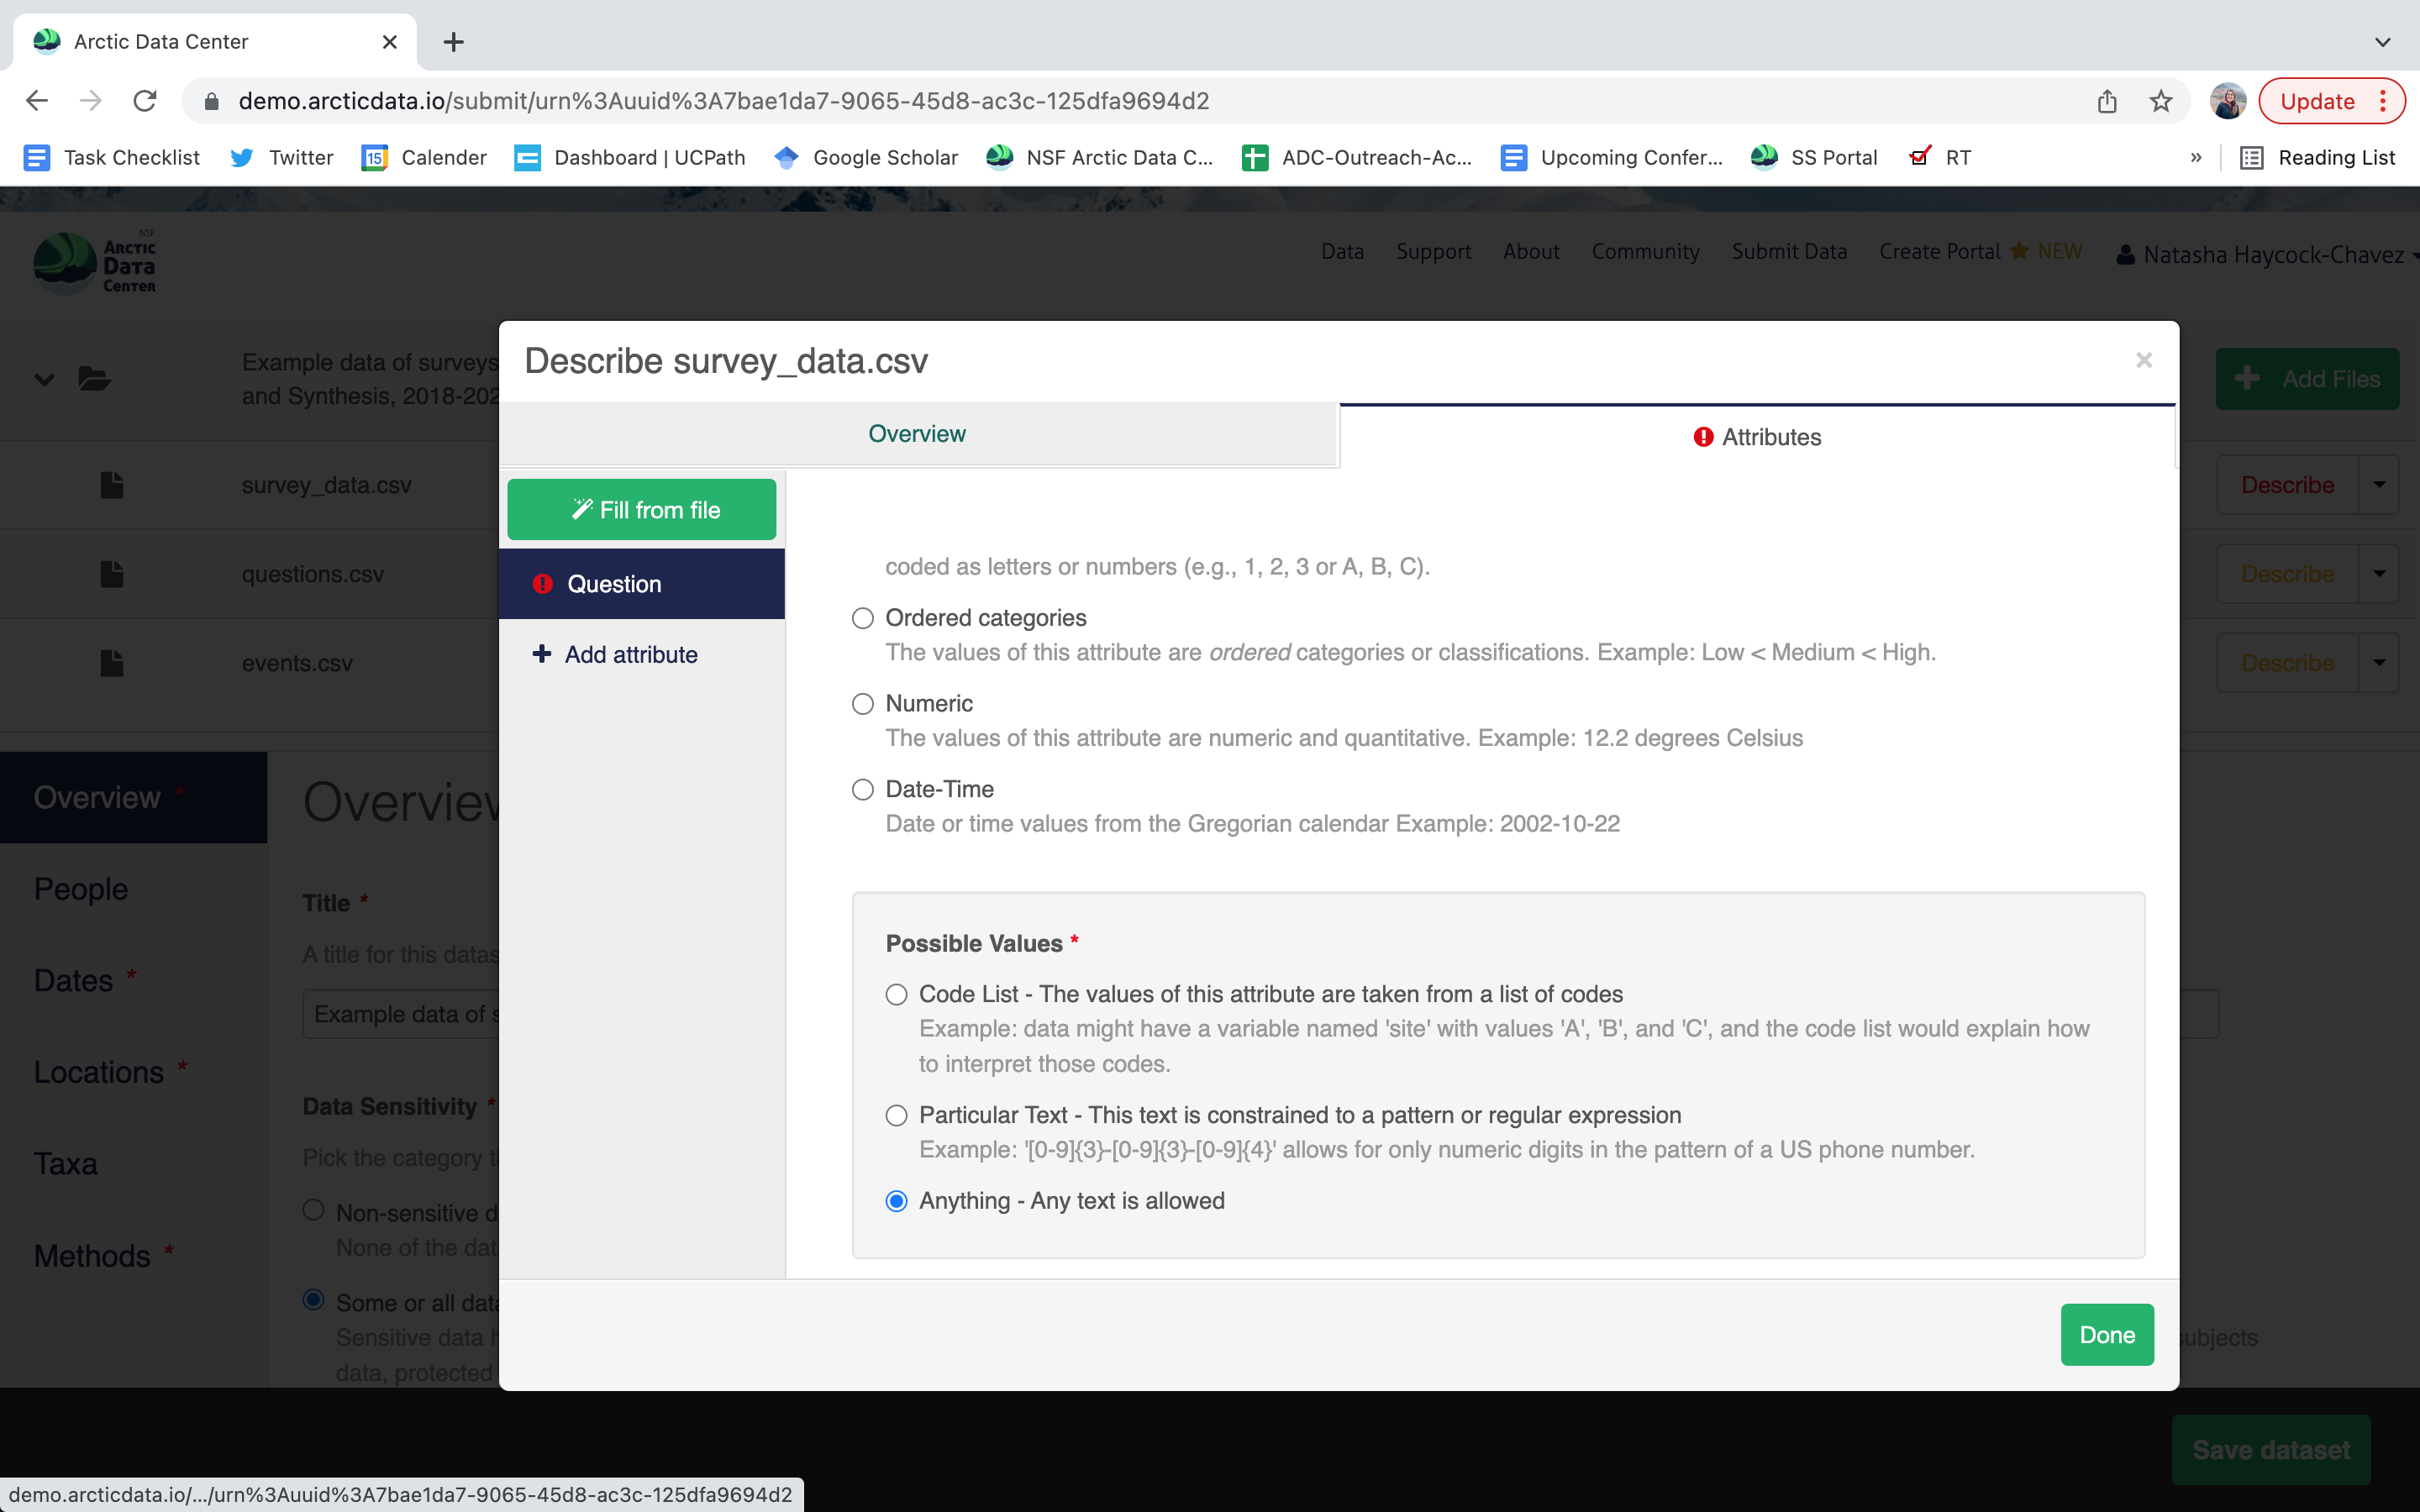
Users will need to add these definitions for every variable (column) in the file. When done, click Done. Now, the list of data files will show a green checkbox indicating that you have fully described that file’s internal structure. Proceed with documenting other unique file types, and then click Save Dataset to save all of these changes.
Tip
When dealing with large datasets, the Data Team can help users fill out metadata for similar file types with identical internal structures. An example of this will be discussed in the Best Practices section.
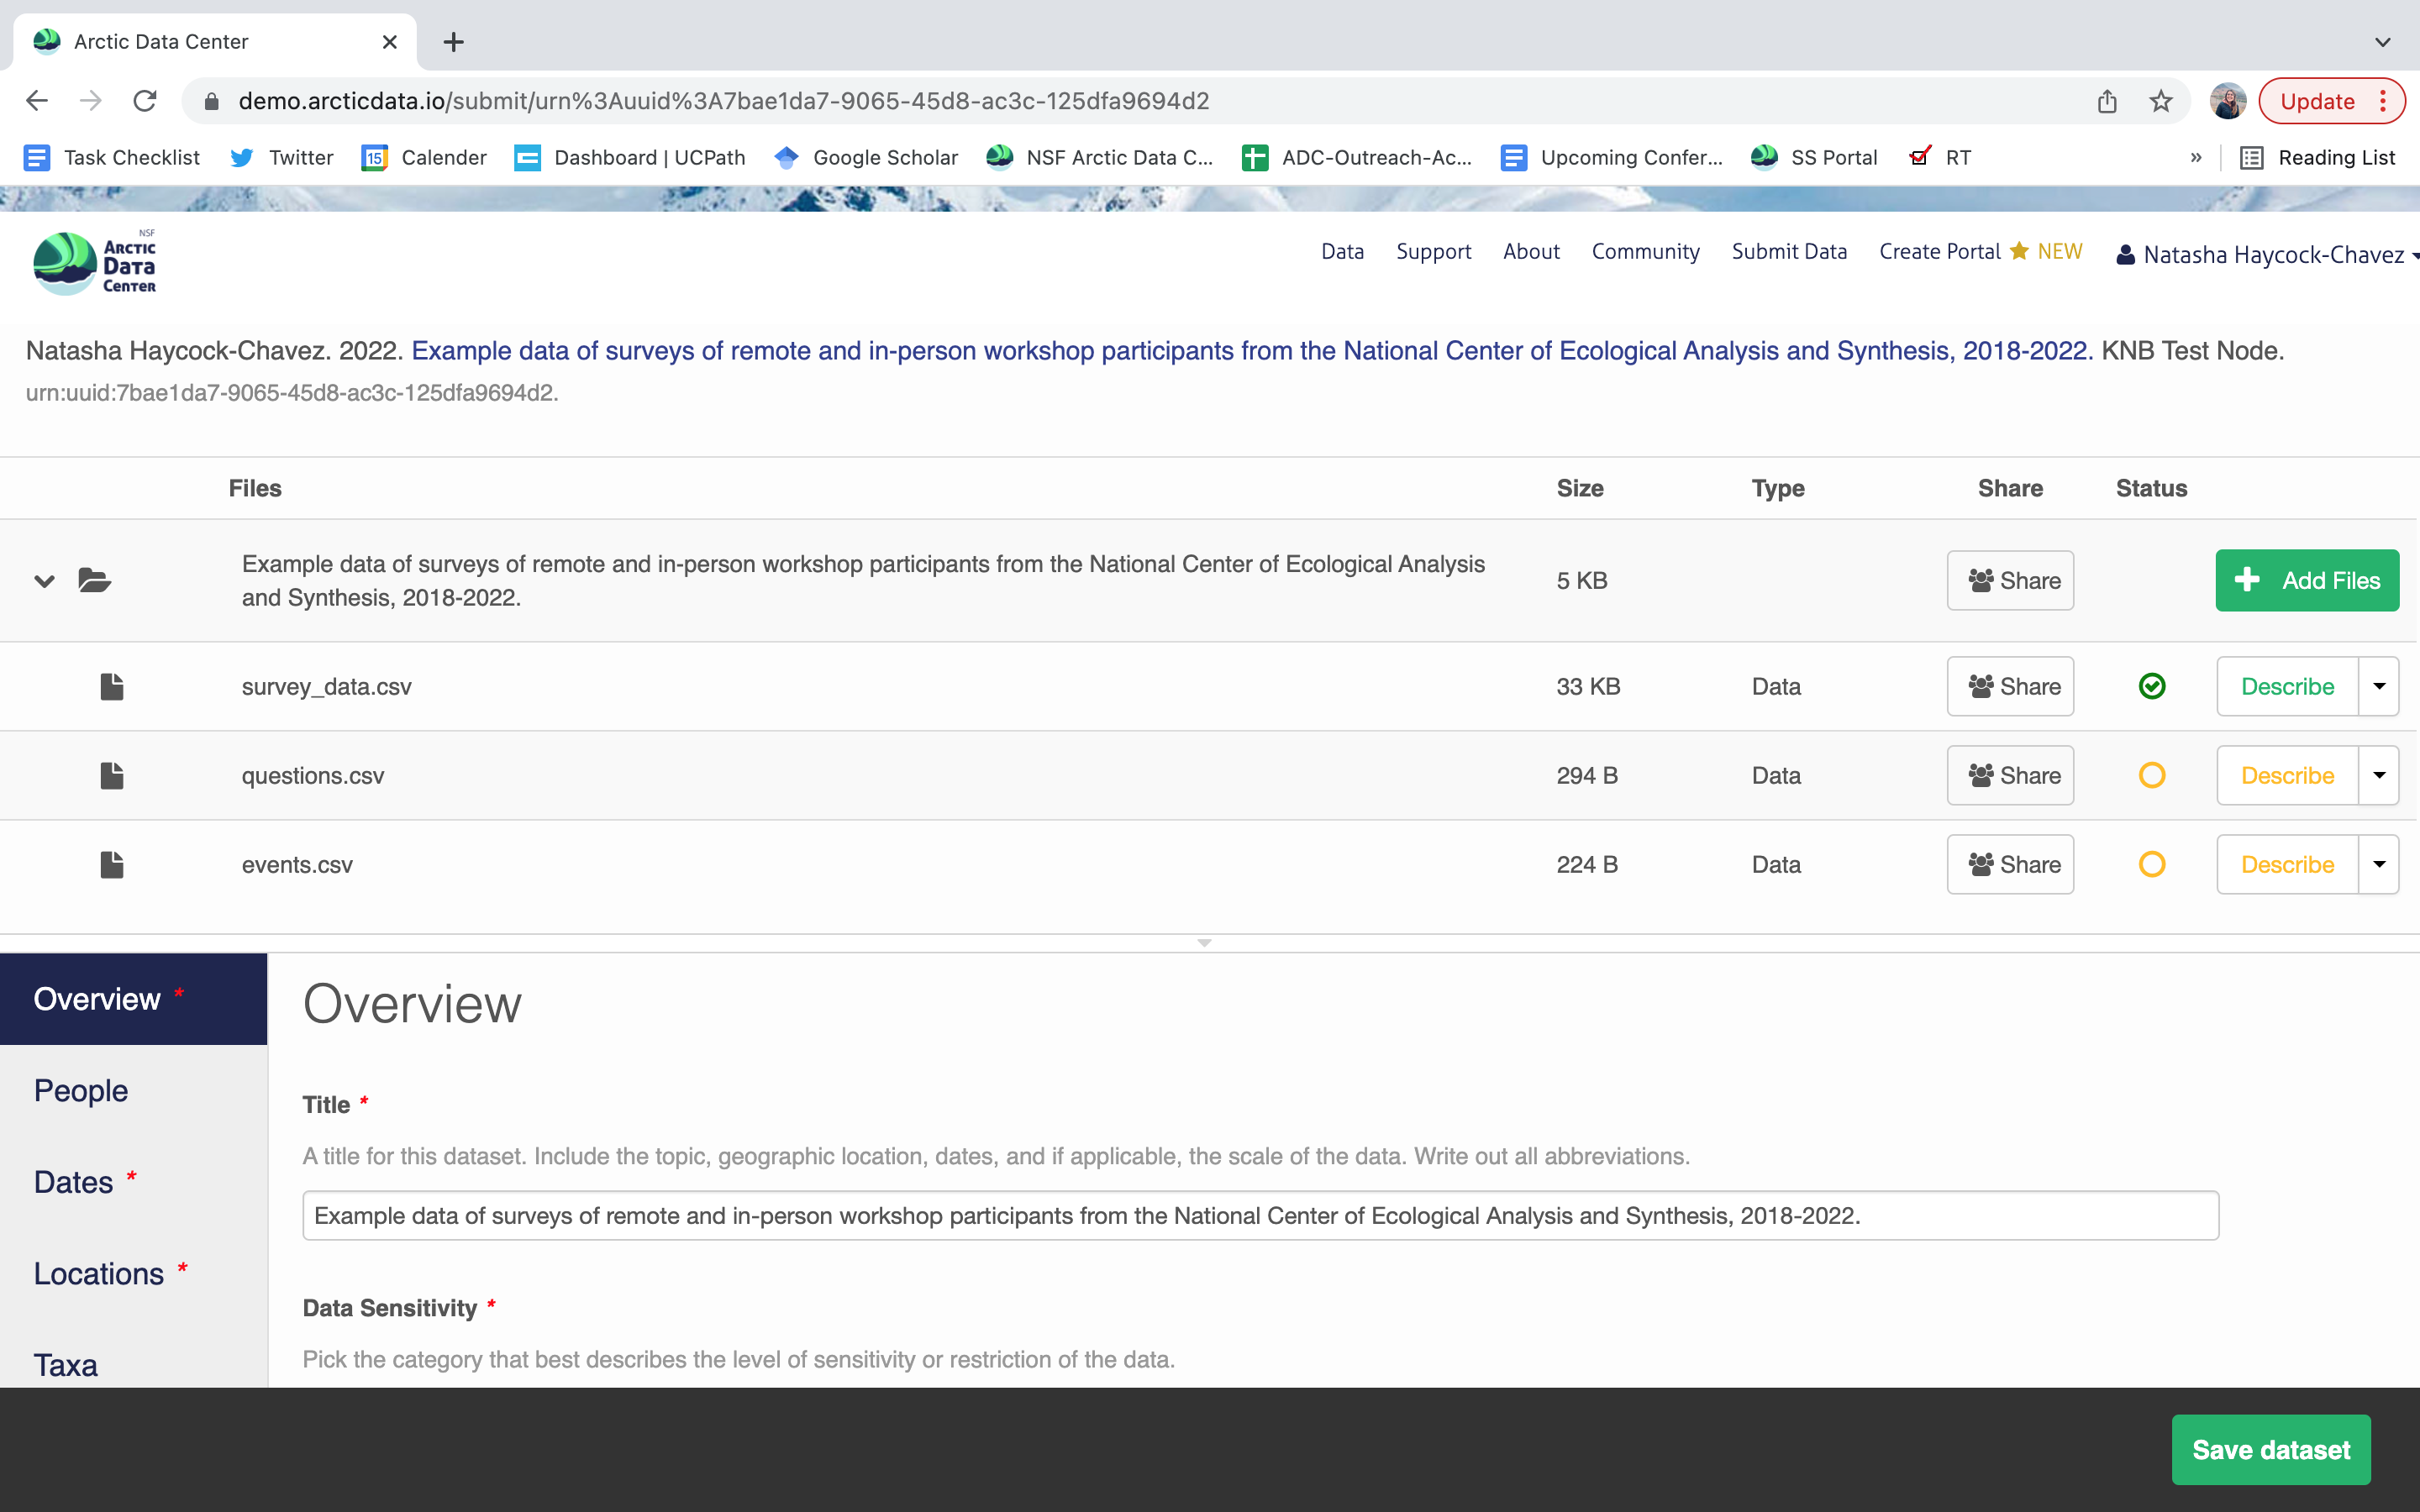
After you get the big green success message, you can visit your dataset and review all of the information that you provided. If you find any errors, simply click Edit again to make changes.
5.5.3 Step 3: Uploading Large Data
In order to submit your large data files to the Arctic Data Center repository, we encourage users to directly upload their data to the Data Team’s servers using a secure file transfer protocol (SFTP). There are a number of GUI driven and command line programs out there that all work well. For a GUI program, our team uses and recommends the free program Cyberduck. We will discuss command line programs in Session 18 in more detail, including rsync and Globus.
Before we begin, let’s answer the following question: Why would a user want to upload their data through a separate process, rather than the web form when they submit their metadata?
Depending on your internet connection, the number of files you have, and the cumulative size of the data, users may experience difficulty uploading their data through the submission form. These difficulties are most often significantly reduced upload speeds and submission malfunctions. As such, it is best for all parties for large quantities of data to be uploaded directly to our server through an FTP.
The second question is, under what circumstances should I consider uploading data directly to the server, versus the webform? Although server uploads are more efficient for large datasets, for smaller datasets it is much more efficient to go through the webform. So, what constitutes a large dataset and what tools should you consider? Here is a helpful diagram:
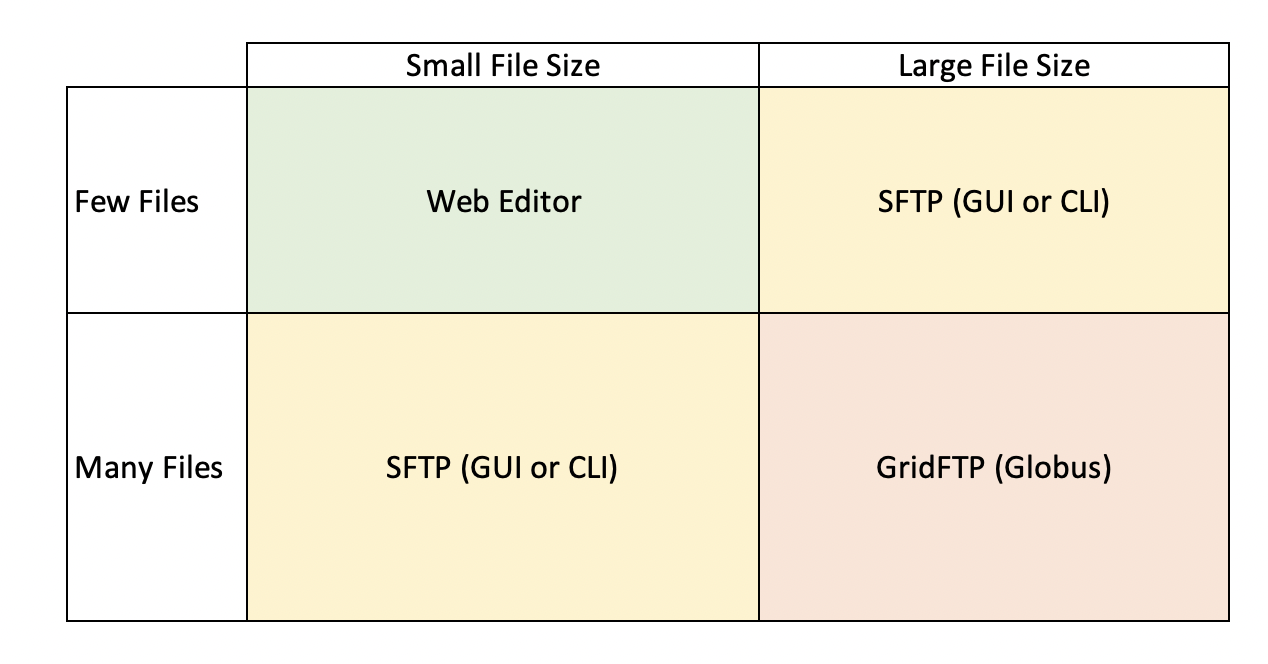
Web Editor: The web editor is most often used by those with less than a hundred files and a small cumulative file size (0-5 GBs). Overall, this option is best for those who have less than 250 files with a small cumulative file size.
SFTP: For users that expect to upload more than 250 files and have a medium cumulative file size (10-100 GBs), uploading data to our servers via SFTP is the recommended method. This can be done through the command line, or a program like Cyberduck. If you find yourself considering uploading a zip file through the web editor, you should instead upload your files using this method.
GridFTP: For users that expect to upload hundreds or thousands of files, with a cumulative file size of hundreds of GB to TBs, you will likely want to make use of GridFTP through Globus. Jeanette will be talking about data transfers in more depth on Thursday.
Before you can upload your data to the Data Team’s server, make sure to email us at support@arcticdata.io to retrieve the login password. Once you have that, you can proceed through the following steps.
Tip
If you know that you will need to use this process for more than one dataset, we suggest creating folders with the same name as the associated dataset’s title. This way, it will be clear as to which submission the data should be associated with.
Once you have finished uploading your data to our servers, please let the Data Team know via email so that we can continue associate your uploaded data with your metadata submission.
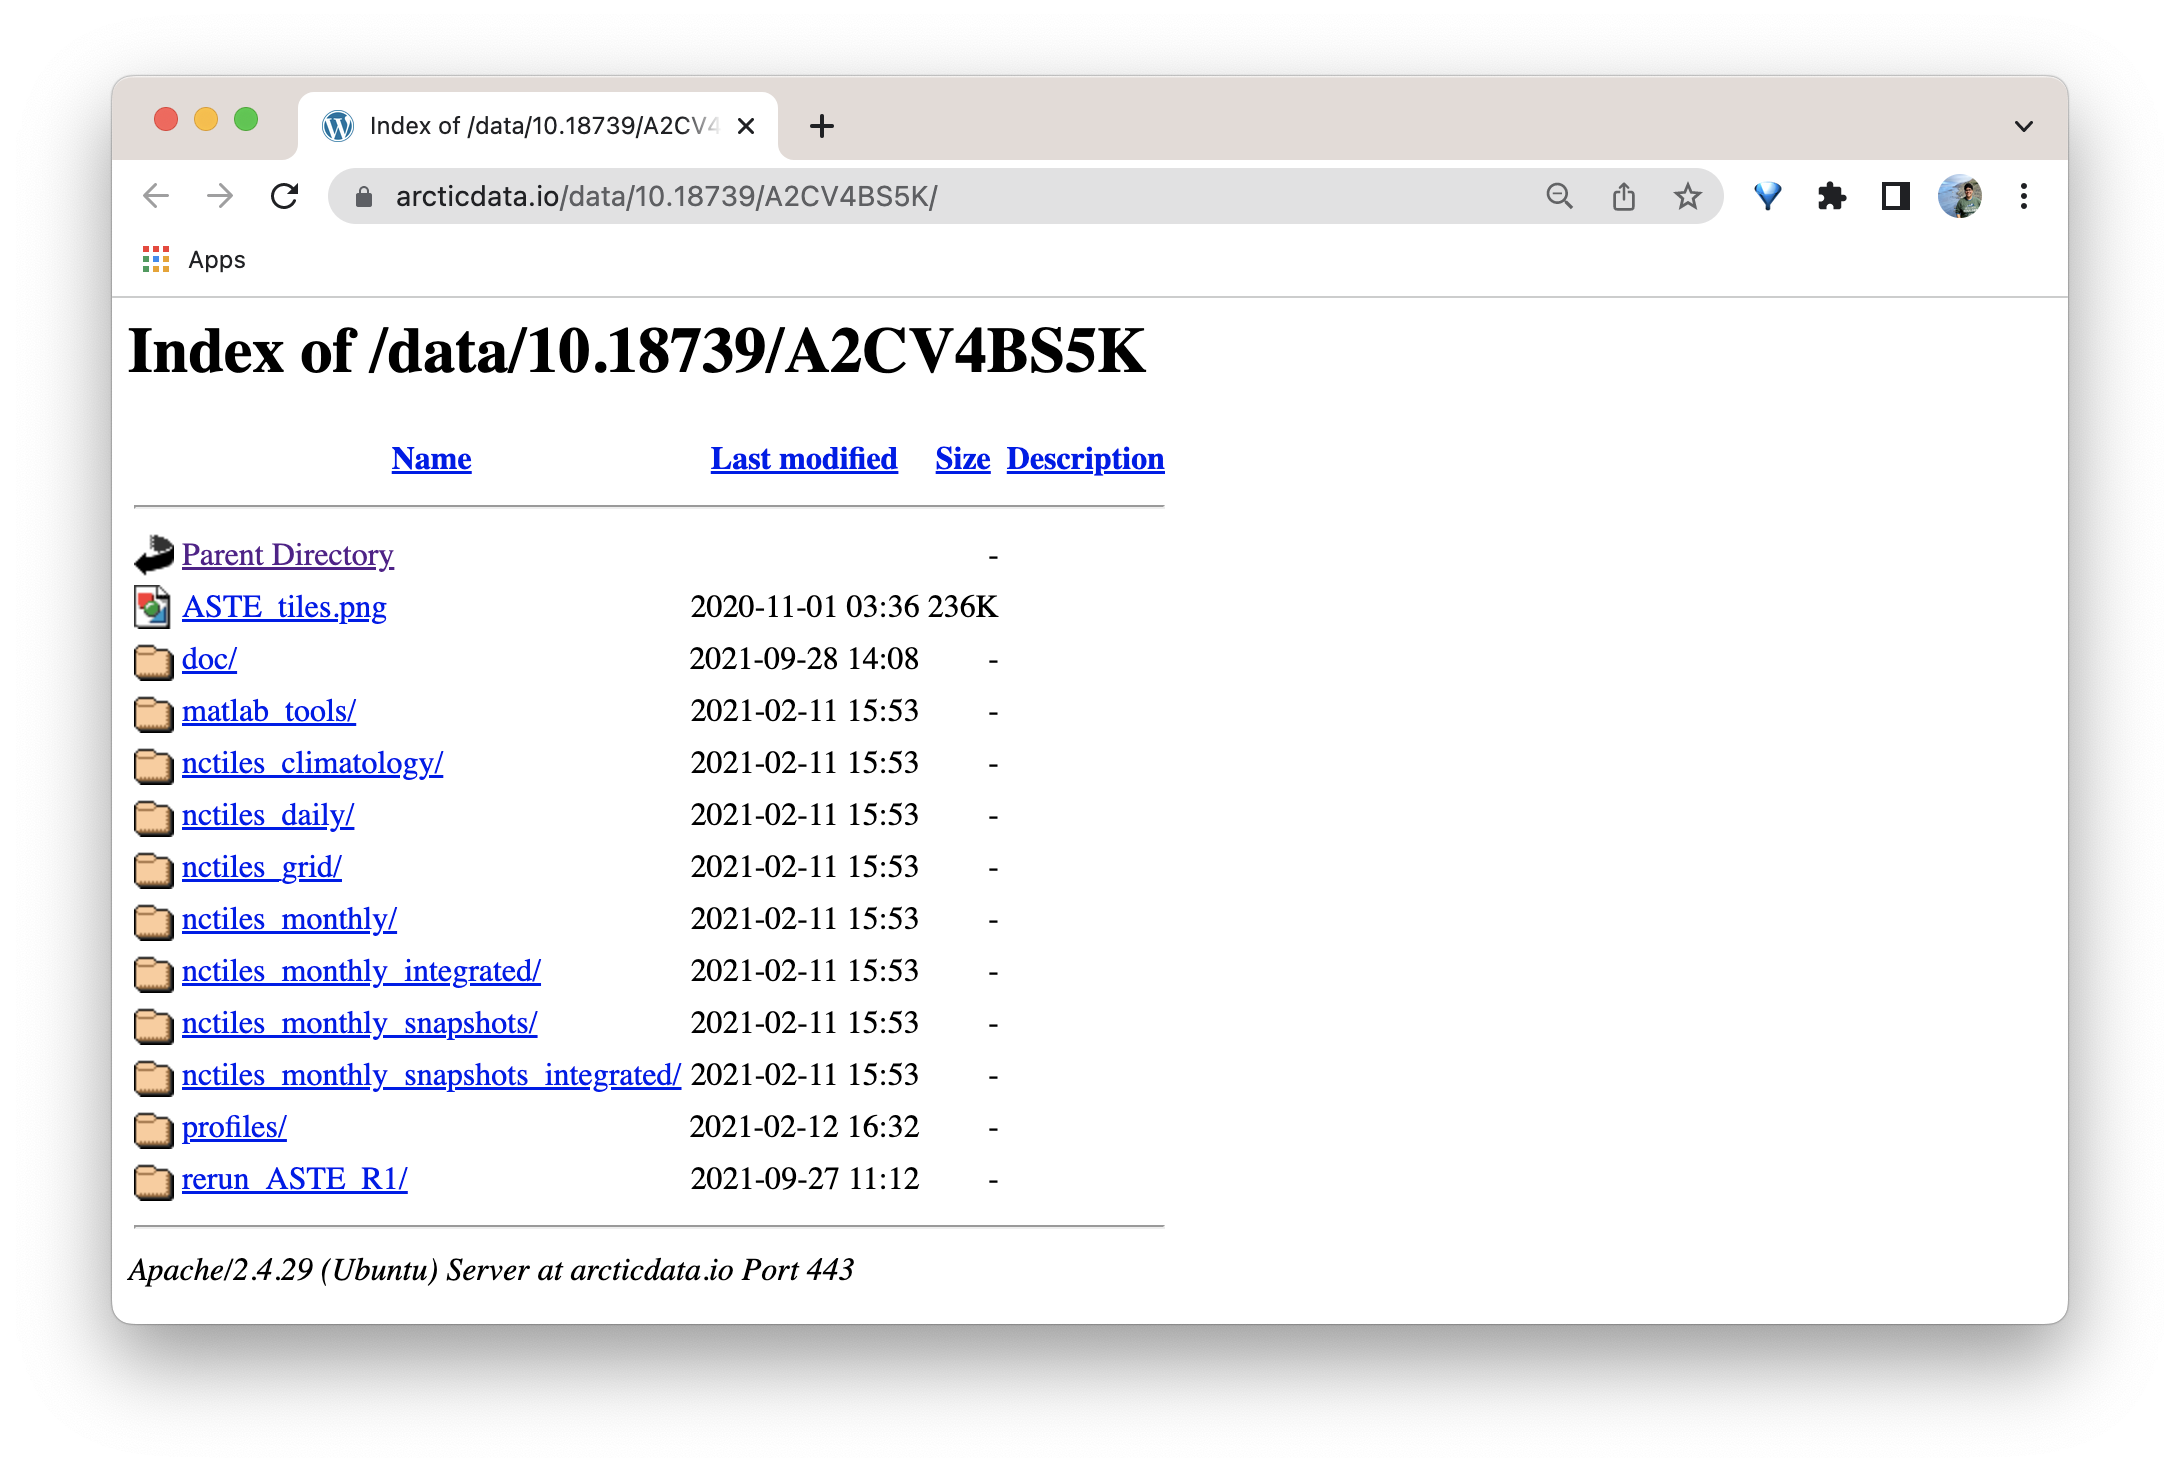
As mentioned in Step 1: The Narrative Metadata Submission section above, when the data package is finalized and made public, there will be a sentence in the abstract that directs users to a separate page where your data will live. The following image is an example of where the data from this dataset live.
5.6 Best Practices for Submitting Large Data
5.6.1 Data Organization
The data archival process is much smoother when users already have a well structured and organized file management system. We strongly recommend starting to work with the Arctic Data Center towards the beginning of your project, instead of the very end. Our curation team can help you publish your data faster, and more smoothly, the earlier you talk to us. Regardless of where you are in your project, however, considering your organization strategy is best done before data upload.
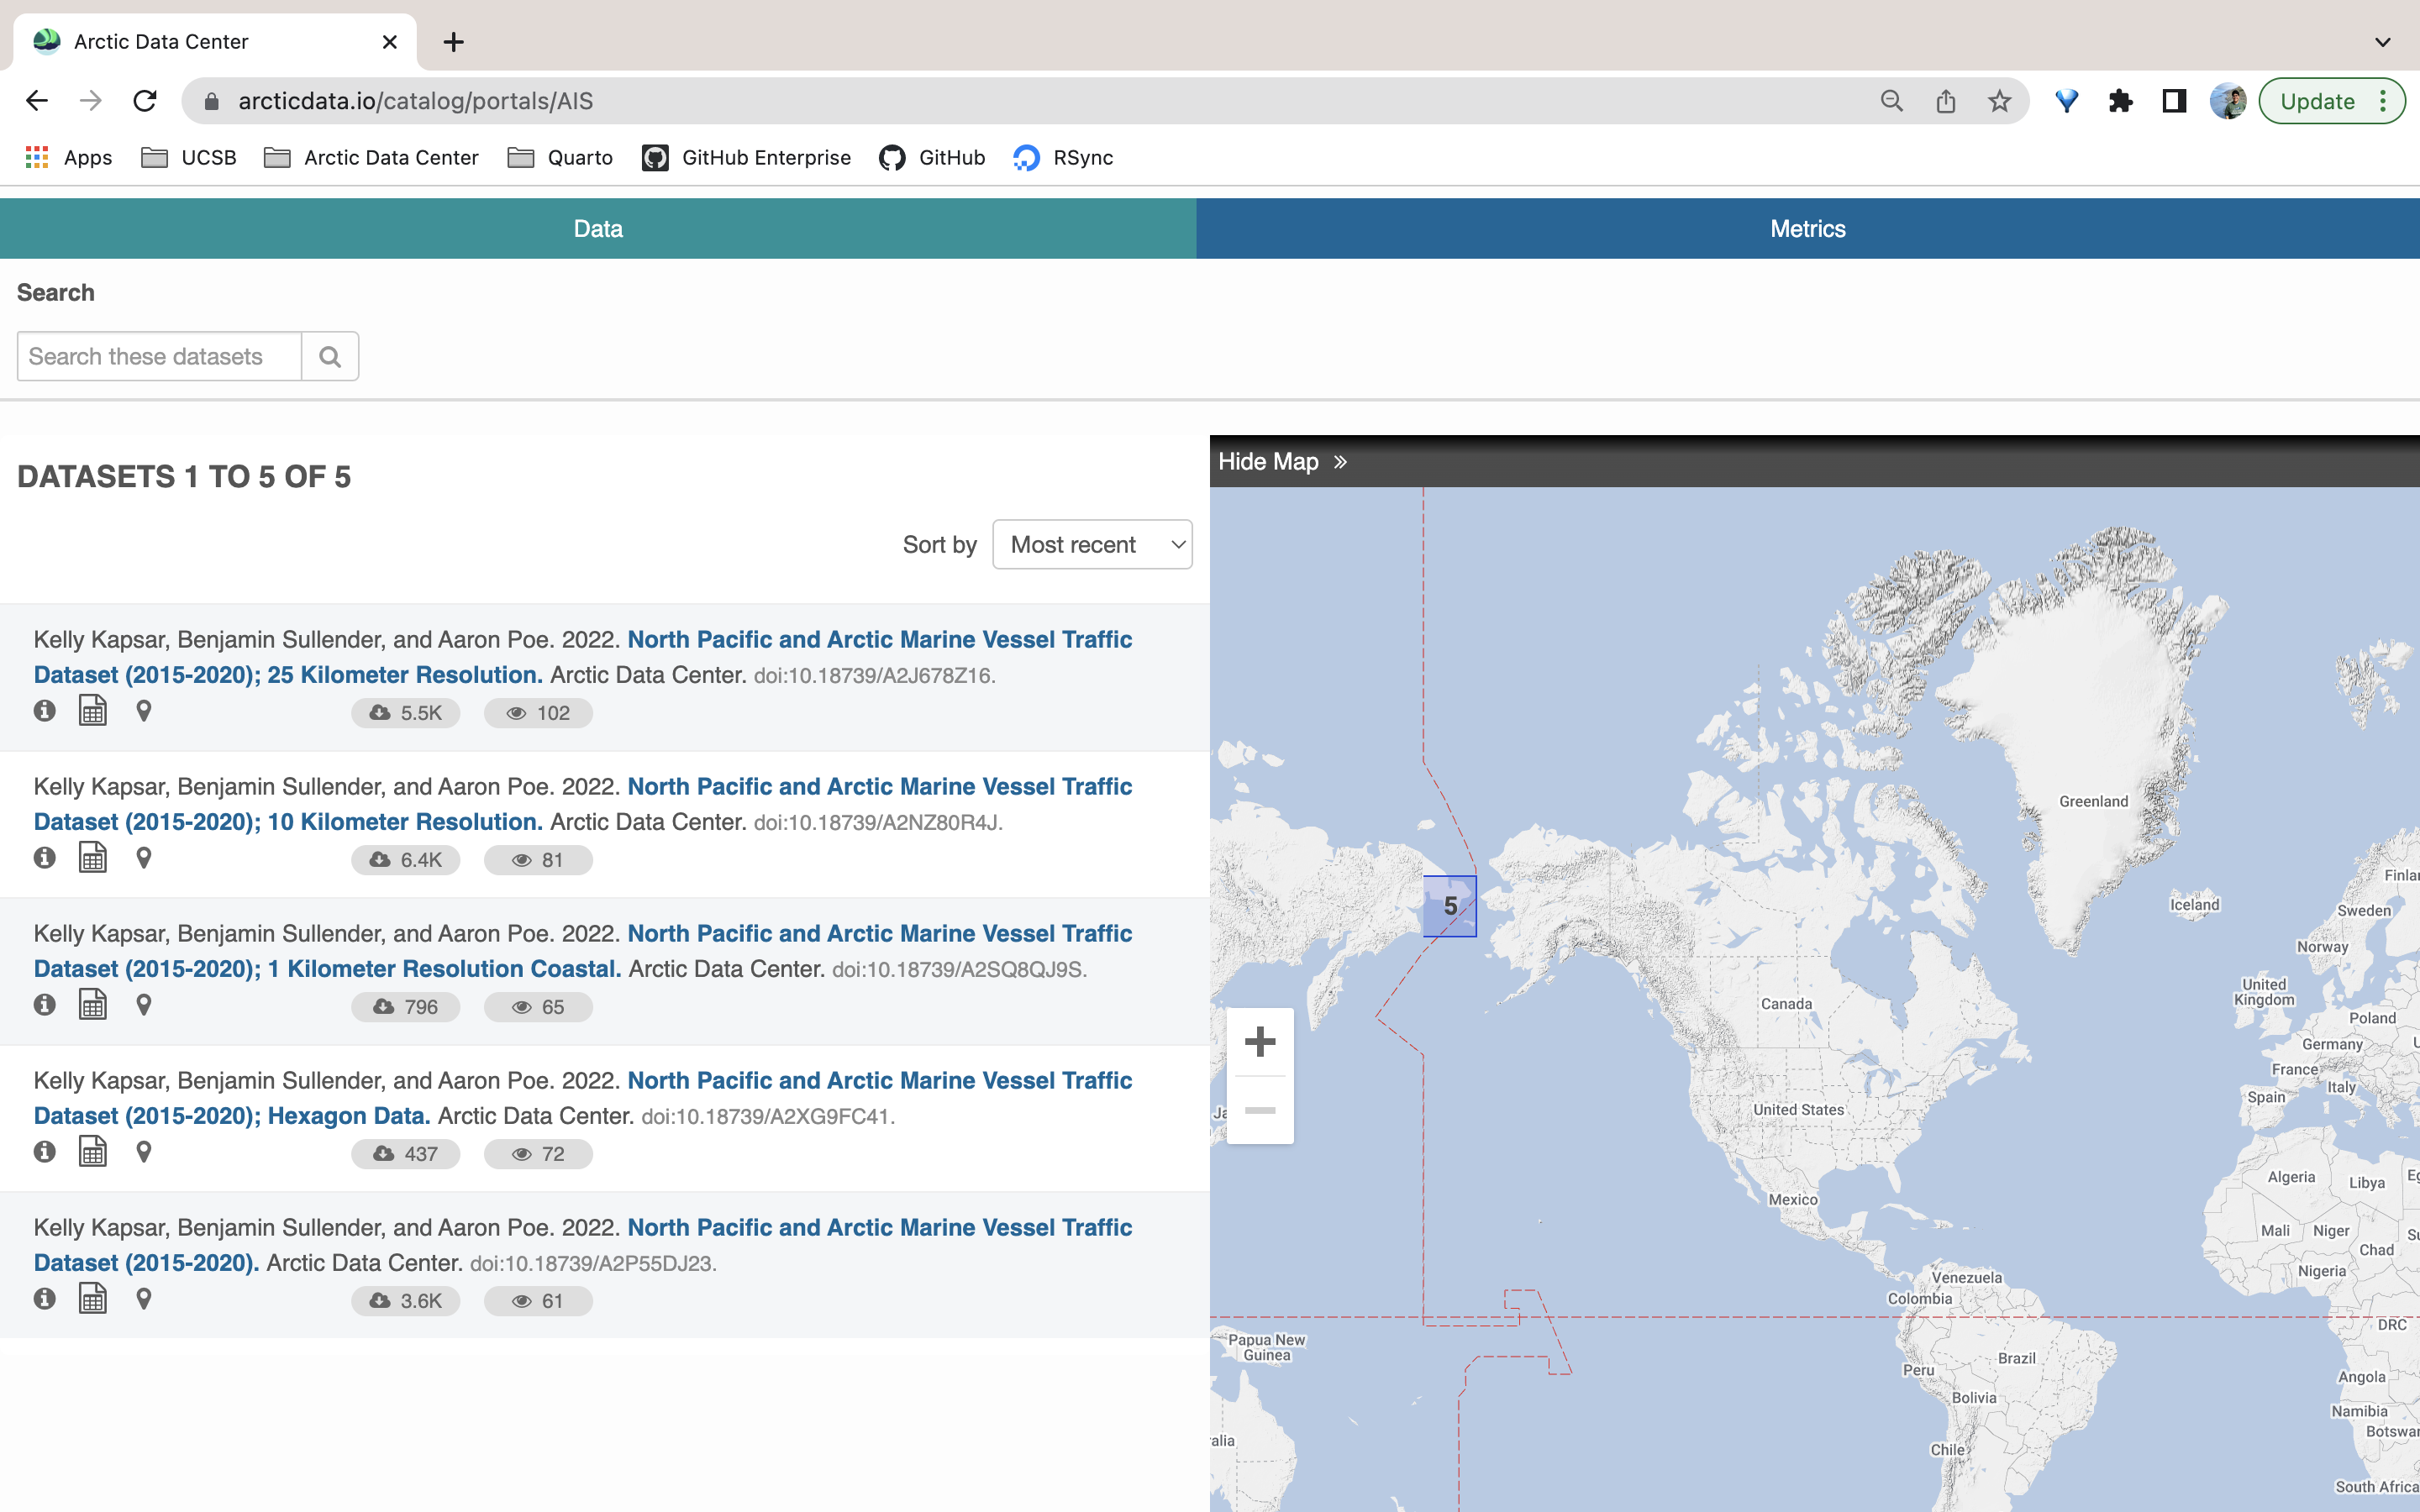
Take a look at this recently made data portal. Originally, this user had only submitted one dataset with all of her files (over 700, at varying resolutions). The data contain rasters and shapefiles depicting vessel paths in the North Pacific at many different resolutions. Upon review, the submitter and curation team together determined that it would be best if other users could download the data at specific resolution scales. As a solution, we created separate datasets according to resolution and data type. With the addition of the data portal, the user was able to house their related datasets at a single URL, which allows for search and discovery within only the datasets for that project.
Note
To find out more about portals, visit https://arcticdata.io/data-portals/. You can view our catalog of portals here. We recommend reviewing the Distributed Biological Observatory’s portal to see what a more fleshed out portal can look like.
Tip
This example also illustrates that users can create multiple datasets for a single NSF award. It’s understandable that you may think you have to submit all your data for a given award under one dataset. However, we think breaking up data into separate datasets (in logical, structured ways) increases the discoverability and usability of the data. This is especially true when users also create a data portal for their project.
When uploading your data files using SFTP, either through the command line or a GUI, we recommend creating folders with the same name as your dataset’s title so that it is easier to associate the data with their associated metadata submission.
For more complex folder structures, it is wise to include a README file that explicitly walks users through the structure and provides a basic understanding of what is available. Generally speaking, we recommend structuring your data in an easy to understand way such that a README isn’t completely necessary.
5.7 Data transfer tools
Now that we’ve talked about what types of large datasets you might have that need to get published on the Arctic Data Center, let’s discuss how to actually get the data there. If you have even on the order of only 50GB, or more than 500 files, it will likely be more expedient for you to transfer your files via a command line tool than uploading them via our webform. So you know that you need to move a lot of data, how are you going to do it? More importantly, how can you do it in an efficient way?
There are three key elements to data transfer efficiency:
- endpoints
- network
- transfer tool
Endpoints
The from and to locations of the transfer, an endpoint is a remote computing device that can communicate back and forth with the network to which it is connected. The speed with which an endpoint can communicate with the network varies depending on how it is configured. Performance depends on the CPU, RAM, OS, and disk configuration. One key factor that affects data transfer speed is how quickly that machine can write data to disk. Slow write speeds will throttle a data transfer on even the fastest internet connection with the most streamlined transfer tool. Examples of endpoints could be:
- NCEAS
included-crabserver - Your standard laptop
- A cloud service like AWS
Network speed
Network speed determines how quickly information can be sent between endpoints. It is largely, but not enitrely, dependent on what you pay for. Importantly, not all networks are created equal, even if they nominally have the same speed capability. Wired networks get significantly more speed than wireless. Networks with lots of “stuff” along the pipe (like switches or firewalls) can perform worse than those that don’t. Even the length and type of network cabling used can matter.
Transfer tools
Poll: what data transfer tools do you use regularly?
Finally, the tool or software that you use to transfer data can also significantly affect your transfer speed. There are a lot of tools out there that can move data around, both GUI driven and command line. We’ll discuss a few here, and their pros and cons.
scp
scp or secure copy uses ssh for authentication and transfer, and it is included with both unix and linux. It requires no setup (unless you are on a Windows machine and need to install), and if you can ssh to a server, you can probably use scp to move files without any other setup. scp copies all files linearly and simply. If a transfer fails in the middle, it is difficult to know exactly what files didn’t make it, so you might have to start the whole thing over and re-transfer all the files. This, obviously, would not be ideal for large data transfers. For a file or two, scp is a fine tool to use.
rsync
rsync is similar to scp, but syncs files/directories as opposed to copying. This means that rsync checks the destination to see if that file (with the same size and modified date) already exists. If it does, rsync will skip the file. This means that if an rsync transfer fails, it can be restarted again and will pick up where it left off, essentially. Neat!
Globus
Globus is a software that uses multiple network sockets simultaneously on endpoints, such that data transfers can run in parallel. As you can imagine, that parallelization can dramatically speed up data transfers. Globus, like rsync can also fail gracefully, and even restart itself. Globus does require that each endpoint be configured as a Globus node, which is more setup than is required of either scp or rsync. Many instituions computing resources may have endpoints already configured as Globus endpoints, so it is always worth checking in with any existing resources that might already be set up before setting up your own. Although Globus is a free software, there are paid options which provide support for configuring your local workstation as a Globus node. Globus is a fantastic tool, but remember the other two factors controlling data transfer, it can only help so much in overcoming slow network or write speeds.
5.7.0.1 AWS sync
Amazon Web Services (AWS) has a Command Line Interface (CLI) that includes a sync utility. This works much like rsync does in that it only copies new or updated files to the destination. The difference, of course, is that AWS sync is specifically built to work with interacting with the AWS cloud, and is compatible with S3 buckets.
5.7.0.2 nc
nc (or netcat) is a low level file transfer utility that is extremely efficient when moving files around on nodes in a cluster. It is not the easiest of these tools to use, however, in certain situations it might be the best option because it has the least overhead, and therefore can run extremely efficiently.
5.8 Summary
In this lesson we learned about metadata and the structure of a data package; how to submit narrative metadata; how to upload data and when to use different services; how to document file and attribute-level metadata; and best practices for data organization and management. As mentioned earlier, more in-depth information on uploading data to our servers using Globus and RSync can be found in Session 18.