Learning Objectives
- Apply the principles, features, and collaboration tools of
Gitand GitHub to effectively collaborate with colleagues on code - Analyze and evaluate common causes of conflicts that arise when collaborating on repositories
- Demonstrate the ability to resolve conflicts using
Gitconflict resolution techniques - Apply workflows and best practices that minimize conflicts on collaborative repositories
1.1 Introduction to Git and GitHub Tools for Collaboration
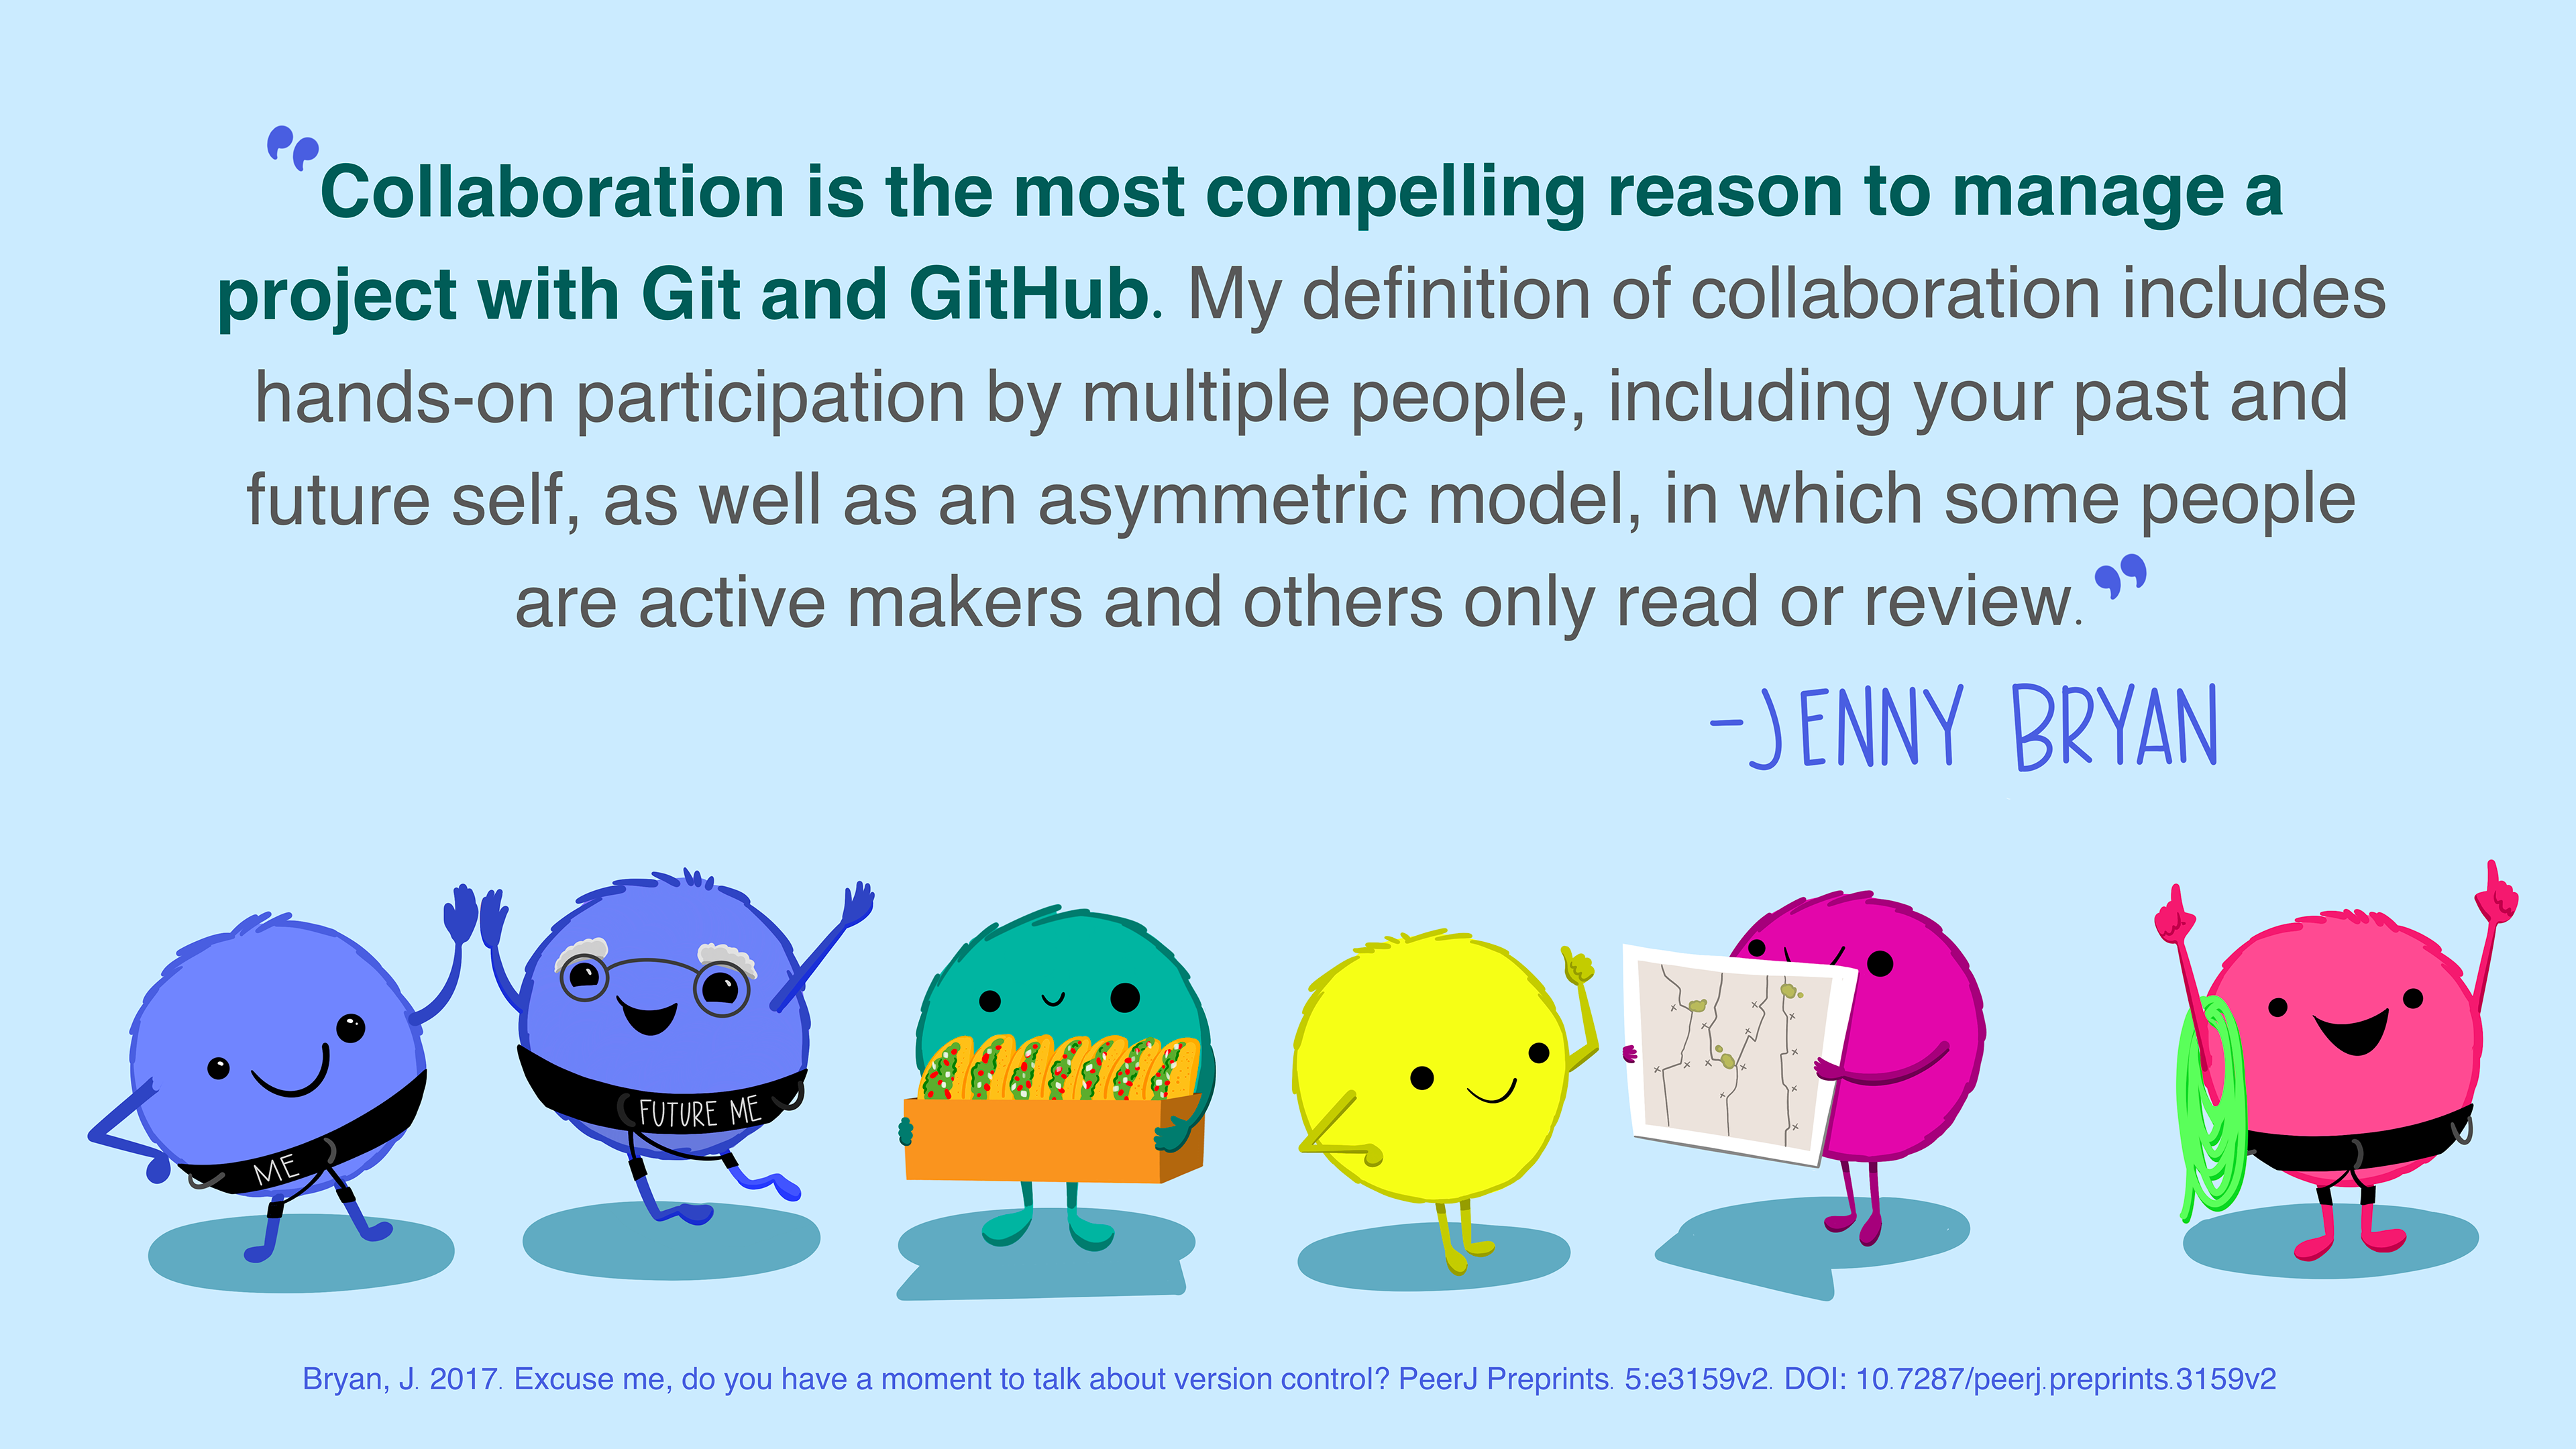
Git is not only a powerful tool for individual work but also an excellent choice for collaborating with friends and colleagues. Git ensures that after you’ve completed your contributions to a repository, you can confidently synchronize your changes with changes made by others.
One of the easiest and most effective ways to collaborate using Git is by utilizing a shared repository on a hosting service like GitHub. This shared repository acts as a central hub, enabling collaborators to effortlessly exchange and merge their changes. With Git and a shared repository, you can collaborate seamlessly and work confidently, knowing that your changes will be integrated smoothly with those of your collaborators.

There are many advanced techniques for synchronizing Git repositories, but let’s start with a simple example.
In this example, the Collaborator will clone a copy of the Owner’s repository from GitHub, and the Owner will grant them Collaborator status, enabling the Collaborator to directly pull and push from the Owner’s GitHub repository.
1.2 Collaborating with a trusted colleague without conflicts
We start our collaboration by giving a trusted colleague access to our repository on GitHub. In this example, we define the Owner as the individual who owns the repository, and the Collaborator as the person whom the Owner chooses to give permission to make changes to their repository.
The Collaborator will make changes to the repository and then push those changes to the shared repository on GitHub. The Owner will then use pull to retrieve the changes without encountering any conflicts. This is the most ideal workflow.
The instructors will demonstrate this process in the next section.
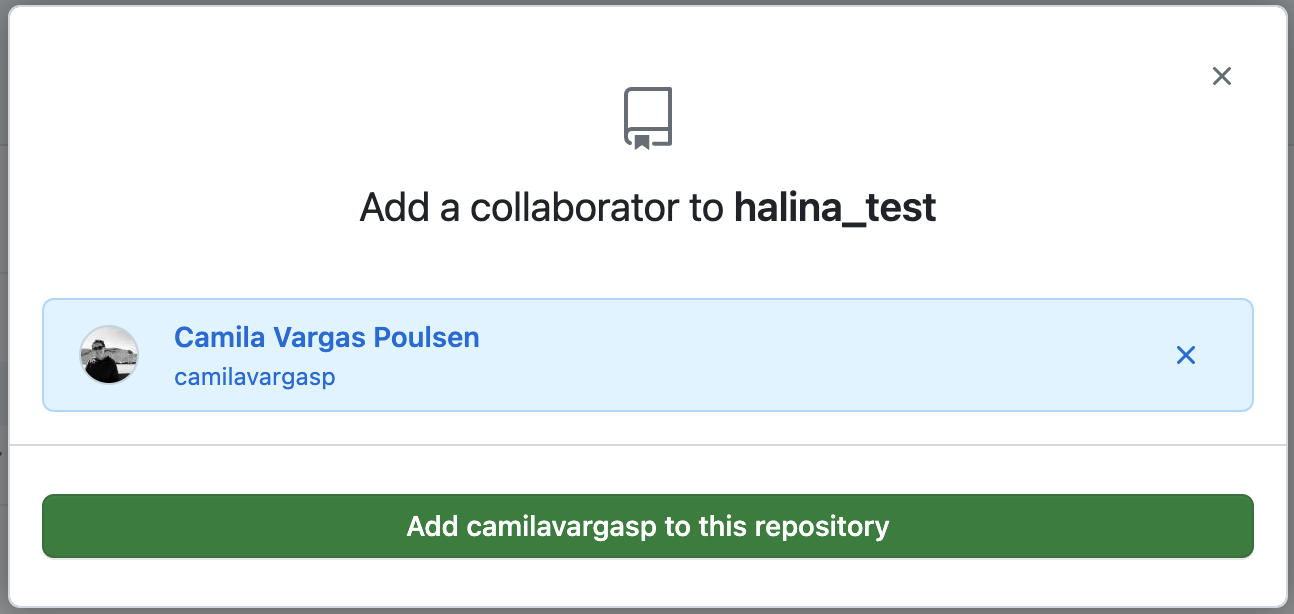
Step 0: Owner adds Collaborator to shared repository
The Owner must change the settings of the repository and give the Collaborator access to the repository by inviting them as a collaborator to the repository. Once the Collaborator has accepted the invite, they can contribute to the repository.
Step 1: Collaborator clone
To be able to contribute to a repository, the Collaborator must clone the repository from the Owner’s GitHub account. To do this, the Collaborator should visit the GitHub page for the Owner’s repository, and then copy the clone URL. In R Studio, the Collaborator will create a new project from version control by pasting this clone URL into the appropriate dialog (see the earlier chapter introducing GitHub).

Step 2: Collaborator edit
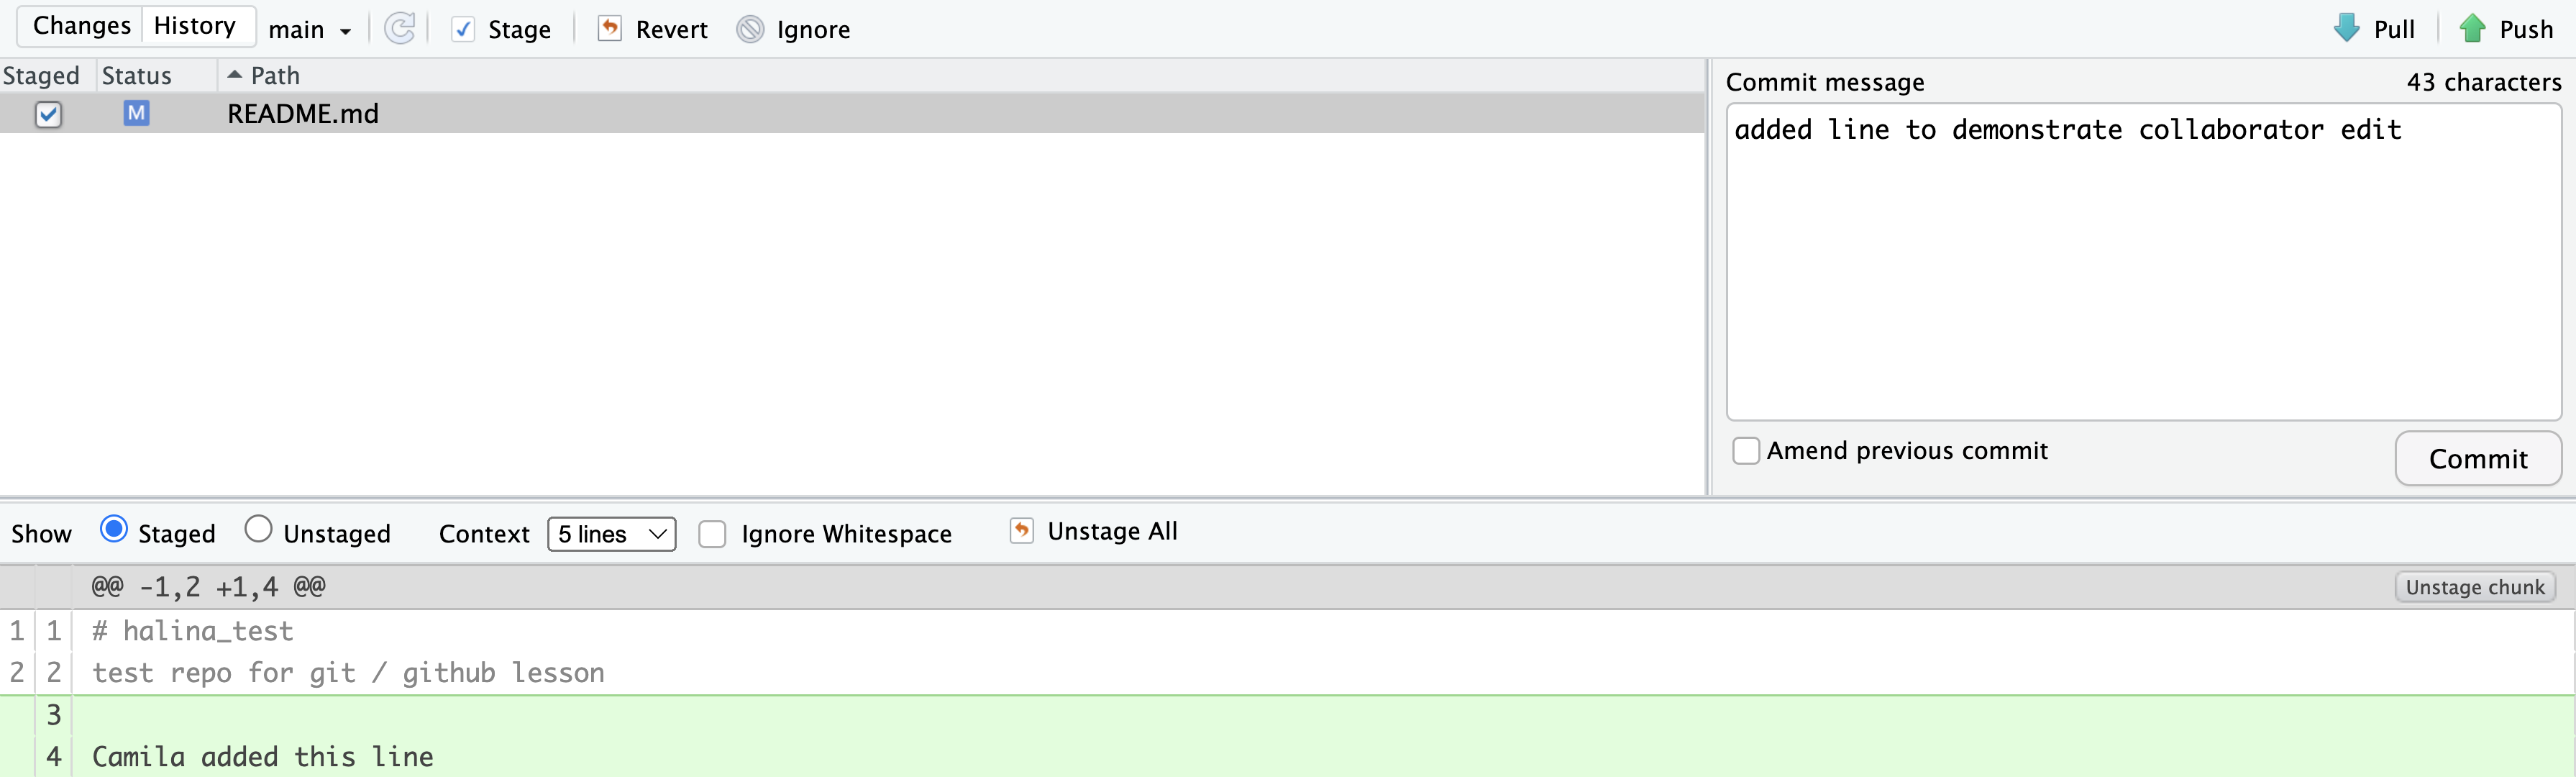
With a clone copied locally, the Collaborator can now make changes to the README.md file in the repository, adding a line or statement somewhere noticeable near the top. Save your changes.
Step 3: Collaborator commit and push
To sync changes, the Collaborator will need to add, commit, and push their changes to the Owner’s repository. But before doing so, it’s good practice to pull immediately before committing to ensure you have the most recent changes from the Owner. So, in RStudio’s Git tab, first click the “Diff” button to open the Git window, and then press the green “Pull” down arrow button. This will fetch any recent changes from the origin repository and merge them. Next, add the changed README.Rmd file to be committed by clicking the check box next to it, type in a commit message, and click “Commit”. Once that finishes, then the Collaborator can immediately click “Push” to send the commits to the Owner’s GitHub repository.
Step 4: Owner pull
Now, the Owner can open their local working copy of the code in RStudio, and pull those changes down to their local copy.
Congrats, the Owner now has your changes!
Step 5: Owner edits, commit, and push
Next, the Owner should do the same. Make changes to a file in the repository, save it, pull to make sure no new changes have been made while editing, and then add, commit, and push the Owner changes to GitHub.
Step 6: Collaborator pull
The Collaborator can now pull down those Owner changes, and all copies are once again fully synced. And you’re off to collaborating.
1.3 Exercise 1: With a partner collaborate in a repository without a merge conflict
- Get into pairs, then choose one person as the Owner and one as the Collaborator
- Both logon to GitHub
These next steps are for the Owner:
- Navigate to the
{FIRSTNAME}_testrepository - Go to “Settings” and navigate to “Collaborators” in the “Access” section on the left-hand side
- Under “Manage Access” click the button “Add people” and type the username of your Collaborator in the search box
- Once you’ve found the correct username, click “Add {Collaborator username} to this repository
Now, the Collaborator will follow this step:
- Check your email for an invitation to GitHub or check your notifications (likely under “Your Organizations”) on GitHub to accept the invite to collaborate.
You will do the exercise twice, where each person will get to practice being both the Owner and the Collaborator roles.
- Step 0: Designate one person as the Owner and one as the Collaborator.
Round One:
- Step 1: Owner adds Collaborator to
{FIRSTNAME}_testrepository (see Setup block above for detailed steps) - Step 2: Collaborator clones the Owner’s
{FIRSTNAME}_testrepository - Step 3: Collaborator edits the
READMEfile:- Collaborator adds a new level 2 heading to
READMEtitled “GitWorkflow”
- Collaborator adds a new level 2 heading to
- Step 4: Collaborator commits and pushes the
READMEfile with the new changes to GitHub - Step 5: Owner pulls the changes that the Collaborator made
- Step 6: Owner edits the
READMEfile:- Under “
GitWorkflow”, Owner adds the steps of theGitworkflow we’ve been practicing
- Under “
- Step 7: Owner commits and pushes the
READMEfile with the new changes to GitHub - Step 8: Collaborator pulls the
Ownerschanges from GitHub - Step 9: Go back to Step 0, switch roles, and then follow the steps in Round Two.
Round Two:
- Step 1: Owner adds Collaborator to
{FIRSTNAME}_testrepository - Step 2: Collaborator clones the Owner’s
{FIRSTNAME}_testrepository - Step 3: Collaborator edits the
READMEfile:- Collaborator adds a new level 2 heading to
READMEtitled “How to Create aGitRepository from an existing project” and adds the high level steps for this workflow
- Collaborator adds a new level 2 heading to
- Step 4: Collaborator commits and pushes the
READMEfile with the new changes to GitHub - Step 5: Owner pulls the changes that the Collaborator made
- Step 6: Owner edits the
READMEfile:- Under “How to Create a
GitRepository”, Owner adds the high level steps for this workflow
- Under “How to Create a
- Step 7: Owner commits and pushes the
READMEfile with the new changes to GitHub - Step 8: Collaborator pulls the
Ownerschanges from GitHub
Hint: If you don’t remember how to create a Git repository, refer to the chapter Intro to Git and GitHub where we created two Git repositories
1.4 A Note on Advanced Collaboration Techniques
There are many Git and GitHub collaboration techniques, some more advanced than others. We won’t be covering advanced strategies in this course. But here is a table for your reference on a few popular Git collaboration workflow strategies and tools.
| Collaboration Technique | Benefits | When to Use | When Not to Use |
|---|---|---|---|
| Branch Management Strategies | 1. Enables parallel development and experimentation 2. Facilitates isolation of features or bug fixes 3. Provides flexibility and control over project workflows |
When working on larger projects with multiple features or bug fixes simultaneously. When you want to maintain a stable main branch while developing new features or resolving issues on separate branches. When collaborating with teammates on different aspects of a project and later integrating their changes. |
When working on small projects with a single developer or limited codebase. When the project scope is simple and doesn’t require extensive branch management. When there is no need to isolate features or bug fixes. |
| Code Review Practices | 1. Enhances code quality and correctness through feedback 2. Promotes knowledge sharing and learning within the team 3. Helps identify bugs, improve performance, and ensure adherence to coding standards |
When collaborating on a codebase with team members to ensure code quality and maintain best practices. When you want to receive feedback and suggestions on your code to improve its readability, efficiency, or functionality. When working on critical or complex code that requires an extra layer of scrutiny before merging it into the main branch. |
When working on personal projects or small codebases with no collaboration involved. When time constraints or project size make it impractical to conduct code reviews. When the codebase is less critical or has low complexity. |
| Forking | 1. Enables independent experimentation and development 2. Provides a way to contribute to a project without direct access 3. Allows for creating separate, standalone copies of a repository |
When you want to contribute to a project without having direct write access to the original repository. When you want to work on an independent variation or extension of an existing project. When experimenting with changes or modifications to a project while keeping the original repository intact. |
When collaborating on a project with direct write access to the original repository. When the project does not allow external contributions or forking. When the project size or complexity doesn’t justify the need for independent variations. |
| Pull Requests | 1. Facilitates code review and discussion 2. Allows for collaboration and feedback from team members 3. Enables better organization and tracking of proposed changes |
When working on a shared repository with a team and wanting to contribute changes in a controlled and collaborative manner. When you want to propose changes to a project managed by others and seek review and approval before merging them into the main codebase. |
When working on personal projects or individual coding tasks without the need for collaboration. When immediate changes or fixes are required without review processes. When working on projects with a small team or single developer with direct write access to the repository. |
The “When Not to Use” column provides insights into situations where it may be less appropriate to use each collaboration technique, helping you make informed decisions based on the specific context and requirements of your project.
These techniques provide different benefits and are used in various collaboration scenarios, depending on the project’s needs and team dynamics.
1.5 Merge conflicts
Merge conflicts occur when both collaborators make conflicting changes to the same file. Resolving merge conflicts involves identifying the root of the problem and restoring the project to a normal state. Good communication, discussing file sections to work on, and avoiding overlaps can help prevent merge conflicts. However, if conflicts do arise, Git warns about potential issues and ensures that changes from different collaborators based on the same file version are not overwritten. To resolve conflicts, you need to explicitly specify whose changes should be used for each conflicting line in the file.
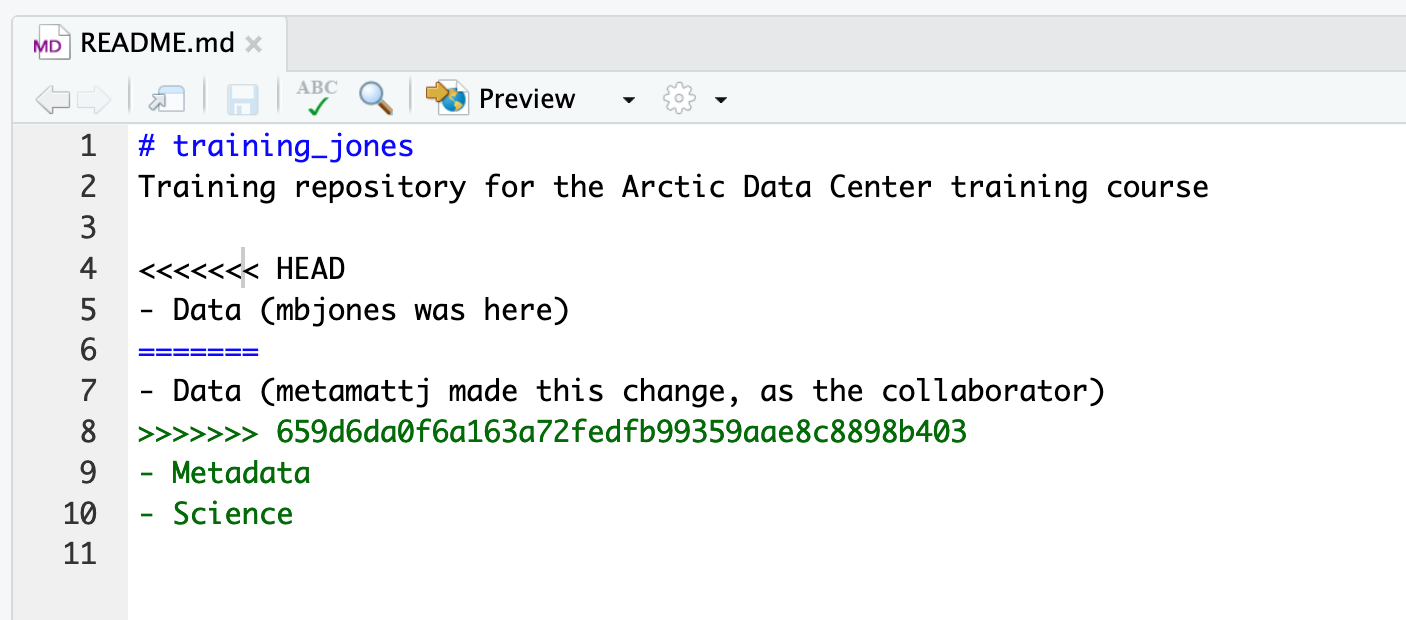
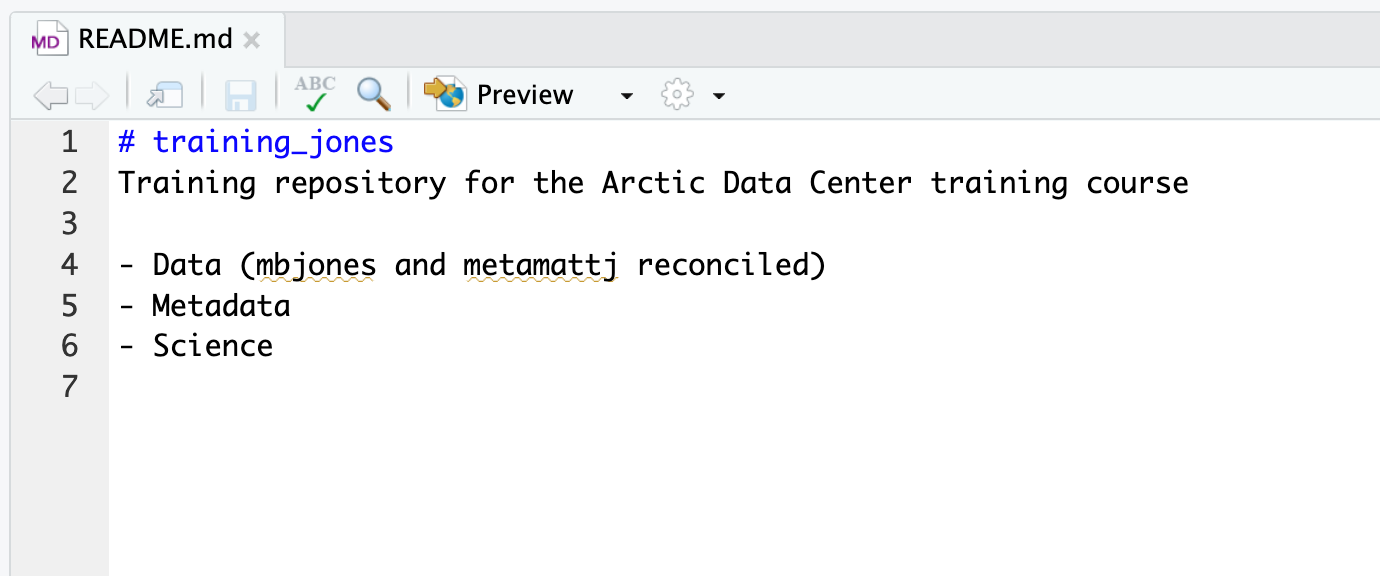
In this image, we see collaborators mbjones and metamattj have both made changes to the same line in the same README.md file. This is causing a merge conflict because Git doesn’t know whose changes came first. To resolve it, we need to tell Git whose changes to keep for that line, and whose changes to discard.

1.5.1 Common ways to resolve a merge conflict
1. Abort, abort, abort…
Sometimes you just made a mistake. When you get a merge conflict, the repository is placed in a “Merging” state until you resolve it. There’s a Terminal command to abort doing the merge altogether:
git merge --abortOf course, after doing that you still haven’t synced with your Collaborator’s changes, so things are still unresolved. But at least your repository is now usable on your local machine.
2. Checkout
The simplest way to resolve a conflict, given that you know whose version of the file you want to keep, is to use the command line Git program to tell Git to use either your changes (the person doing the merge), or their changes (the Collaborator).
- keep your Collaborator’s file:
git checkout --theirs conflicted_file.Rmd - keep your own file:
git checkout --ours conflicted_file.Rmd
Once you have run that command, then run add (staging), commit, pull, and push the changes as normal.
3. Pull and edit the file
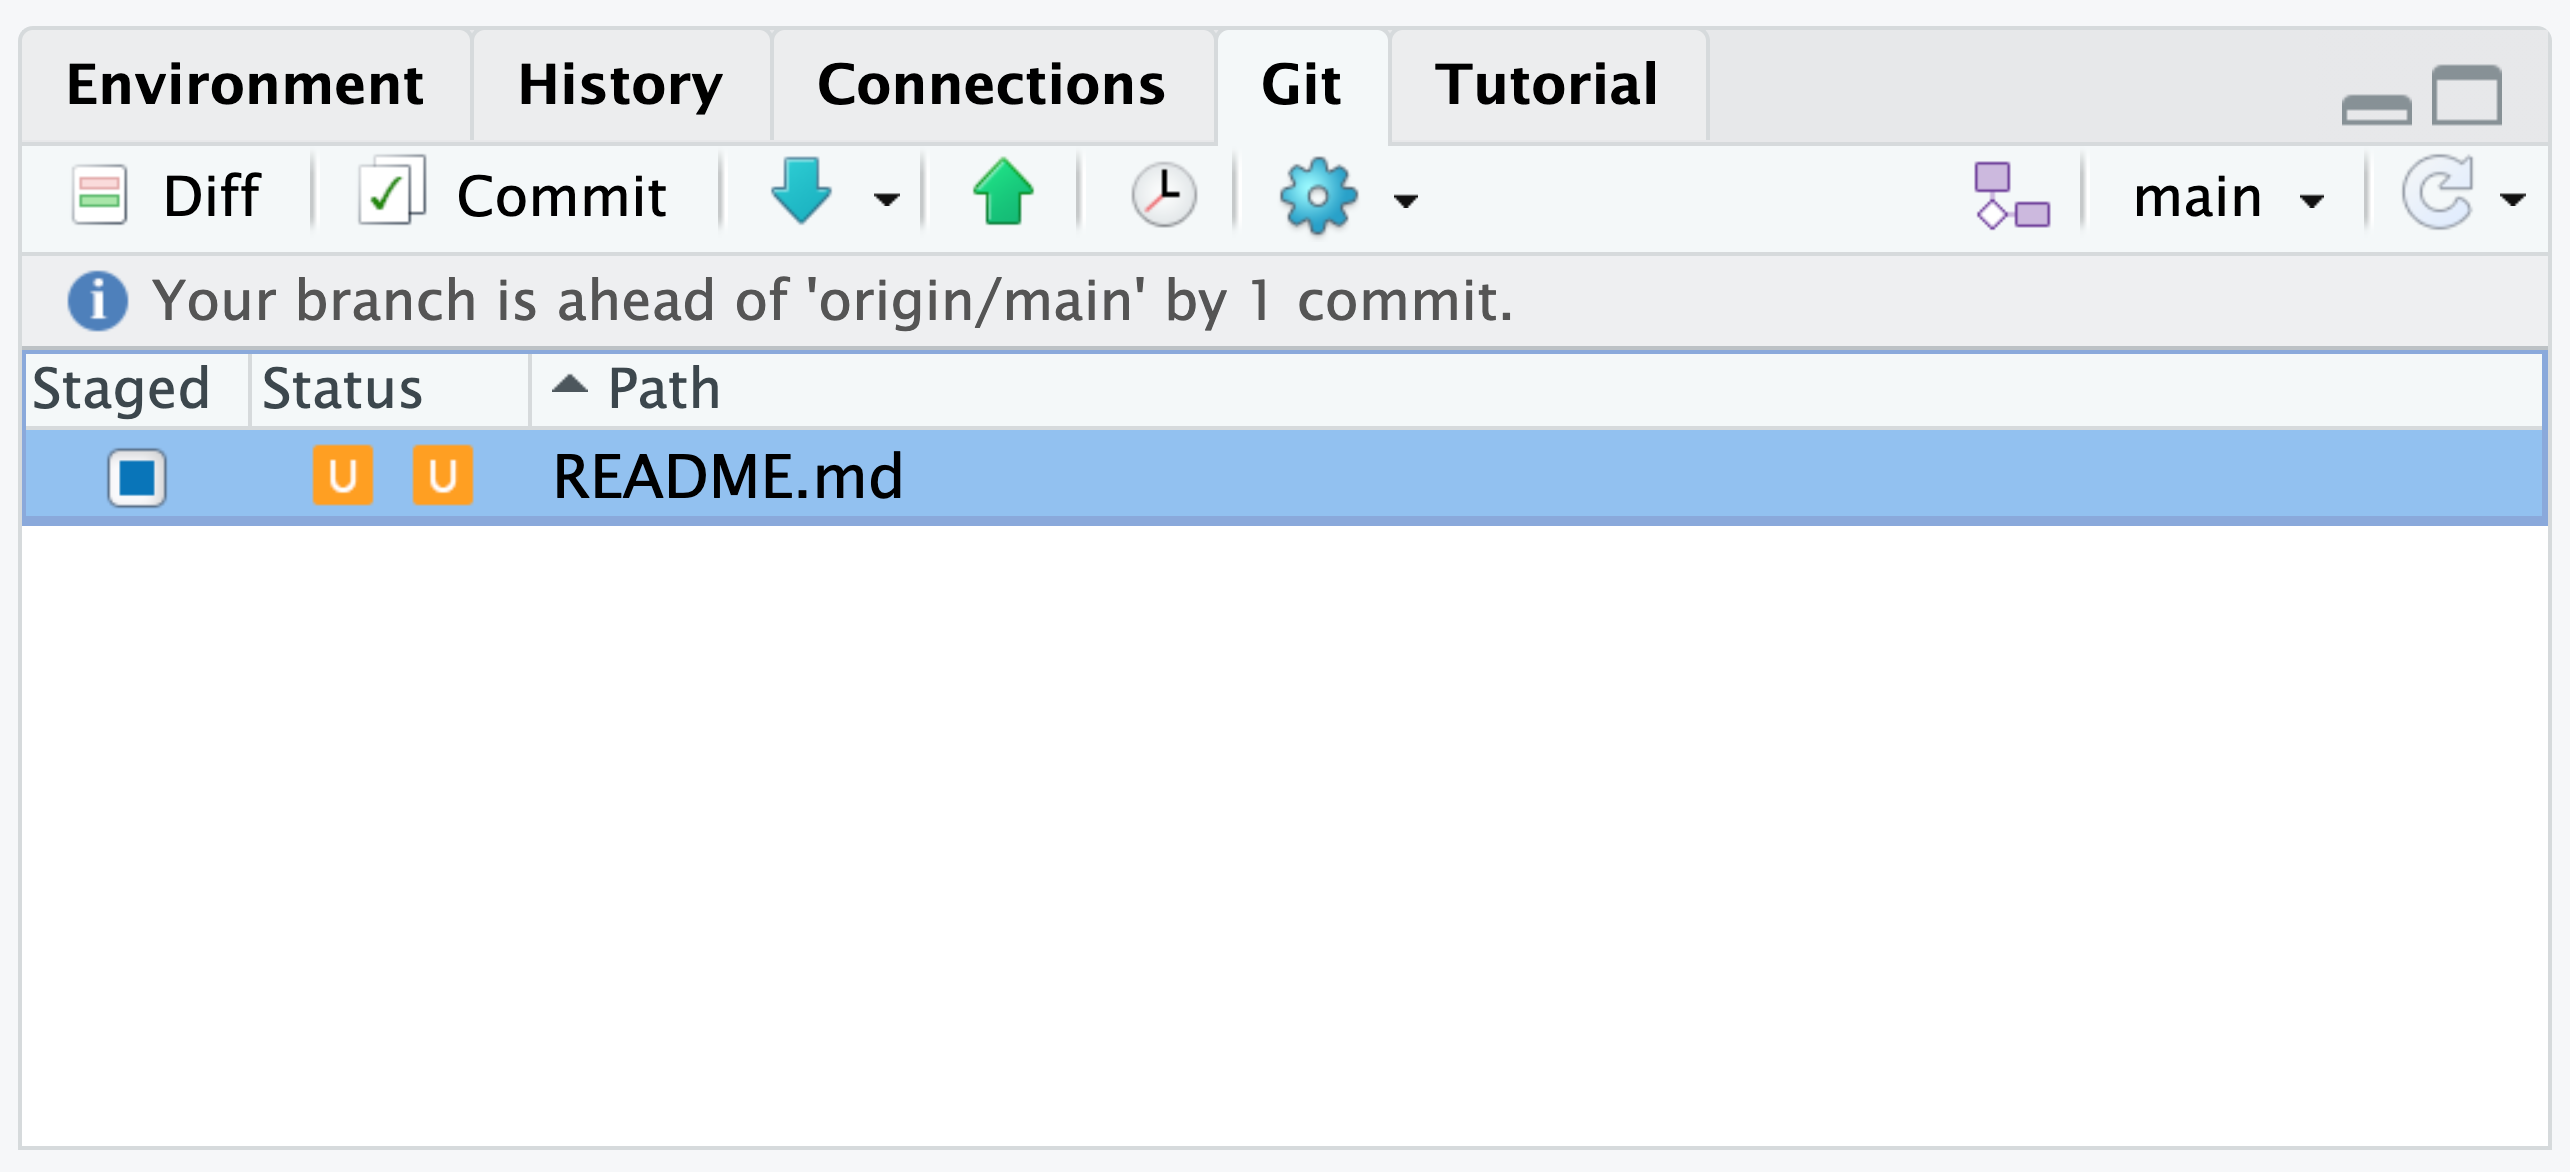
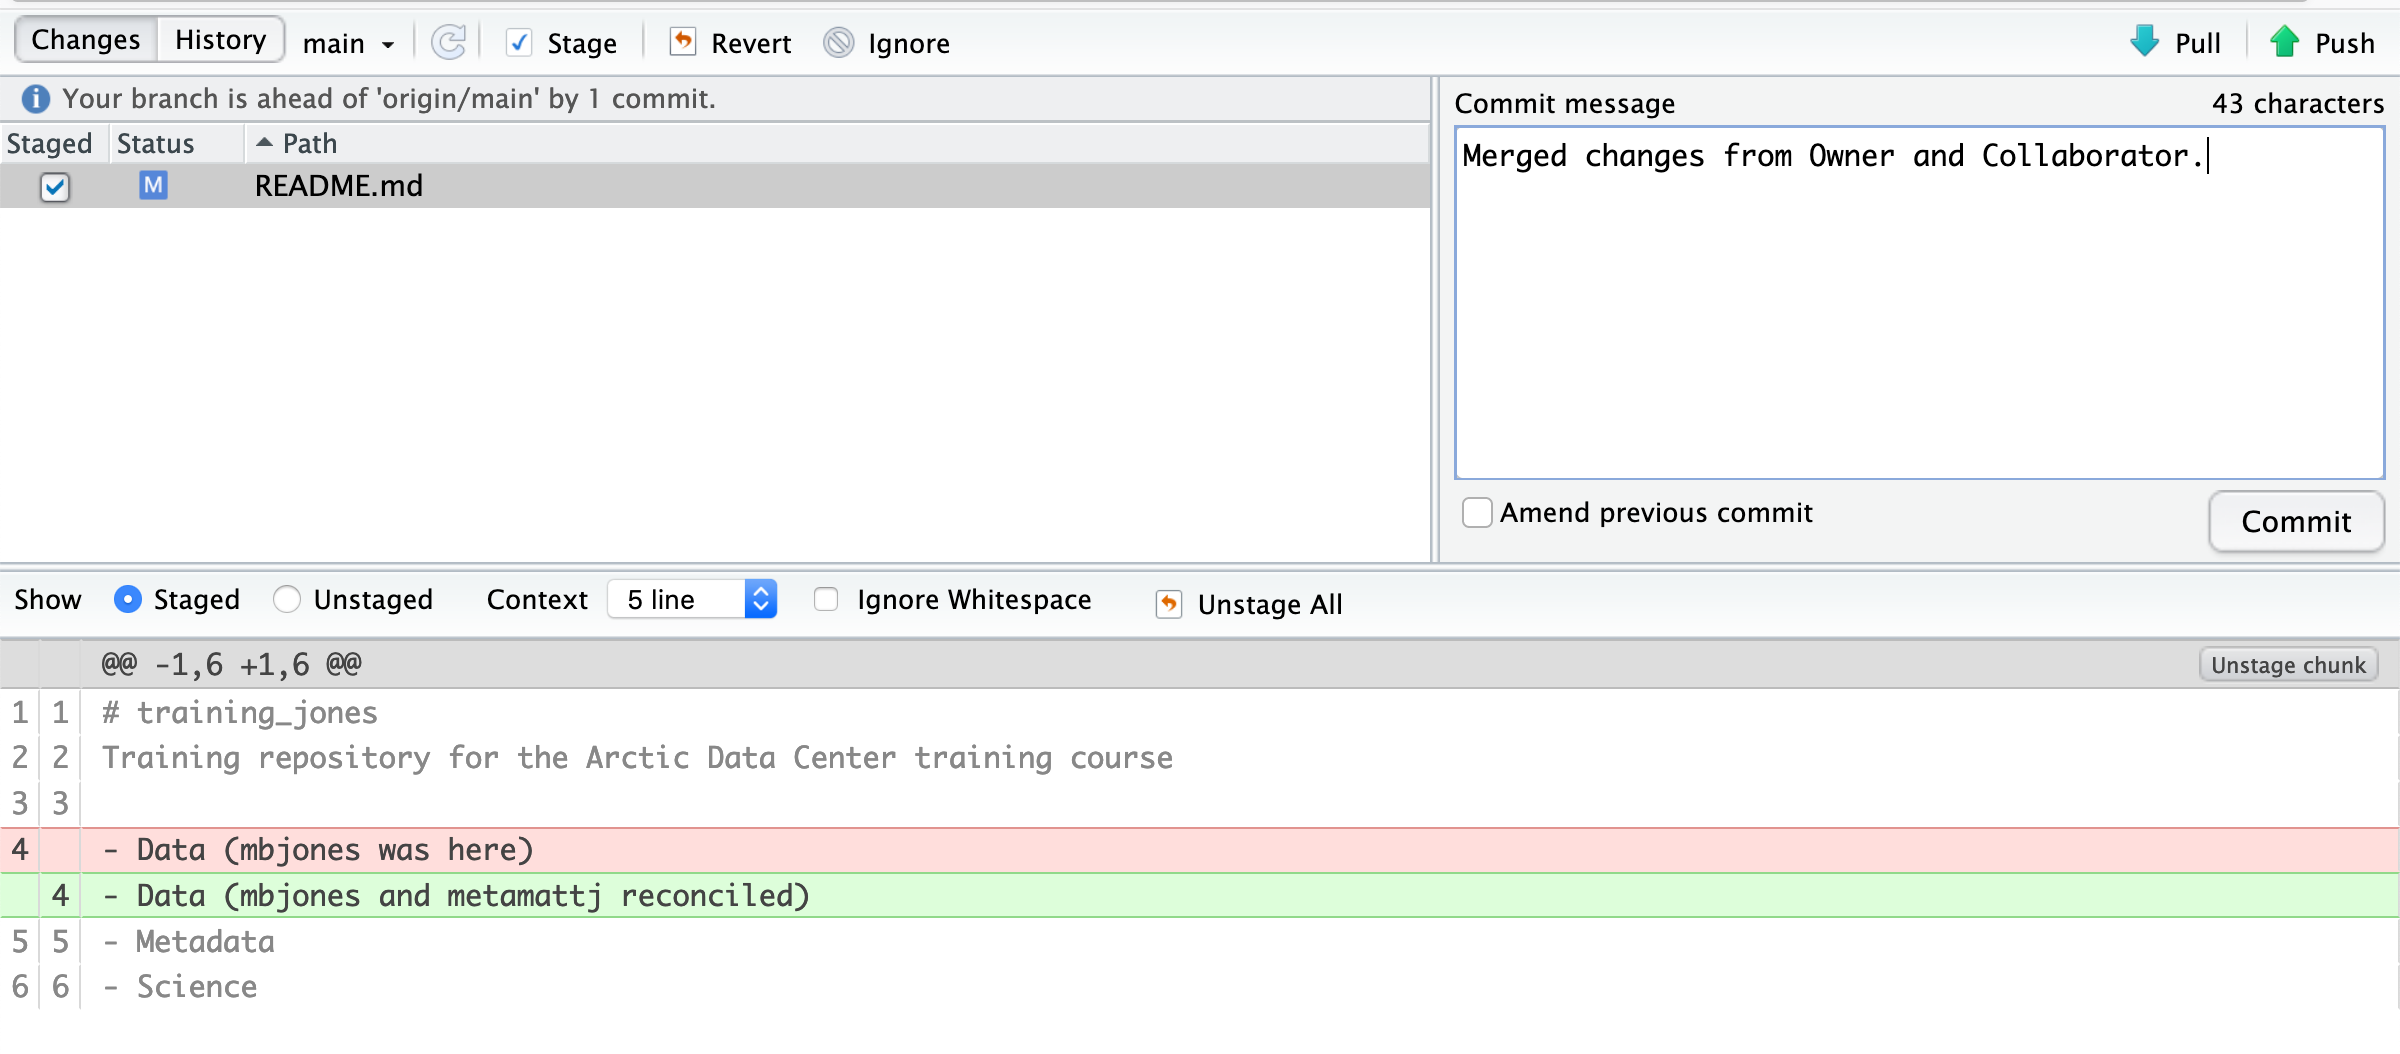
But that requires the command line. If you want to resolve from RStudio, or if you want to pick and choose some of your changes and some of your Collaborator’s, then instead you can manually edit and fix the file. When you pull the file with a conflict, Git notices that there is a conflict and modifies the file to show both your own changes and your Collaborator’s changes in the file. It also shows the file in the Git tab with an orange U icon, which indicates that the file is Unmerged, and therefore awaiting your help to resolve the conflict. It delimits these blocks with a series of less than and greater than signs, so they are easy to find:
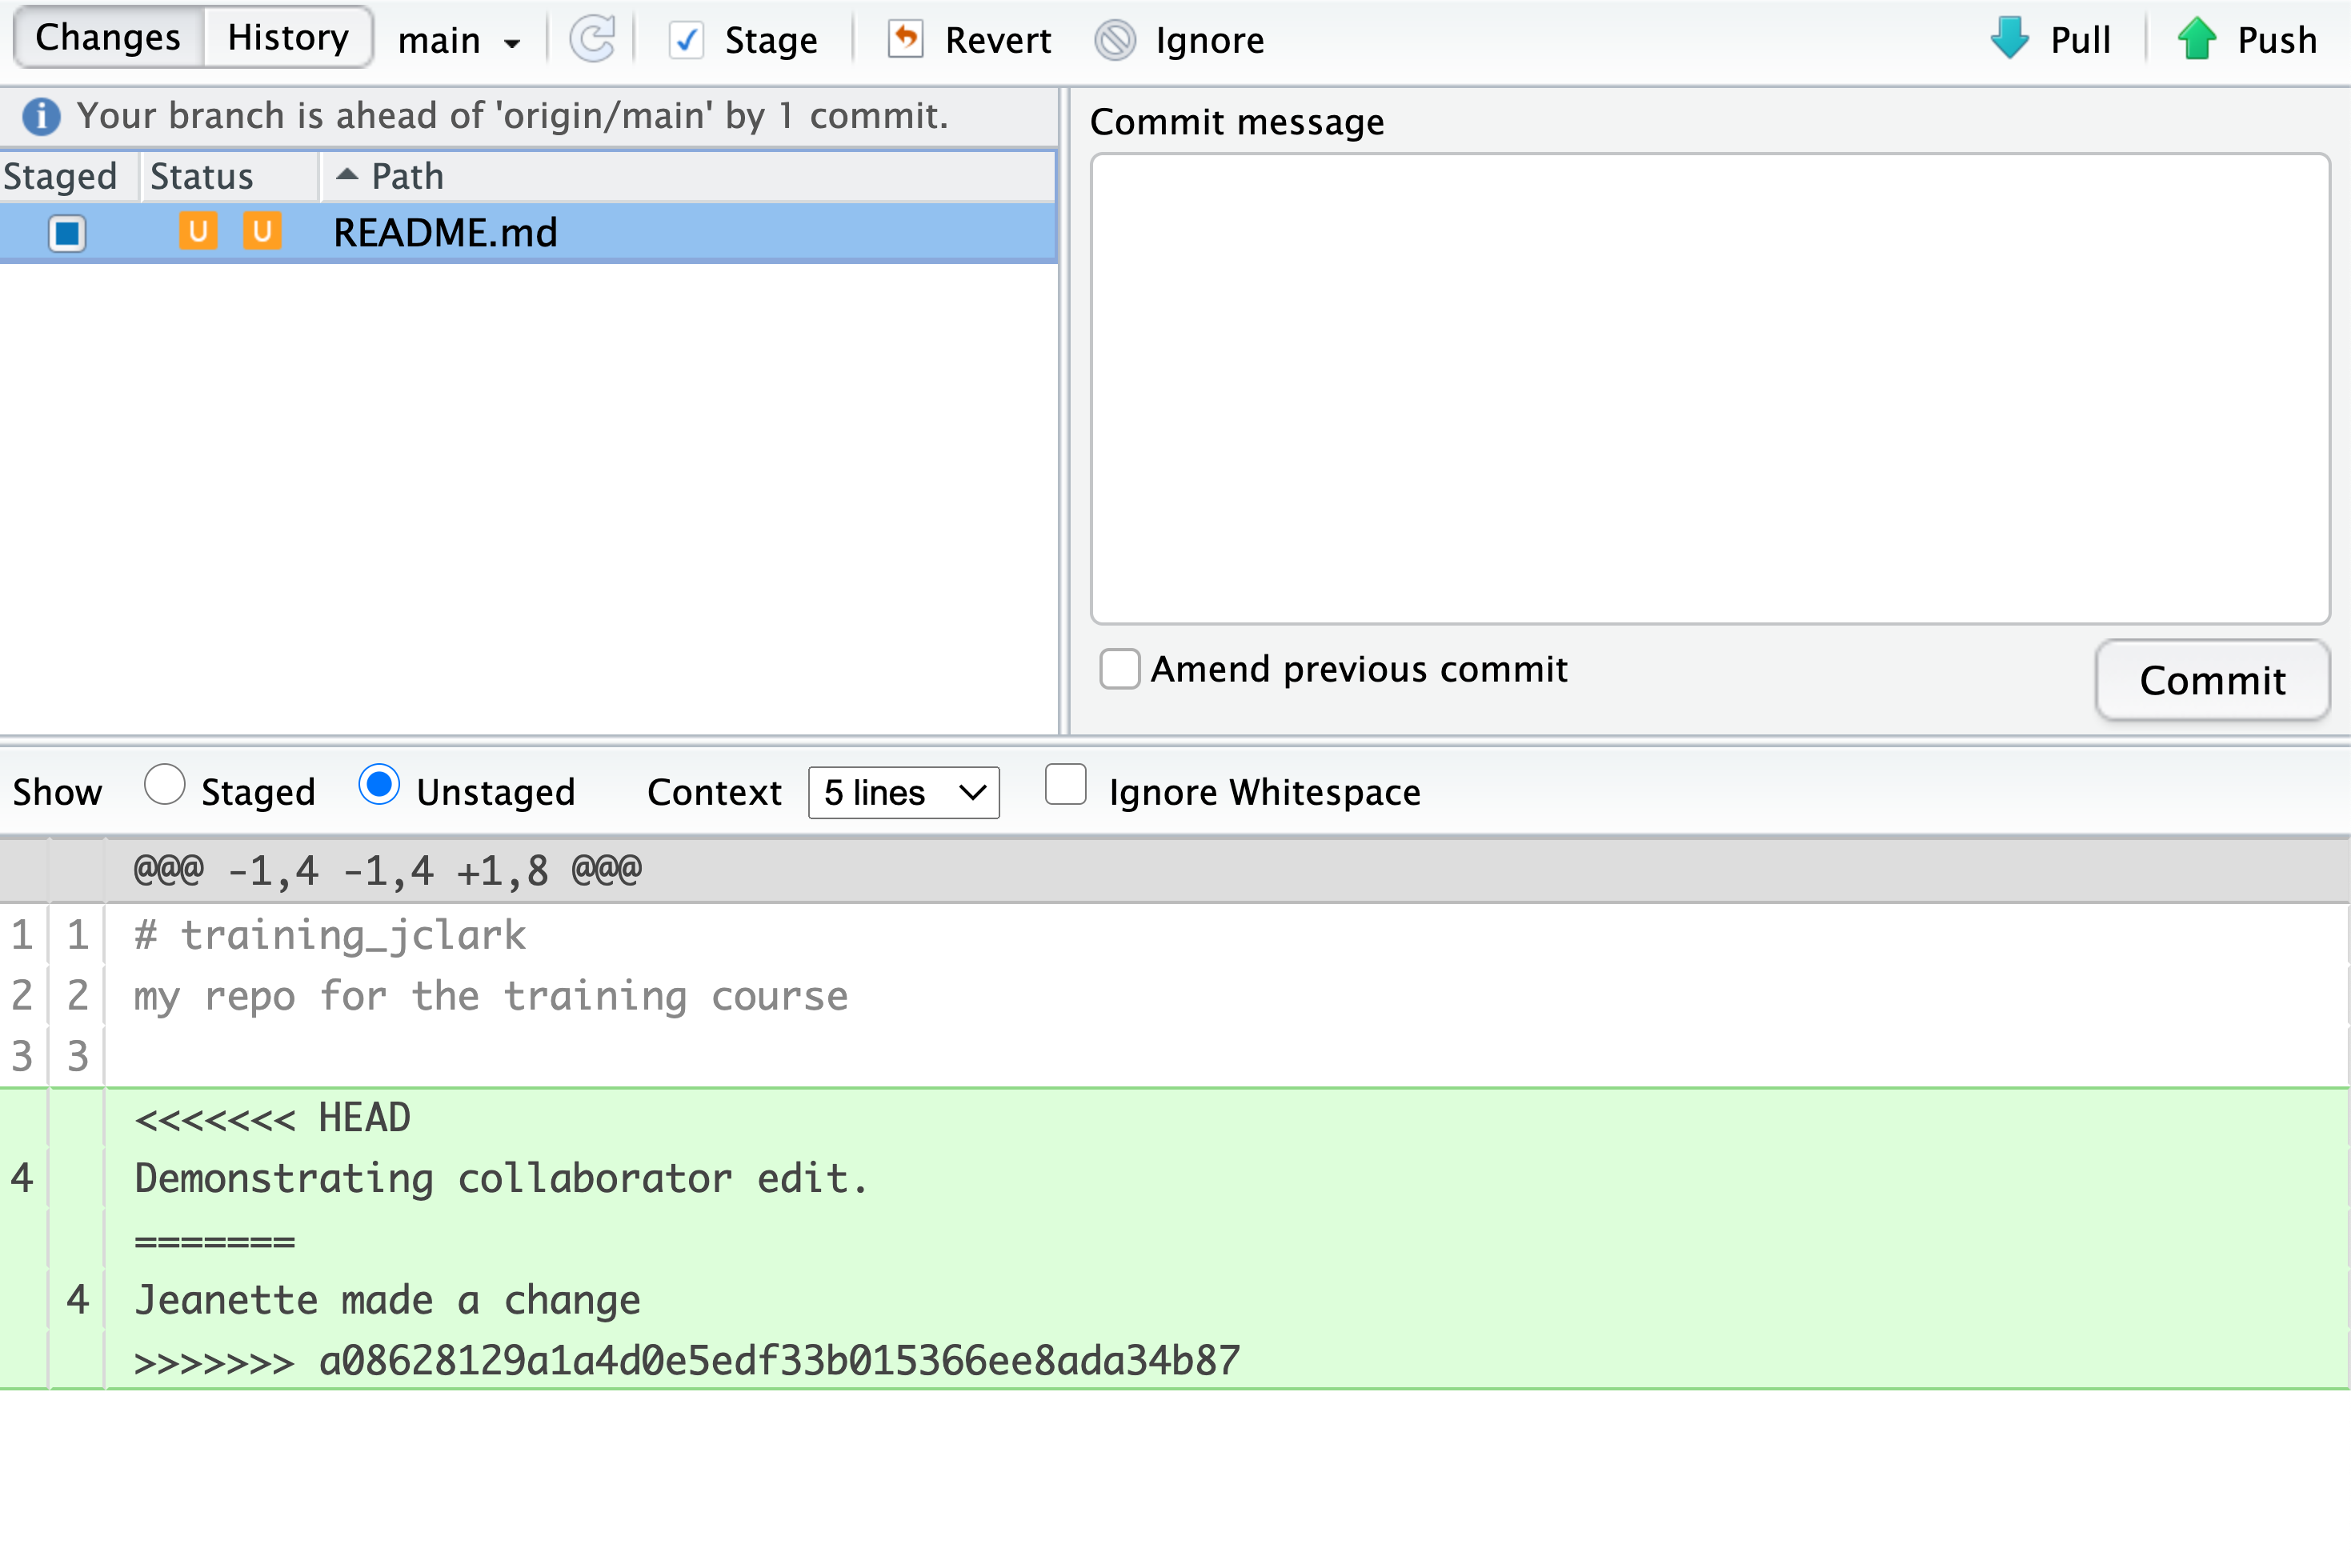
To resolve the conflicts, simply find all of these blocks, and edit them so that the file looks how you want (either pick your lines, your Collaborator’s lines, some combination, or something altogether new), and save. Be sure you removed the delimiter lines that started with
<<<<<<<,=======,- and
>>>>>>>.
Once you have made those changes, you simply add (staging), commit, and push the files to resolve the conflict.
1.6 Producing and resolving merge conflicts
To illustrate this process, the instructors are going to carefully create a merge conflict step by step, show how to resolve it, and show how to see the results of the successful merge after it is complete. First, the instructors will walk through the exercise to demonstrate the issues. Then, participants will pair up and try the exercise.
Step 1: Owner and Collaborator ensure all changes are updated
First, start the exercise by ensuring that both the Owner and Collaborator have all of the changes synced to their local copies of the Owner’s repository in RStudio. This includes doing a git pull to ensure that you have all changes local, and make sure that the Git tab in RStudio doesn’t show any changes needing to be committed.
Step 2: Owner makes a change and commits
From that clean slate, the Owner first modifies and commits a small change including their name on a specific line of the README.md file (we will change the first line, the title). Work to only change that one line, and add your username to the line in some form and commit the changes (but DO NOT push). We are now in a situation where the Owner has unpushed changes that the Collaborator can not yet see.
Step 3: Collaborator makes a change and commits on the same line
Now the Collaborator also makes changes to the same line (the first line, the title) on the README.md file in their RStudio copy of the project, adding their name to the line. They then commit. At this point, both the Owner and Collaborator have committed changes based on their shared version of the README.md file, but neither has tried to share their changes via GitHub.
Step 4: Collaborator pushes the file to GitHub
Sharing starts when the Collaborator pushes their changes to the GitHub repo, which updates GitHub to their version of the file. The Owner is now one revision behind, but doesn’t know it yet.
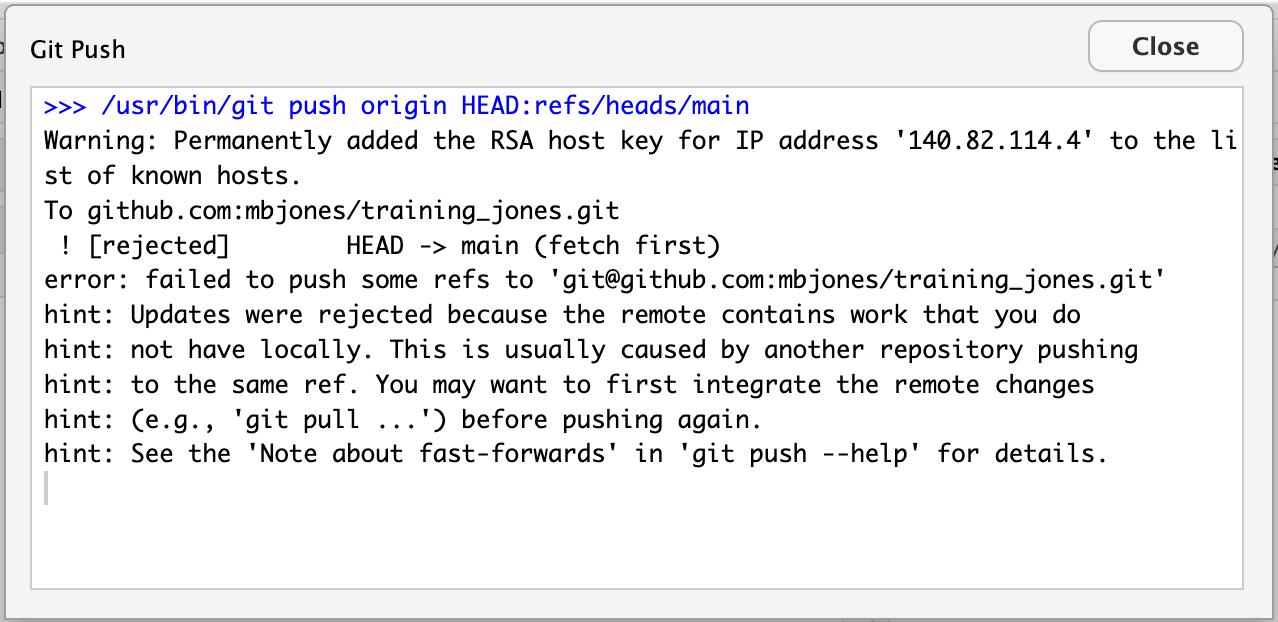
Step 5: Owner pushes their changes and gets an error
At this point, the Owner tries to push their change to the repository, which triggers an error from GitHub. While the error message is long, it basically tells you everything needed (that the Owner’s repository doesn’t reflect the changes on GitHub, and that they need to pull before they can push).
Step 6: Owner pulls from GitHub to get Collaborator changes
Doing what the message says, the Owner pulls the changes from GitHub, and gets another, different error message. In this case, it indicates that there is a merge conflict because of the conflicting lines.
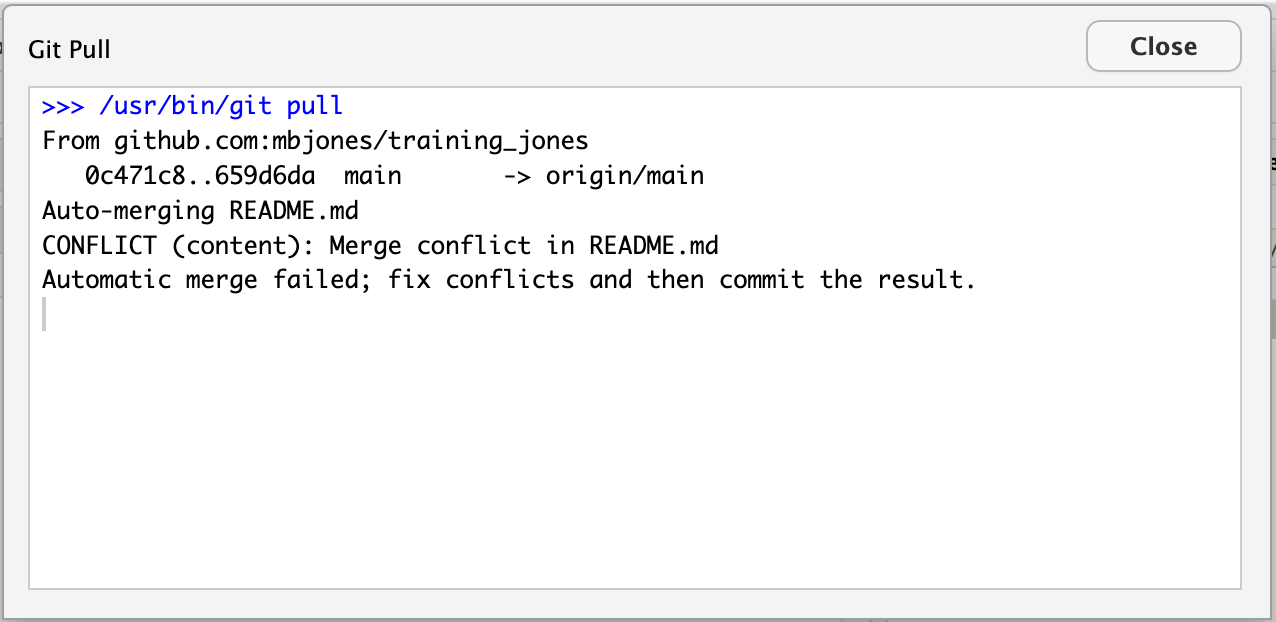
In the Git pane of RStudio, the file is also flagged with an orange U, which stands for an unresolved merge conflict.
Step 7: Owner edits the file to resolve the conflict
To resolve the conflict, the Owner now needs to edit the file. Again, as indicated above, Git has flagged the locations in the file where a conflict occurred with <<<<<<<, =======, and >>>>>>>. The Owner should edit the file, merging whatever changes are appropriate until the conflicting lines read how they should, and eliminate all of the marker lines with <<<<<<<, =======, and >>>>>>>.
Of course, for scripts and programs, resolving the changes means more than just merging the text – whoever is doing the merging should make sure that the code runs properly and none of the logic of the program has been broken.
Step 8: Owner commits the resolved changes
From this point forward, things proceed as normal. The Owner first add the file changes to be made, which changes the orange U to a blue M for modified, and then commits the changes locally. The Owner now has a resolved version of the file on their system.
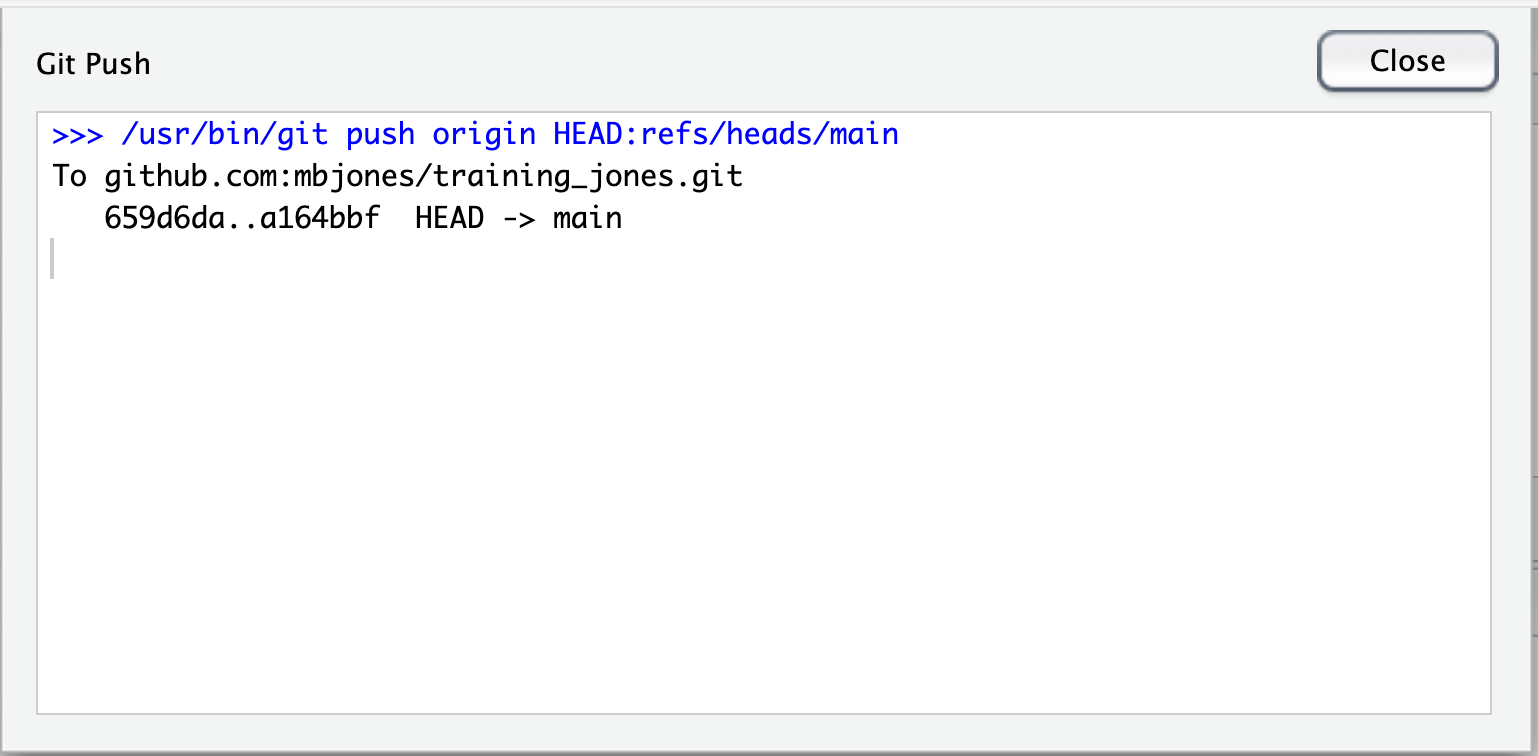
Step 9: Owner pushes the resolved changes to GitHub
Have the Owner push the changes, and it should replicate the changes to GitHub without error.
Step 10: Collaborator pulls the resolved changes from GitHub
Finally, the Collaborator can pull from GitHub to get the changes the Owner made.
Step 11: Both can view commit history
When either the Collaborator or the Owner view the history, the conflict, associated branch, and the merged changes are clearly visible in the history.

1.7 Exercise 2: With a partner collaborate in a repository and resolve a merge conflict
Note you will only need to complete the Setup and Git configuration steps again if you are working in a new repository. Return to Exercise 1 for Setup and Git configuration steps.
Now it’s your turn. In pairs, intentionally create a merge conflict, and then go through the steps needed to resolve the issues and continue developing with the merged files. See the sections above for help with each of the steps below. You will do the exercise twice, where each person will get to practice being both the Owner and the Collaborator roles.
- Step 0: Designate one person as the Owner and one as the Collaborator.
Round One:
- Step 1: Both Owner and Collaborator
pullto ensure both have the most up-to-date changes - Step 2: Owner edits the
READMEfile and makes a change to the title and commits do not push - Step 3: On the same line, Collaborator edits the
READMEfile and makes a change to the title and commits - Step 4: Collaborator pushes the file to GitHub
- Step 5: Owner pushes their changes and gets an error
- Step 6: Owner pulls from GitHub to get Collaborator changes
- Step 7: Owner edits the
READMEfile to resolve the conflict - Step 8: Owner commits the resolved changes
- Step 9: Owner pushes the resolved changes to GitHub
- Step 10: Collaborator pulls the resolved changes from GitHub
- Step 11: Both view commit history
- Step 12: Go back to Step 0, switch roles, and then follow the steps in Round Two.
Round Two:
- Step 1: Both Owner and Collaborator
pullto ensure both have the most up-to-date changes - Step 2: Owner edits the
READMEfile and makes a change to line 2 and commits do not push - Step 3: On the same line, Collaborator edits the
READMEfile and makes a change to line 2 and commits - Step 4: Collaborator pushes the file to GitHub
- Step 5: Owner pushes their changes and gets an error
- Step 6: Owner pulls from GitHub to get Collaborator changes
- Step 7: Owner edits the
READMEfile to resolve the conflict - Step 8: Owner commits the resolved changes
- Step 9: Owner pushes the resolved changes to GitHub
- Step 10: Collaborator pulls the resolved changes from GitHub
- Step 11: Both view commit history
1.8 Best practices to avoid merge conflicts
Some basic rules of thumb can avoid the vast majority of merge conflicts, saving a lot of time and frustration. These are words our teams live by:
- Communicate often and set up effective communication channels
- Tell each other what you are working on
- Start your working session with a
pull Pullimmediately before youcommitorpushCommitoften in small chunks (this helps you organize your work!)- Make sure you and who you are collaborating with all fully understand the
Gitworkflow you’re using aka make sure you’re on the same page before you start!
A good workflow is encapsulated as follows:
Pull -> Edit -> Save -> Add (stage) -> Commit -> Pull -> Push
Always start your working sessions with a pull to get any outstanding changes, then start your work. Stage your changes, but before you commit, pull again to see if any new changes have arrived. If so, they should merge in easily if you are working in different parts of the program. You can then commit and immediately push your changes safely.
Good luck, and try to not get frustrated. Once you figure out how to handle merge conflicts, they can be avoided or dispatched when they occur, but it does take a bit of practice.