15 Docker Containers
15.1 Learning Objectives
- What is docker anyway?
- Think about dependency management, reproducibility, and software
- Become familiar with containers as a tool to improve computational reproducibility
- Build and run docker containers to create reproducible python environments
15.2 Just what is a container?
A container represents an instance of an image that can be run.
And why might I want one? In short, as a very lightweight way to create a reproducible computing environment. Containers have some desirable properties:
- Declarative: Containers are defined by a clear procedure making it possible to reliably rebuild an identical container in a variety of environments, promototing reproducibility
- Portable: Containers are designed to run on a container runtime which works identically across systems, so you can launch a container from a Mac, Linux, or Windows and get the same output every time
- Lightweight: Containers contain only the exact files and data needed for a specific application, without all of the extra operating system baggage found in virtual machines
- Scalable: Containers can be launched multiple times from their source image, and thus can be horizontally scaled across a compute cluster to parallelize operations
From the following figure, one can see that a container is much more lightweight than both a bare metal server and a virtual machine, in that it contains only the files needed for a specific application.
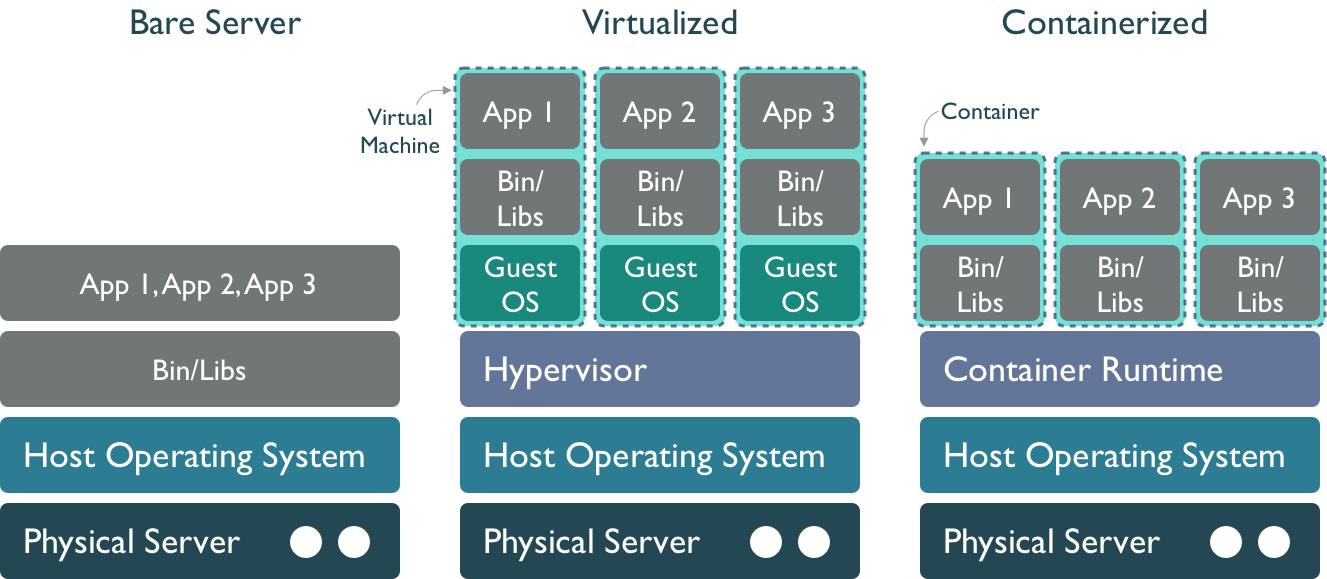
Images An image is a snapshot of a computing environment. It contains all of the files and data needed to execute a particular application or service, along with the instructions on which service should be run. But it is not executed per se. As a snapshot, an image represents a template that can be used to create one or more containers (each of which is an instantiation of the contents of the image). Images are also built using a layered file system, which allows multiple images to be layered together to create a composite that provides rich services without as much duplication.
Containers A container represents an instance of an image that can be run. Containers are executed in a Container Runtime such as containerd or Docker Engine. Like virtual machines, containers provide mechanisms to create images that can be executed by a container runtime, and which provide stronger isolation among deployments. But they are also more lightweight, as the container only contains the libraries and executables needed to execute a target application, and not an entire guest operating system. This means that applications run with fewer resources, start up and shut down more quickly, and can be migrated easily to other hosts in a network.
![]()
The Docker system was one of the first widespread implementations of containers, and its popularity drove much of the terminology around containers. After it’s inception, the software ecosystem around contaianers has been standardized and maintained by the Open Container Intitiative (OCI), which defines the image specification, runtime specification, and distribution specification followed by most vendors. So, we might often use the ‘docker’ terminology, but we are referring to OCI-compliant images and containers.
15.3 Installing Rancher Desktop
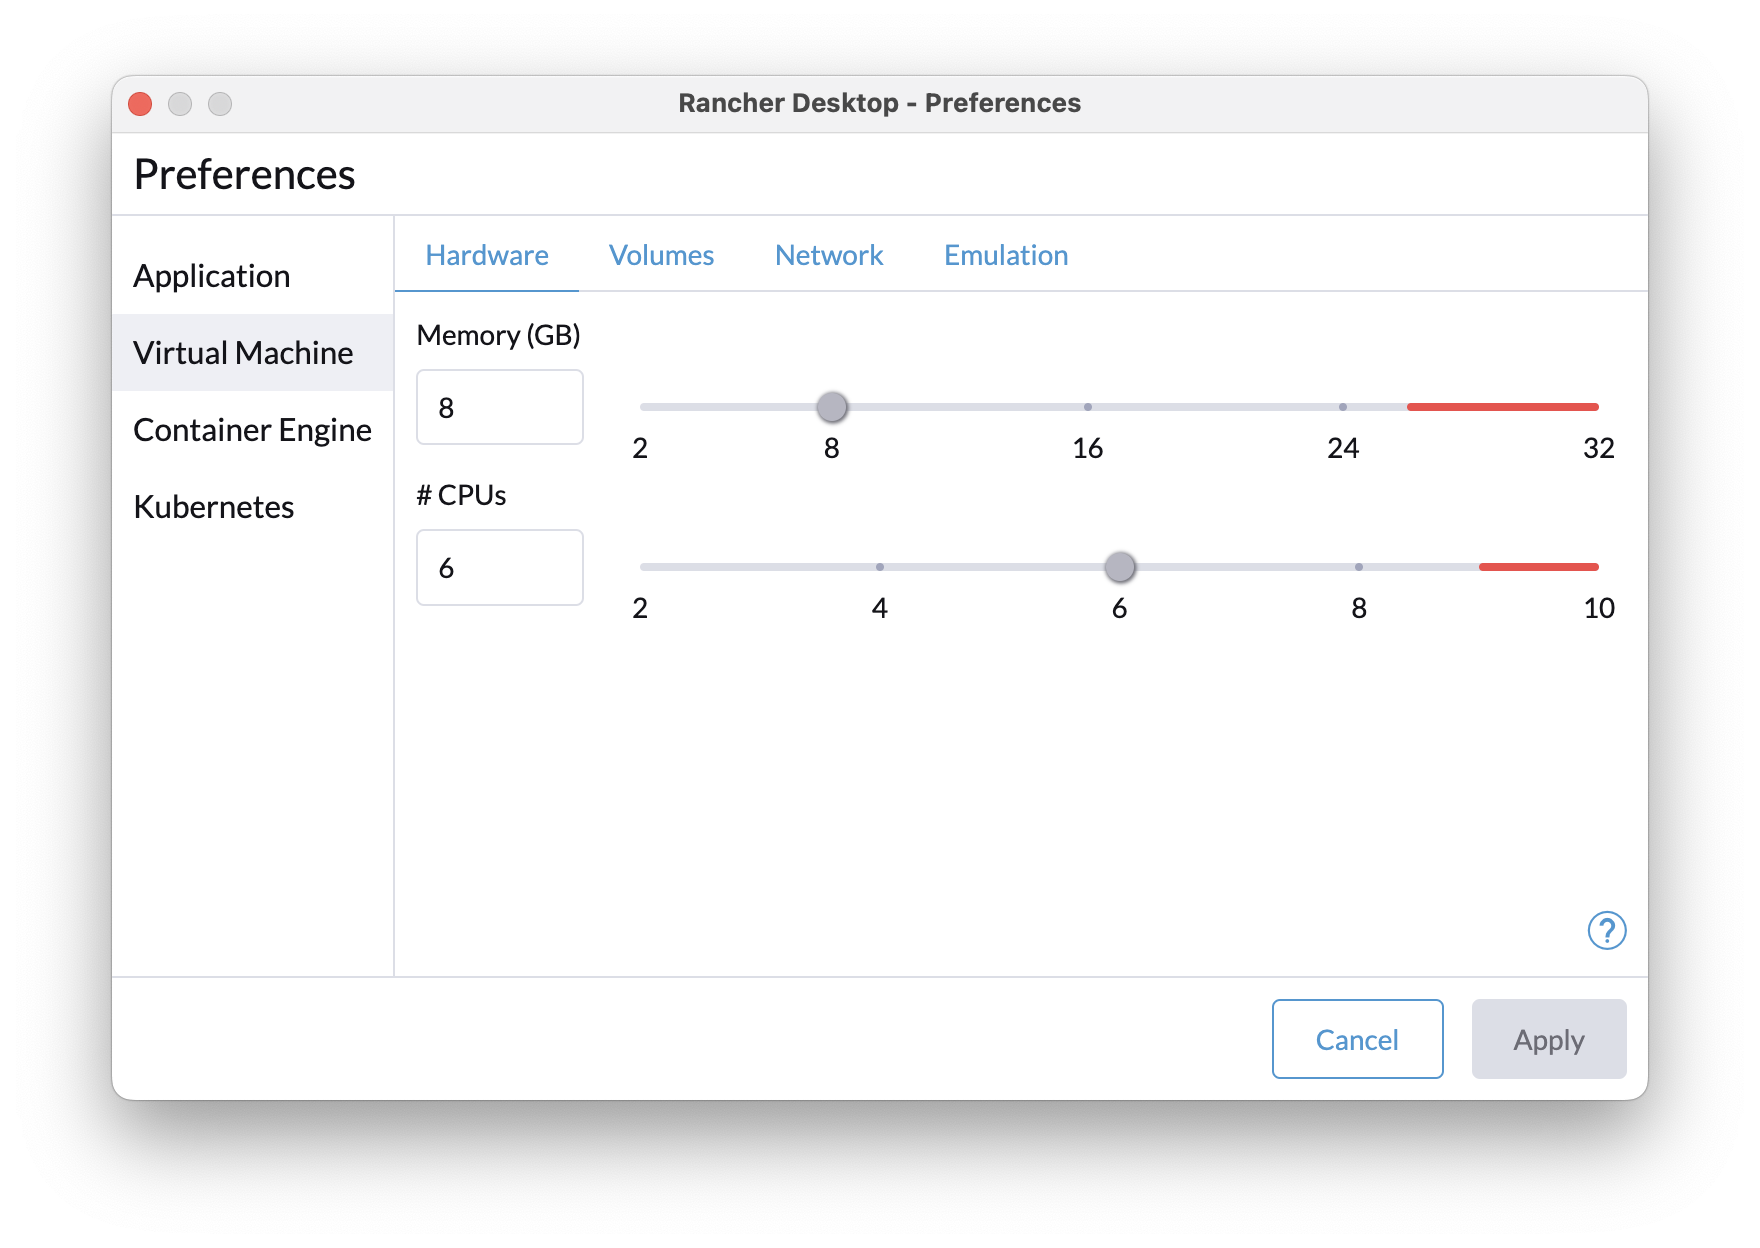
Working with docker or containers requires a container runtime. Whether you’re on a Mac, Windows, or Linux machine, you can run containers through a variety of different runtime systems. One of the nicest lately is Rancher Desktop. Install the binary for your platform, and then after it starts, open the Preferences dialog to configure it.
![]()
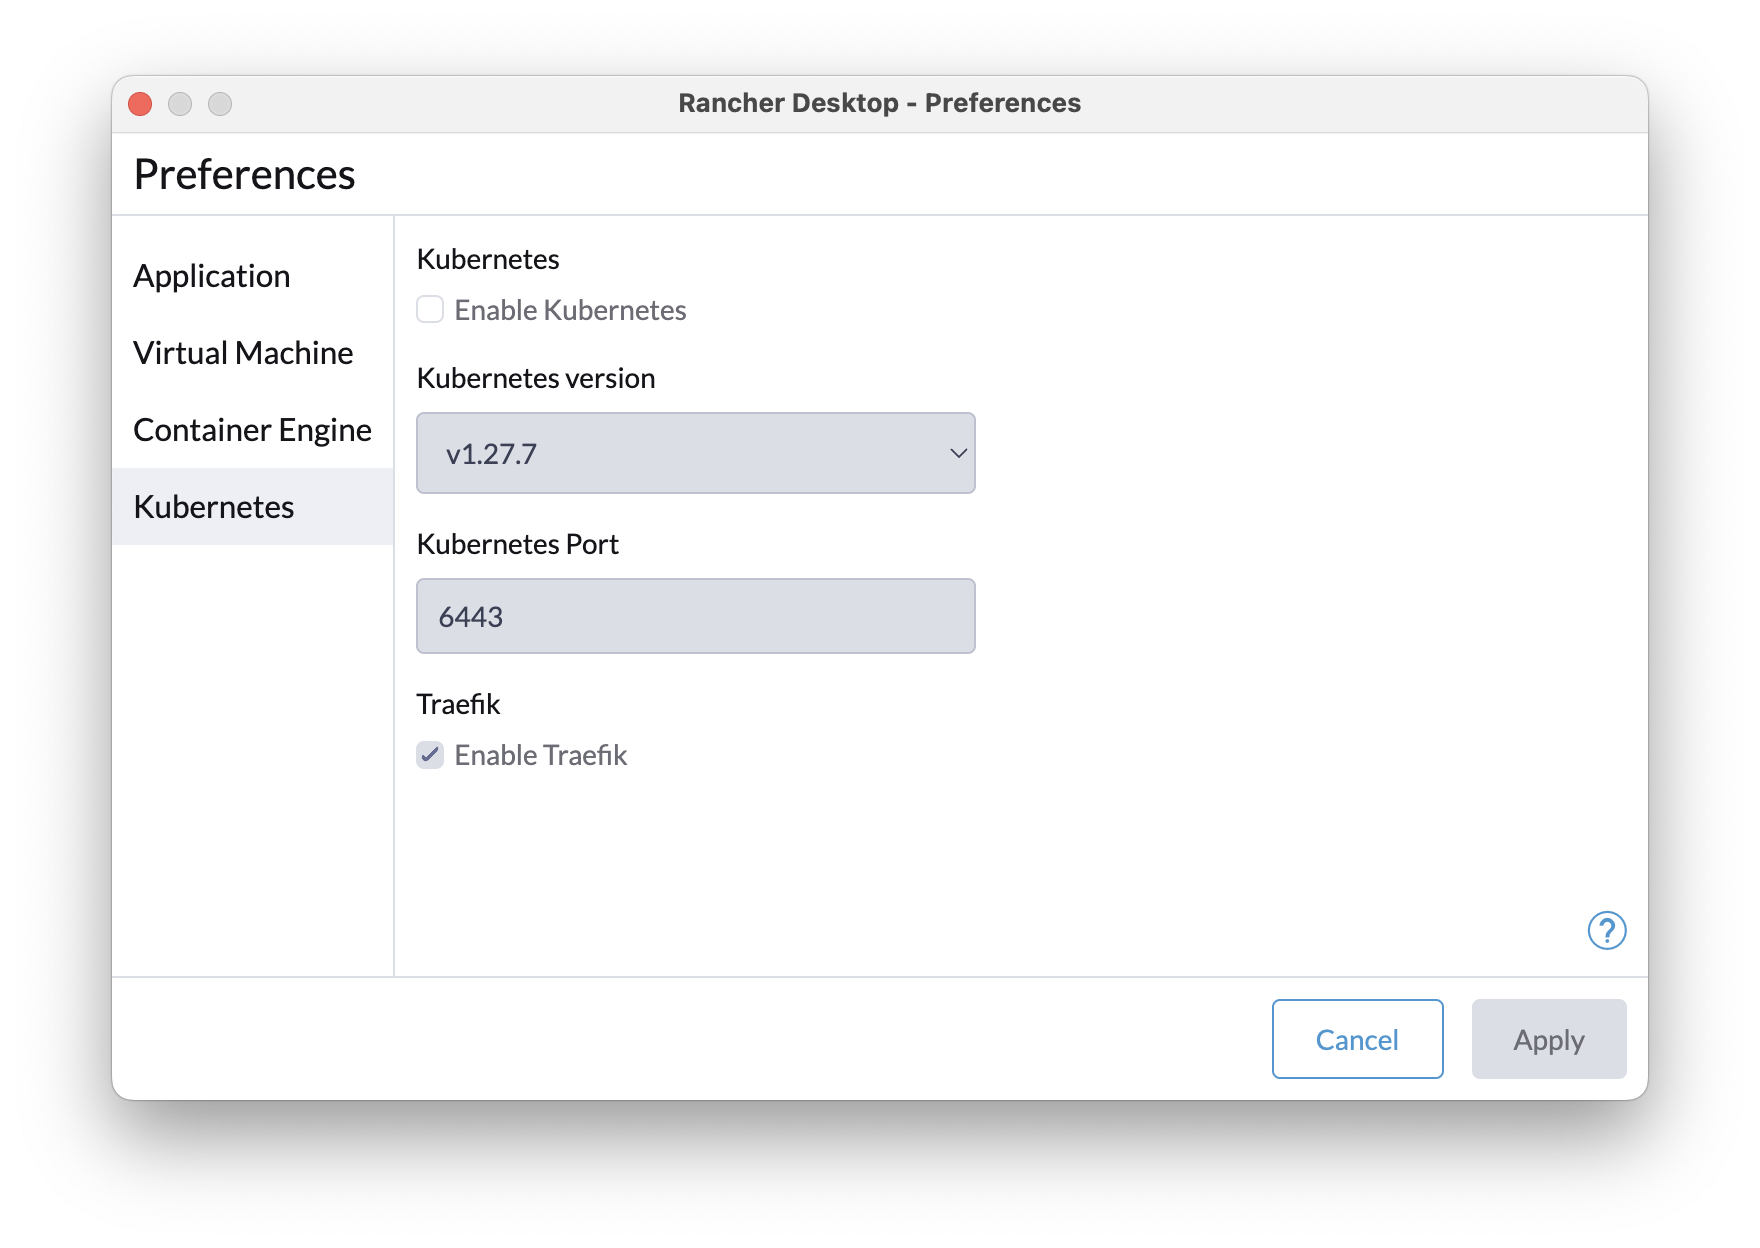
First, under the Virtual Machine tab, configure it to use a reasonable amount of your local machine’s resources, say about 50% of the CPUs and memory. Second, deselect “Kubernetes” to disable the kubernetes distribution, which takes up a lot of resources if you’re not using it.
There are many different tools you can use with docker, including the docker client tool, and the containerd ecosystem using nerdctl as a client tool. Both the docker client command and the nerdctl command share the same command syntax.
15.4 Container and Image portability
Images are portable across container runtimes that share the same architecture (e.g., all ARM processors, or x86 processors). This makes it easy to launch and run a container by downloading an image for your architecture, and executing it in a container runtime like containerd or dockerd. While we will be working on your local Rancher Desktop instance, images you build could also be run on other hosts, such as a linux server, or on a cluster of servers, if they were built for that architecture and have containerd installed. Because the container runtime is typically run as the root or administrative user, many high-performance computing centers will only expose container runtimes such as Apptainer, which supports a more sophisticated security model, or Kubernetes, which creates a fully-featured orchestration system.
15.5 Hands-on with Containers and Docker
Let’s get started. At it’s simplest, you can use docker to run an image that somebody else created. Let’s do that with a simple Hello World app. Open a terminal (on a machine with docker installed), and run:
$ docker run hello-worldHello from Docker!
This message shows that your installation appears to be working correctly.
To generate this message, Docker took the following steps:
1. The Docker client contacted the Docker daemon.
2. The Docker daemon pulled the "hello-world" image from the Docker Hub.
(arm64v8)
3. The Docker daemon created a new container from that image which runs the
executable that produces the output you are currently reading.
4. The Docker daemon streamed that output to the Docker client, which sent it
to your terminal.
To try something more ambitious, you can run an Ubuntu container with:
$ docker run -it ubuntu bash
Share images, automate workflows, and more with a free Docker ID:
https://hub.docker.com/
For more examples and ideas, visit:
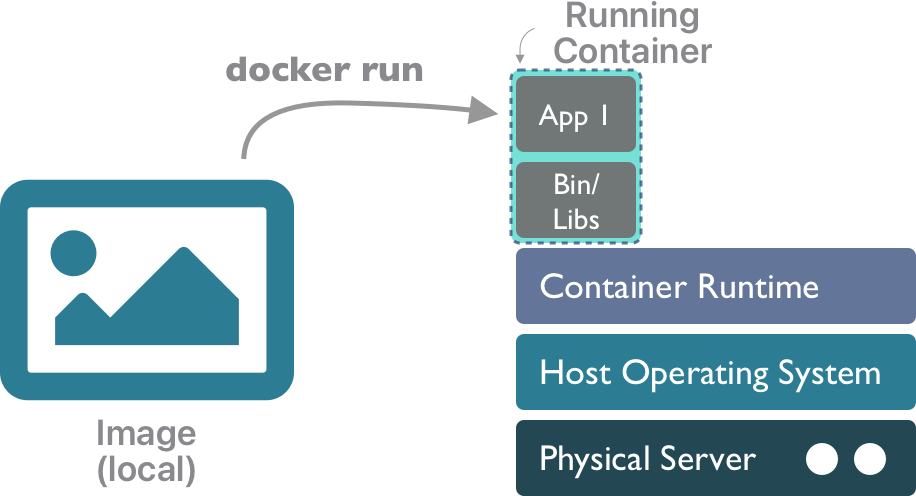
https://docs.docker.com/get-started/In a nutshell, the docker run command will take an image from your local machine, and execute it as a container instance.
You can manage your local containers and images using the docker client. Start by listing your local images:
$ docker image ls
REPOSITORY                                          TAG       IMAGE ID       CREATED         SIZE
hello-world                                         latest    ee301c921b8a   10 months ago   9.14kB
And you can list the containers that are running. Because containers are somewhat analogous to processes, list them with:
$ docker ps
CONTAINER ID   IMAGE     COMMAND   CREATED   STATUS    PORTS     NAMES
There is no output there, because no containers are currently running. You can see the containers that were run previously by adding the -a (all) option. Only long-running containers will generally be visible with docker ps without the -a flag.
$ docker ps -a
CONTAINER ID   IMAGE         COMMAND    CREATED          STATUS                      PORTS     NAMES
f0a2c6c27af7   hello-world   "/hello"   12 minutes ago   Exited (0) 12 minutes ago             nervous_vaughan
So from that listing, we can see the hello-world image (with id f0a2c6c27af7) was run 12 minutes ago. We could run it again with either the container identifier (using docker start -i f0a2c6c27af7), or with the container name, which was assigned automatically (docker start -i nervous_vaughan). Using start, we are running the same container instance (f0a2c6c27af7) as previously, rather than creating a new one (which we could do by calling docker run again).
Once you are finished with a container you can remove the container, but note that the image will still be present locally.
$ docker ps -a
CONTAINER ID   IMAGE         COMMAND    CREATED          STATUS                     PORTS     NAMES
f0a2c6c27af7   hello-world   "/hello"   22 minutes ago   Exited (0) 6 minutes ago             nervous_vaughan

$ docker rm f0a2c6c27af7
f0a2c6c27af7

$ docker ps -a
CONTAINER ID   IMAGE         COMMAND    CREATED      STATUS                  PORTS     NAMES

$ docker image ls
REPOSITORY                                          TAG       IMAGE ID       CREATED         SIZE
hello-world                                         latest    ee301c921b8a   10 months ago   9.14kB
So the image is still on your local machine and could be run again to create a new container anytime.
15.6 How about python?
We’ve been using python 3.10, which is installed on the server. What if you wanted to run a newer version of python? It’s a command away with docker:
![]()
$ docker run -it python:3.12
Unable to find image 'python:3.12' locally
3.12: Pulling from library/python
6ee0baa58a3d: Pull complete
992a857ef575: Pull complete
3861a6536e4e: Pull complete
e5e6faea05ea: Pull complete
91c9495e7b5a: Pull complete
9001688a971d: Pull complete
ad27ab4515af: Pull complete
b152d3b07485: Pull complete
Digest: sha256:336461f63f4eb1100e178d5acbfea3d1a5b2a53dea88aa0f9b8482d4d02e981c
Status: Downloaded newer image for python:3.12

Python 3.12.2 (main, Mar 12 2024, 08:01:18) [GCC 12.2.0] on linux
Type "help", "copyright", "credits" or "license" for more information.
>>> print("Hello from python!")
Hello from python!
>>>
You can even use this image to run commands at the command prompt. The -i interactive and -t terminal options allow you to run a command interactively with terminal output. Let’s run a quick command to print the python version:
$ docker run -it --rm python:3.12 python -V
Python 3.12.2
and we could run a little python command-line calculation from the image:
$ docker run -it --rm python:3.12 python -c 'print(f"Four plus one is {4+1}")'
Four plus one is 5
If you were to run commands like this frequently, you’d build up a lot of container instances from your image, so instead we passed the --rm option to tell docker to delete the container (but not the image) when it is done executing each time. So, at times you’ll need to clean up. I’ve run the commands a few times interactively without remembering the --rm option, so now I can list and remove the containers that I don’t need hanging around any more.
$ docker ps -a
CONTAINER ID   IMAGE         COMMAND     CREATED             STATUS                           PORTS     NAMES
d3f717354ed5   python:3.12   "python3"   About an hour ago   Exited (0) 59 minutes ago                  laughing_borg
e882d6a89f2c   python:3.12   "python3"   About an hour ago   Exited (130) About an hour ago             interesting_elgamal
9d984d596e4e   python:3.12   "python3"   About an hour ago   Exited (0) About an hour ago               adoring_jang
b015e761fbab   hello-world   "/hello"    7 days ago          Exited (0) 7 days ago                      compassionate_wozniak
1bf3a36a924c   hello-world   "/hello"    7 days ago          Exited (0) 7 days ago                      jolly_goldwasser

$ docker rm laughing_borg interesting_elgamal adoring_jang compassionate_wozniak
laughing_borg
interesting_elgamal
adoring_jang
compassionate_wozniak

$ docker ps -a
CONTAINER ID   IMAGE         COMMAND    CREATED      STATUS                  PORTS     NAMES
1bf3a36a924c   hello-world   "/hello"   7 days ago   Exited (0) 7 days ago             jolly_goldwasser
15.7 Exploring image registries
Now that version of python is available on your machine. When you list the image, you’ll see that the python version is provided as the tag.
$ docker image ls
REPOSITORY TAG IMAGE ID CREATED SIZE
python 3.12 ff82813aa87b 6 weeks ago 1.02GB
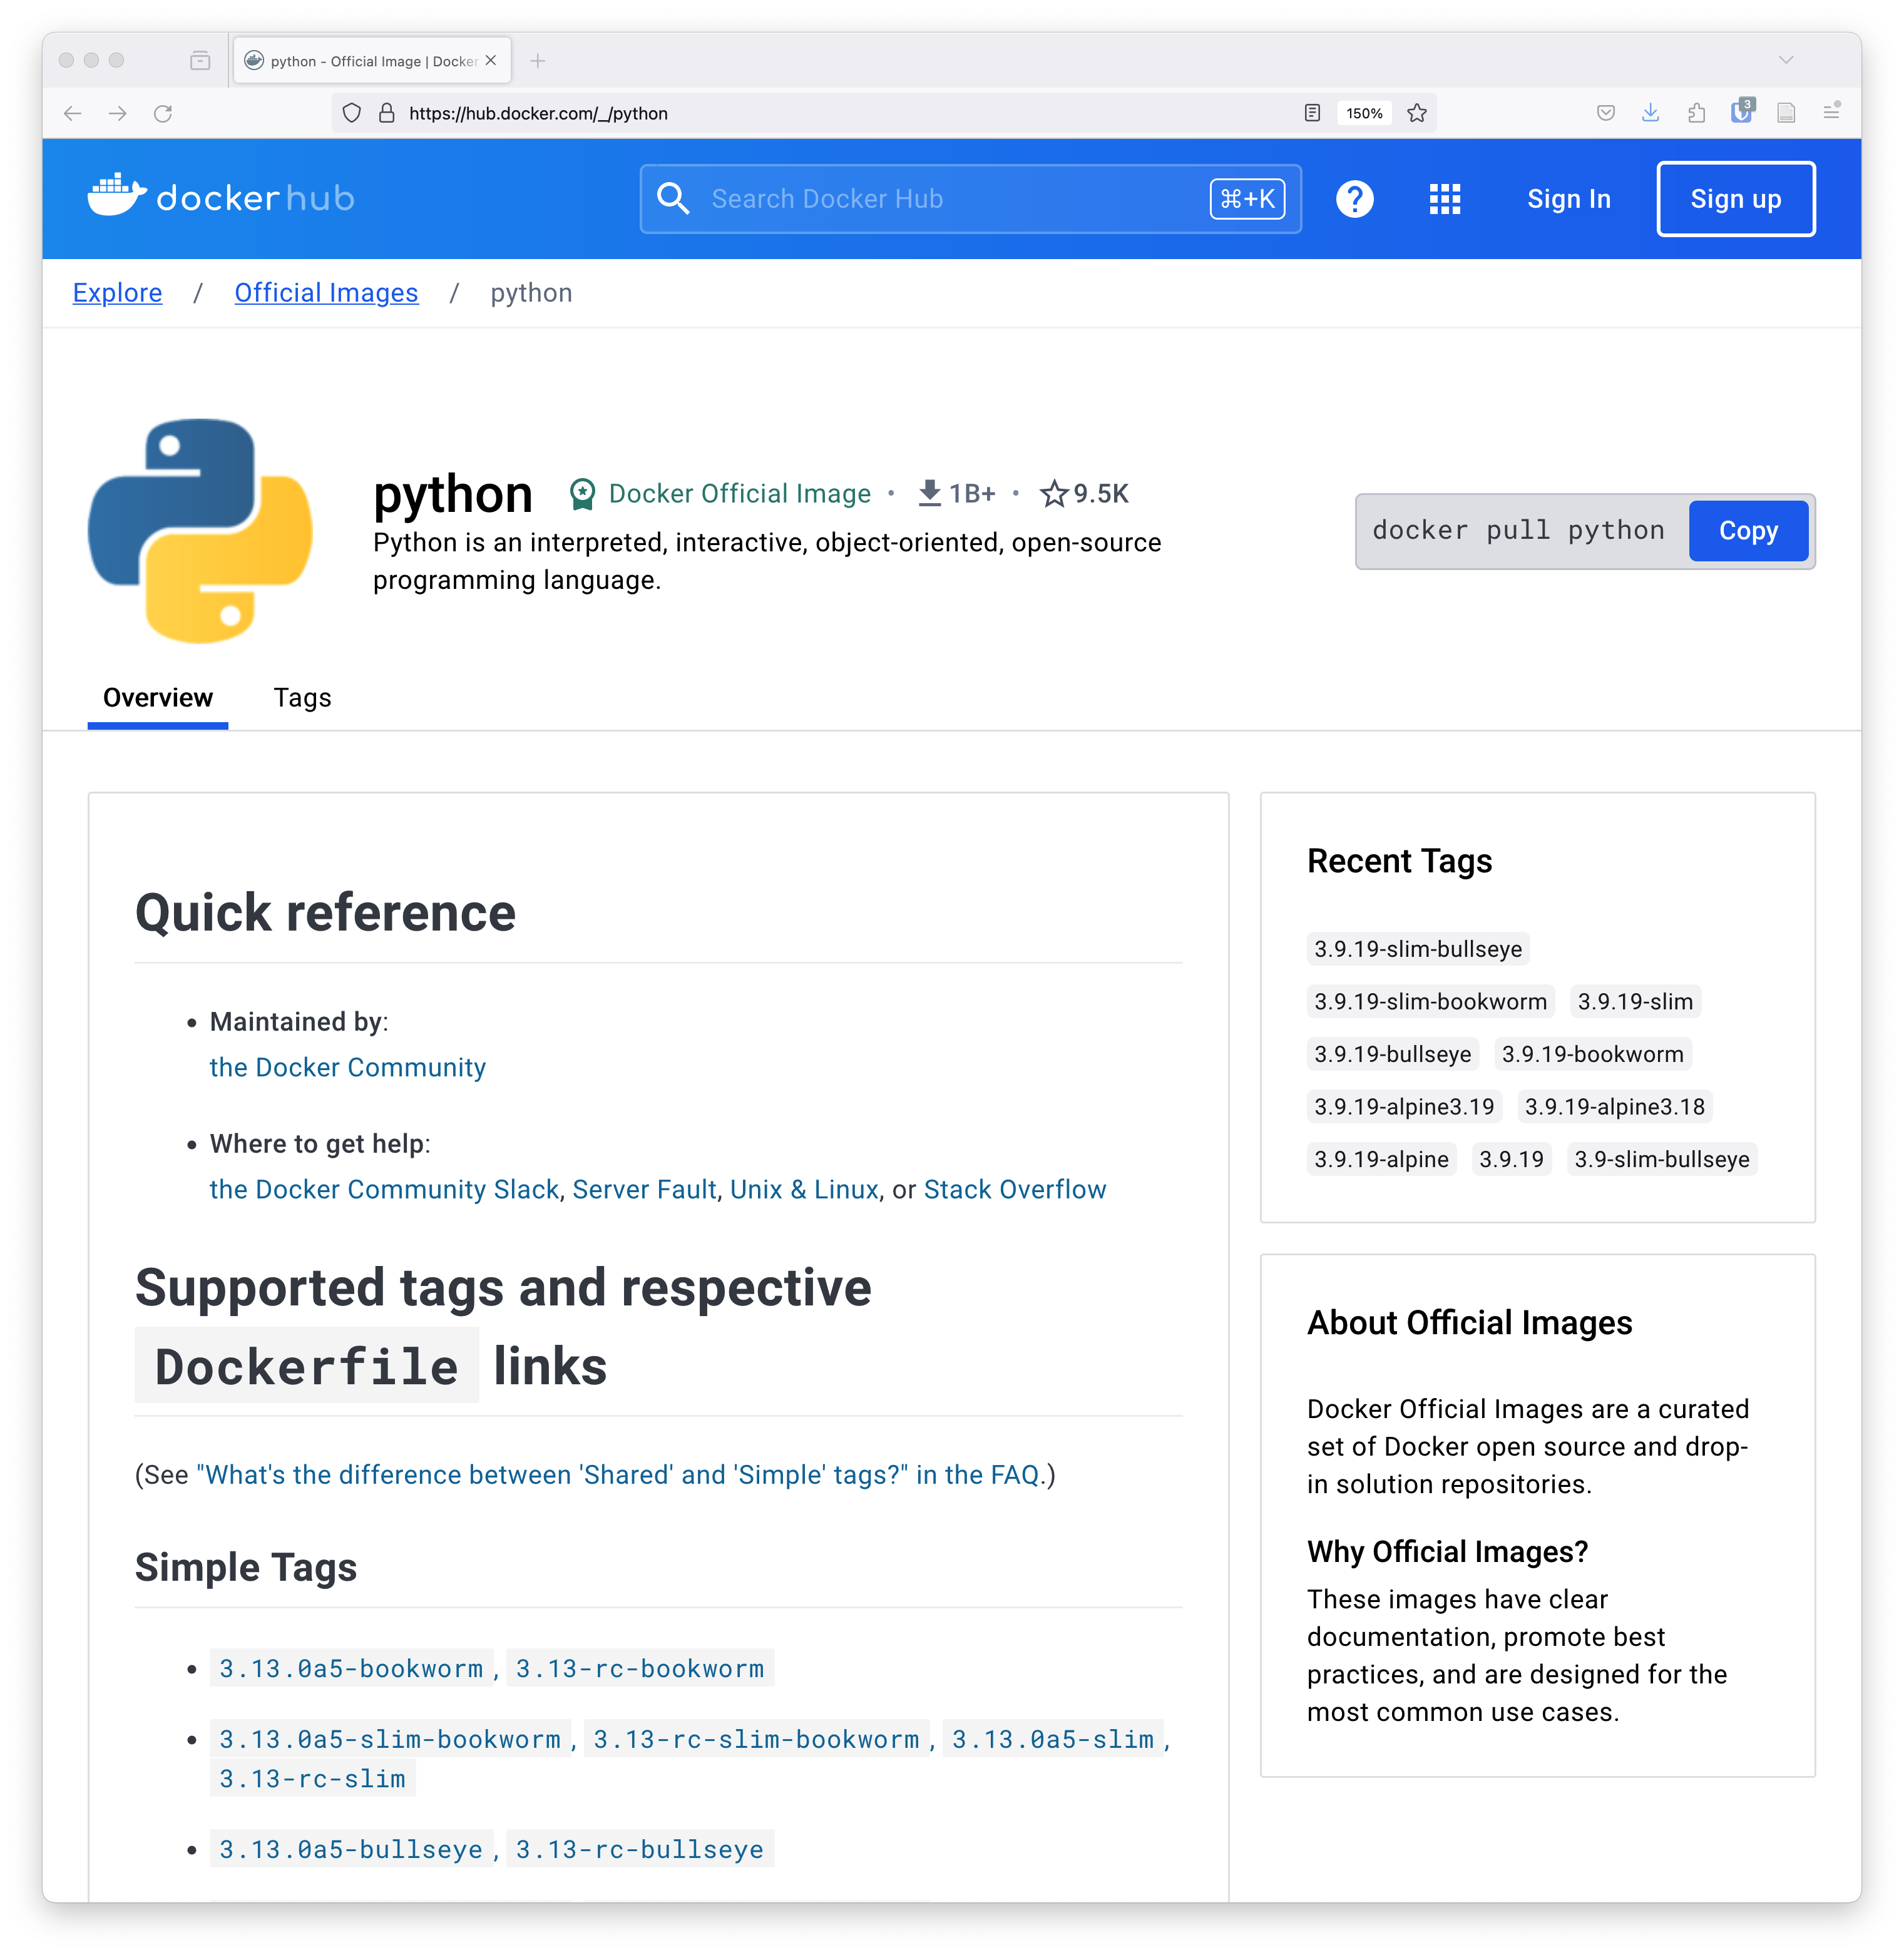
hello-world latest ee301c921b8a 10 months ago 9.14kBThe TAG associated with an image is typically used to indicate the version of the image. We downloaded this image from the DockerHub image registry. If you inspect the DockerHub python page, you’ll see that this is an ‘official’ image from the python project, and that it is one of many different images that can be downloaded. So, images are a fantastic way to be able to reliably return to a specific version of software that you might want to use.
Be careful with images that you download from the internet – they might contain anything, including malware. Because you are running the code locally, you never know what mischief might be managed, and you probably don’t want to find out. So it is best to only run images from trusted sources. Generally, the ‘official’ images for projects are marked in image registries, and there are procedures to ensure they are from those trusted sources. But, it’s also easy to spoof something that looks official, so put on your tinfoil hat when running unfamiliar images.
Of course, python is just the start. You can find images for just about any software you need, including machine learning libraries like TensorFlow (tensorflow/tensorflow), databases like Postresql (bitnami/postgresql), search systems like Solr (solr), and web servers like nginx (nginx). Take a few mintues to explore the thousands of applications available at these image registries:
![]()
![]()
15.8 Custom images with Dockerfiles
While pre-built images are highly useful, even more importantly, you can build your own custom images with the precise collection of software needed to run an analysis, a model, or visualize your data. This use of images to build custom containers creates portable and highly repeatible analyses because it allows us to declare the exact set of software needed in your computing environment. Basically, it allows you to take your pre-defined computing environment anywhere needed for execution, from your local laptop to the largest supercomputers in the world.
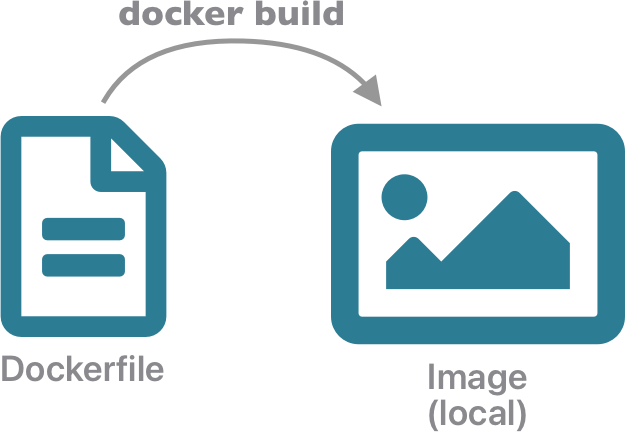
Images can be built by declaring their contents in a Dockerfile, which is a simple text file containing instructions on how to build the image and what it contains. In general, you can customize an existing image by adding folders and files contianing software and data that you need. To create an image, you can start by creating a Dockerfile that contains a FROM directive listing an existing image you want to build from. In our case, let’s start by building an image based on the stock Ubuntu operating system.
# Dockerfile for ADC Scalable Computing Course
FROM ubuntu:22.04
In that file, the FROM command is the first directive, and it indicates that we want to build an image that extends the existing ubuntu:22.04 image. So our image will start with everything that is present in Ubuntu. Technically, that is all we need to get started. Let’s build and run the image to see what’s there. We pass docker build the -t tag we’d like to use in the form of name:version, and the . to indicate that it should look for a Dockerfile in the current directory.
$ docker build -t adccourse:0.1 .
[+] Building 0.0s (5/5) FINISHED                                                                                                                                    docker:default
 => [internal] load .dockerignore                                                                                                                                             0.0s
 => => transferring context: 2B                                                                                                                                               0.0s
 => [internal] load build definition from Dockerfile                                                                                                                          0.0s
 => => transferring dockerfile: 191B                                                                                                                                          0.0s
 => [internal] load metadata for docker.io/library/ubuntu:22.04                                                                                                               0.0s
 => CACHED [1/1] FROM docker.io/library/ubuntu:22.04                                                                                                                          0.0s
 => exporting to image                                                                                                                                                        0.0s
 => => exporting layers                                                                                                                                                       0.0s
 => => writing image sha256:7dbc68b81268657c977e24cfe712e6907f1cb76c08aaf6397f94a3149db11069                                                                                  0.0s
 => => naming to docker.io/library/adccourse:0.1                                                                                                                              0.0s

$ docker run -it adccourse:0.1
root@76529c3b3358:/# pwd
/
root@76529c3b3358:/# ls
bin  boot  dev  etc  home  lib  media  mnt  opt  proc  root  run  sbin  srv  sys  tmp  usr  var
root@76529c3b3358:/# exit
🎉 We have a working image, declared from our Dockerfile! 🎉
15.8.1 Adding software
Now let’s extend it to add some software we might need. For example, let’s add python and some utilities. First, we’ll use the SHELL directive to indicate that we want all future commmands from the Dockerfile to be run using the Bash shell, and the WORKDIR directive to set up our working directory to a better location than /. In this case, we will be building an application for the scalable computing (scomp) course, so we’ll put our working files in a typical linux HOME directory location, /home/scomp.
The RUN directive can be used to run any shell command that is needed to modify the image. In this example, we will use it to run the apt update and apt install commands to install the python package and some standard utilities on the system. Note how we use the && operator to combine two bash commands into a single RUN invocation. When using apt in an image, you typically need to run apt update first to get the full list of software package sources that can be installed.
# Dockerfile for ADC Scalable Computing Course
FROM ubuntu:22.04
SHELL ["/bin/bash", "-c"]
WORKDIR /home/scomp
RUN apt update && apt -y install python3 pip virtualenvwrapper vim nano iproute2 tree
Build it again with docker build -t adccourse:0.2 ., and then let’s inspect it by running docker run -it adccourse:0.2. Note now that our working directory is /home/scomp, and you can now run the python3 command, which shows we have python 3.10 installed:
$ docker run -it adccourse:0.2
root@e9566a19e24b:/home/scomp# pwd
/home/scomp
root@e9566a19e24b:/home/scomp# python3 -V
Python 3.10.12
root@e9566a19e24b:/home/scomp# exit
When we’’ve been running these containers, we have not been using the --rm flag from before. So, you’ll note that they are building up in our container list. We can clean them up with docker rm as we don’t really intend to reuse these containers as we work through building up our image. And let’s use --rm for future runs to prevent this from happening.
$ docker ps -a
CONTAINER ID   IMAGE           COMMAND       CREATED          STATUS                            PORTS     NAMES
e9566a19e24b   adccourse:0.2   "/bin/bash"   3 minutes ago    Exited (127) About a minute ago             affectionate_swanson
d493605cfb60   adccourse:0.2   "/bin/bash"   5 minutes ago    Exited (0) 4 minutes ago                    sharp_elbakyan
a9ab223669ac   adccourse:0.2   "/bin/bash"   5 minutes ago    Exited (127) 5 minutes ago                  wonderful_chaum
76529c3b3358   adccourse:0.1   "/bin/bash"   22 minutes ago   Exited (0) 8 minutes ago                    heuristic_nash
1bf3a36a924c   hello-world     "/hello"      8 days ago       Exited (0) 8 days ago                       jolly_goldwasser

$ docker rm e9566a19e24b d493605cfb60 a9ab223669ac 76529c3b3358
e9566a19e24b
d493605cfb60
a9ab223669ac
76529c3b3358
15.8.2 Add a user account
When we ran our images previously, we noted that the image was running as the root user, and the default working directory was /. By setting WORKDIR, we are now working within the /home/scomp directory, but still as the user root. Best practice would be to create a dedicated user account that doesn’t have the administrative priveledges of root. So, we’ll create an account scomp and group scomp that will own all of the files we create and will run our processes.
# Dockerfile for ADC Scalable Computing Course
FROM ubuntu:22.04
SHELL ["/bin/bash", "-c"]
WORKDIR /home/scomp
RUN apt update && apt -y install python3 pip virtualenvwrapper vim nano iproute2 tree
RUN groupadd -r scomp && useradd -r -g scomp scomp
RUN mkdir -p /home/scomp && chown scomp.scomp /home/scomp
RUN mkdir -p /var/data && chown scomp.scomp /var/data
USER scomp:scomp
Rebuild the image (docker build -t adccourse:0.3 .) and run it, and you’ll see that we are now running as the scomp user in the /home/scomp directory. This time, when we run it, we’ll also use the -h hostname option to create a bit more readable hostname, rather than the container identifier.
$ docker run -it --rm -h adccourse adccourse:0.3
scomp@adccourse:~$ pwd
/home/scomp
scomp@adccourse:~$ whoami
scomp
scomp@adccourse:~$ exit
15.8.3 Add a python venv
Now that we have a working image with python installed, lets configure the image to create a standardized python virtual environment with the python packages that we’ll need in our application. Start by creating a requirements.txt file in the same directory as your Dockerfile, with the list of packages needed. We’ll start with just two, xarray and matplotlib.
❯ cat requirements.txt
xarray==2024.2.0
matplotlib==3.8.3
To create the virtualenv, we will need to first configure virtualenvwrapper, and then COPY the requirements.txt file into the image, and then finally make the virtual environment inside the image using mkvirtualenv, pip, and workon. We’ll go through these in more detail after we build the image. Let’s build it, this time tagging it as version 1.0.
# Dockerfile for ADC Scalable Computing Course
# Build with:
#     docker build -t adccourse:1.0 .
FROM ubuntu:22.04
SHELL ["/bin/bash", "-c"]
WORKDIR /home/scomp
RUN apt update && apt -y install python3 pip virtualenvwrapper vim nano iproute2 tree
RUN groupadd -r scomp && useradd -r -g scomp scomp
RUN mkdir -p /home/scomp && chown scomp.scomp /home/scomp
USER scomp:scomp
RUN echo "source /usr/share/virtualenvwrapper/virtualenvwrapper.sh" >> /home/scomp/.bashrc
COPY ./requirements.txt .
RUN source /usr/share/virtualenvwrapper/virtualenvwrapper.sh && \
        mkvirtualenv scomp && \
        pip install --no-cache-dir --upgrade -r requirements.txt && \
        echo "workon scomp" >> /home/scomp/.bashrc
The COPY directive is used to copy a file from the local machine into our image. In this case, we are copying the requirements.txt file that we created into the current directory (.), which in this case refers to the WORKDIR in the image (i.e., /home/scomp). We’ll use this in the next step.
The final RUN directive sets up oour virtual environment by doing the following:
- runs
sourceto load the virtualenvwrapper commands for use during this build - runs
mkvirtualenvto create a new virtual environment titledscomp - runs
pipto install all of the packages from the requirements file - appends
workon scompto our bash startup scripts so that the venv loads whenever the container is launched
Layers. Each of the directives in the Dockerfile builds a single image layer, and they are run in order. Each layer is registered using the sha256 identifier for the layer, which enables layers to be cached. Thus, if you already have a layer with a given hash built or pulled into your local registry, then subsequent docker build commands can reuse that layer, rather than building them from scratch. As a result, its best practice to put the layers that change infrequently at the top of the Dockerfile, and layers that might change more frequently (such as application-specfiic commands) near the bottom. This will speed things up by maximizing the use of CACHED layers, which can be seen in the output of docker build.
❯ docker build -t adccourse:1.0 .
[+] Building 24.7s (13/13) FINISHED                                                                                                                docker:default
 => [internal] load build definition from Dockerfile                                                                                                         0.0s
 => => transferring dockerfile: 787B                                                                                                                         0.0s
 => [internal] load .dockerignore                                                                                                                            0.0s
 => => transferring context: 2B                                                                                                                              0.0s
 => [internal] load metadata for docker.io/library/ubuntu:22.04                                                                                              0.0s
 => [1/8] FROM docker.io/library/ubuntu:22.04                                                                                                                0.0s
 => [internal] load build context                                                                                                                            0.0s
 => => transferring context: 115B                                                                                                                            0.0s
 => CACHED [2/8] WORKDIR /home/scomp                                                                                                                         0.0s
 => CACHED [3/8] RUN apt update && apt -y install python3 pip virtualenvwrapper vim nano iproute2 tree                                                       0.0s
 => CACHED [4/8] RUN groupadd -r scomp && useradd -r -g scomp scomp                                                                                          0.0s
 => CACHED [5/8] RUN mkdir -p /home/scomp && chown scomp.scomp /home/scomp                                                                                   0.0s
 => CACHED [6/8] RUN echo "source /usr/share/virtualenvwrapper/virtualenvwrapper.sh" >> /home/scomp/.bashrc                                                  0.0s
 => [7/8] COPY ./requirements.txt .                                                                                                                          0.0s
 => [8/8] RUN source /usr/share/virtualenvwrapper/virtualenvwrapper.sh &&         mkvirtualenv scomp &&         pip install --no-cache-dir --upgrade -r re  23.7s
 => exporting to image                                                                                                                                       0.9s
 => => exporting layers                                                                                                                                      0.9s
 => => writing image sha256:a45927dfe598cb5397195ada7168743f80417faf04f14745f6d66ac352614501                                                                 0.0s
 => => naming to docker.io/library/adccourse:1.0                                                                                                             0.0s                                                                                           0.0s
When we run this image, we’ll now see that the scomp virtualenvironment was activated, and that xarray can be imported in the python3 environment. By being extremely explicit about the software being installed in the Dockerfile image, we can ensure that the environment we’ve built is highly portable and reproducible.
$ docker run -it --rm -h adccourse adccourse:1.0
(scomp) scomp@adccourse:~$ python3
Python 3.10.12 (main, Nov 20 2023, 15:14:05) [GCC 11.4.0] on linux
Type "help", "copyright", "credits" or "license" for more information.
>>> import xarray
>>>
(scomp) scomp@adccourse:~$ exit
In summary, a Dockerfile is a mechanism to declare a complete computing environment in a single text file. Using a Dockerfile makes it straightforward to reliably rebuild the specified environment, installing the precise software and data needed in a lightweight image. You can base images on a huge variety of existing software in the open source ecosystem. Docker images are immutable, and can be run in parallel in multiple containers. In the next section, we start to explore how to get data in and out of these immutable containers.
15.9 Anatomy of image layers
Containers are ephemeral. Any data they create is lost when the container is deleted, unless you go to extra steps to preserve it. This is because the container is actually composed of a set of layers, each of which contains a filesystem with a set of files that gets merged with the files from the other layers to produce a union filesystem that contains all of the files. Each of the layers in an image is layered on top of the one before it, and so higher layers in the stack take precedence if they contain files at identical paths. Each of these layers from the image is read-only, but a top-most read/write layer is set up to allow container-specific changes, giving the appearance that the whole filesytem is writable.
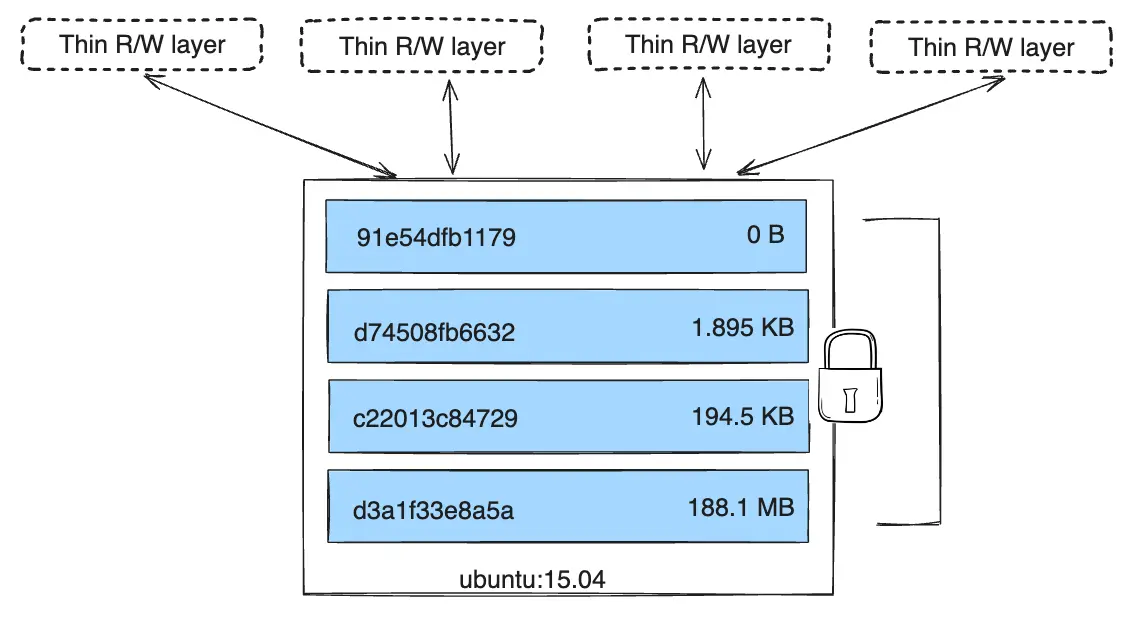
One of the benefits of this layering system is that each layer is immutable and cached, so running many copies of a container each uses the same set of cached layers, adding only the thin read/write layers at the top.
So, how do we get data out of our containers?
15.10 Volume mounts
One approach to getting data out of a container is to mount one or more storage volumes from either the local host or from an accessible network into the container. You can think of a volume like a USB flash drive – when I plug it into one machine, it gets mounted there at a particular path, but if I plug it into a different machine, it might get mounted in a different location. But it still contains the same data and files.
While there are many types of volumes that can be mounted, the simplest is a folder on the local machine that is mounted to be accessible within the container. Docker makes it easy to mount a folder by specifying which folder to mount and the path that you want it mounted at in the container. For example, from a server I might take a folder from my local home directory (e.g., /home/jones/adc-course) and mount it in another location in a docker container at (e.g., /var/data).
You control the permissions on the files and folders that you mount, which determines whether the processes you run in a script can read from or write to the volume. Permission issues can easily arise when you first start using mounted volumes, but just a small amount of tweaking of your Dockerfile can set the permissions straight.
15.10.1 Setup a local directory to preserve data
The first step is to create a host directory on the local machine that contains files and data that we want to mount. To start, create a directory ~/adc-course in your HOME directory, and create input, output, and scripts as children.
We’ll be using an sample river flow discharge data from the Arcctic Data Center:
The Arctic Great Rivers Observatory. (2024). Arctic Great Rivers Observatory Biogeochemistry and Discharge Data, North America and Siberia, 2003 - 2024. Arctic Data Center. doi:10.18739/A2BC3SZ84.
Copy the discharge-data.csv file into the input directory you created, and copy the sample analysis script max-discharge.py into the scripts directory.
$ mkdir ~/adc-course
$ mkdir ~/adc-course/input
$ mkdir ~/adc-course/output
$ mkdir ~/adc-course/scripts
$ cp discharge-data.csv ~/adc-course/input/    # From doi:10.18739/A2BC3SZ84
$ cp max-discharge.py ~/adc-course/scripts/
$ chmod -R go+rwX ~/adc-course
$ tree ~/adc-course
/home/jones/adc-course
|-- input
|   └-- discharge-data.csv
|-- output
└-- scripts
    └-- max-discharge.py
15.10.2 Run the container and mount the volume
When running a docker container, use the -v option to mount a volume. For a host folder, this takes the form -v /path/to/local/dir:/path/in/container. For example, we might want to mount the host directory that we created above from ~/adc-course/ into a directory in the container at /var/data, as follows:
❯ docker run -it --rm -h adccourse -v ~/adc-course:/var/data adccourse:1.0

(scomp) scomp@adccourse:~$ tree /var/data
/var/data
|-- input
|   └-- discharge-data.csv
|-- output
└-- scripts
    └-- max-discharge.py
Note how the directory has the same structure and contents, but is located in a different path from the root (/var/data). Notice also that, because we set up our docker image with our scomp python virtual environment, it is active when we log in interactively. So we can easily launch our python script using that venv, which writes its output plot to /var/data/output.
(scomp) scomp@adccourse:~$ python /var/data/scripts/max-discharge.py
/var/data/scripts/max-discharge.py:6: DtypeWarning: Columns (2) have mixed types. Specify dtype option on import or set low_memory=False.
  discharge = pd.read_csv("/var/data/input/discharge-data.csv")
(scomp) scomp@adccourse:~$ tree /var/data
/var/data
|-- input
|   └-- discharge-data.csv
|-- output
|   └-- max-discharge.png
└-- scripts
    └-- max-discharge.py

3 directories, 3 files
(scomp) scomp@adccourse:~$ exit
exit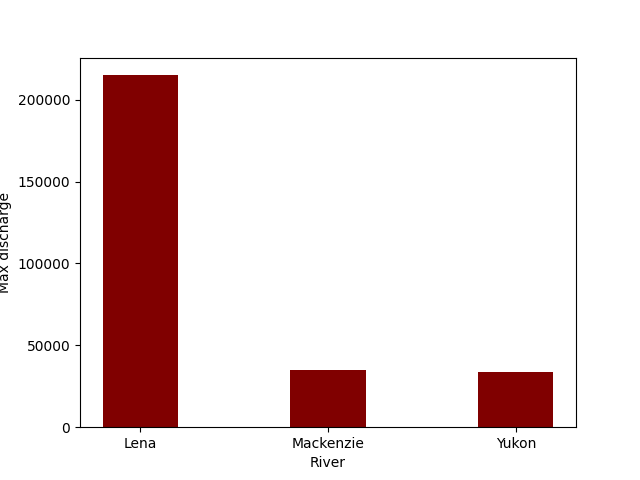
Our analytical script created a summary plot of maximum discharge volume for three rivers from the Arctic Rivers dataset. Because we built a completely repeatable image from a Dockerfile, creating this analysis environment is highly repeatable. Because the image that is produced contains a deterministic virtual environment that can be run on many hosts, it is both portable and scalable. And because the images are built from immutable, cacheable layers, the whole system is lightweight, even when running many instances of the container. We can wrap up by showing that the analysis is completely reproducible by running the whole thing from a single command:
$ docker run -it --rm -h adccourse -v ~/adc-course:/var/data adccourse:1.0 bash -i -c "workon scomp && python /var/data/scripts/max-discharge.py"
/var/data/scripts/max-discharge.py:6: DtypeWarning: Columns (2) have mixed types. Specify dtype option on import or set low_memory=False.
  discharge = pd.read_csv("/var/data/input/discharge-data.csv")
$ tree ~/adc-course
/home/jones/adc-course
|-- input
|   └-- discharge-data.csv
|-- output
|   └-- max-discharge.png
└-- scripts
    └-- max-discharge.py
Finally, you can publish your Dockerfile along with your input data, output data, and scripts to create a fully reproducible data package. We encourage this type of fully reproducible package at the Arctic Data Center, and can help with the details of adding such artifacts to your packages.
15.11 Sharing images to registries
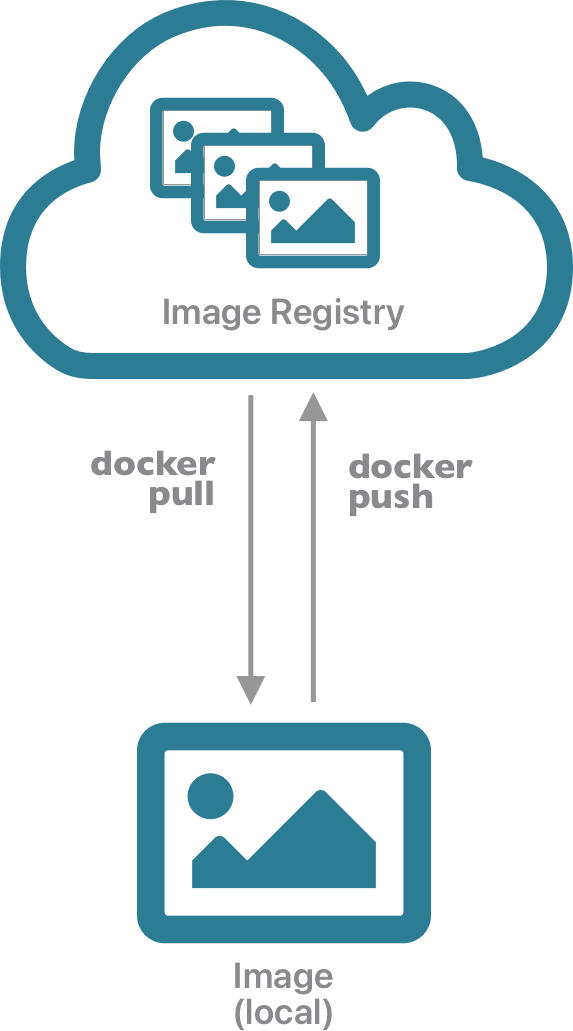
In addition to archiving your source code and Dockerfile at an archival repository, you may also find it helpful to publish your built images to an image registry such as Dockerhub, ArtifactHub, or GitHub Packages (formerly GitHub Container Registry (ghcr.io)). You might want to do this to publicly share the image so that others can run your image, or so that you can deploy the image on many nodes of a cluster, or simply so that you can access it without rebuilding it for future analytical runs.
![]()
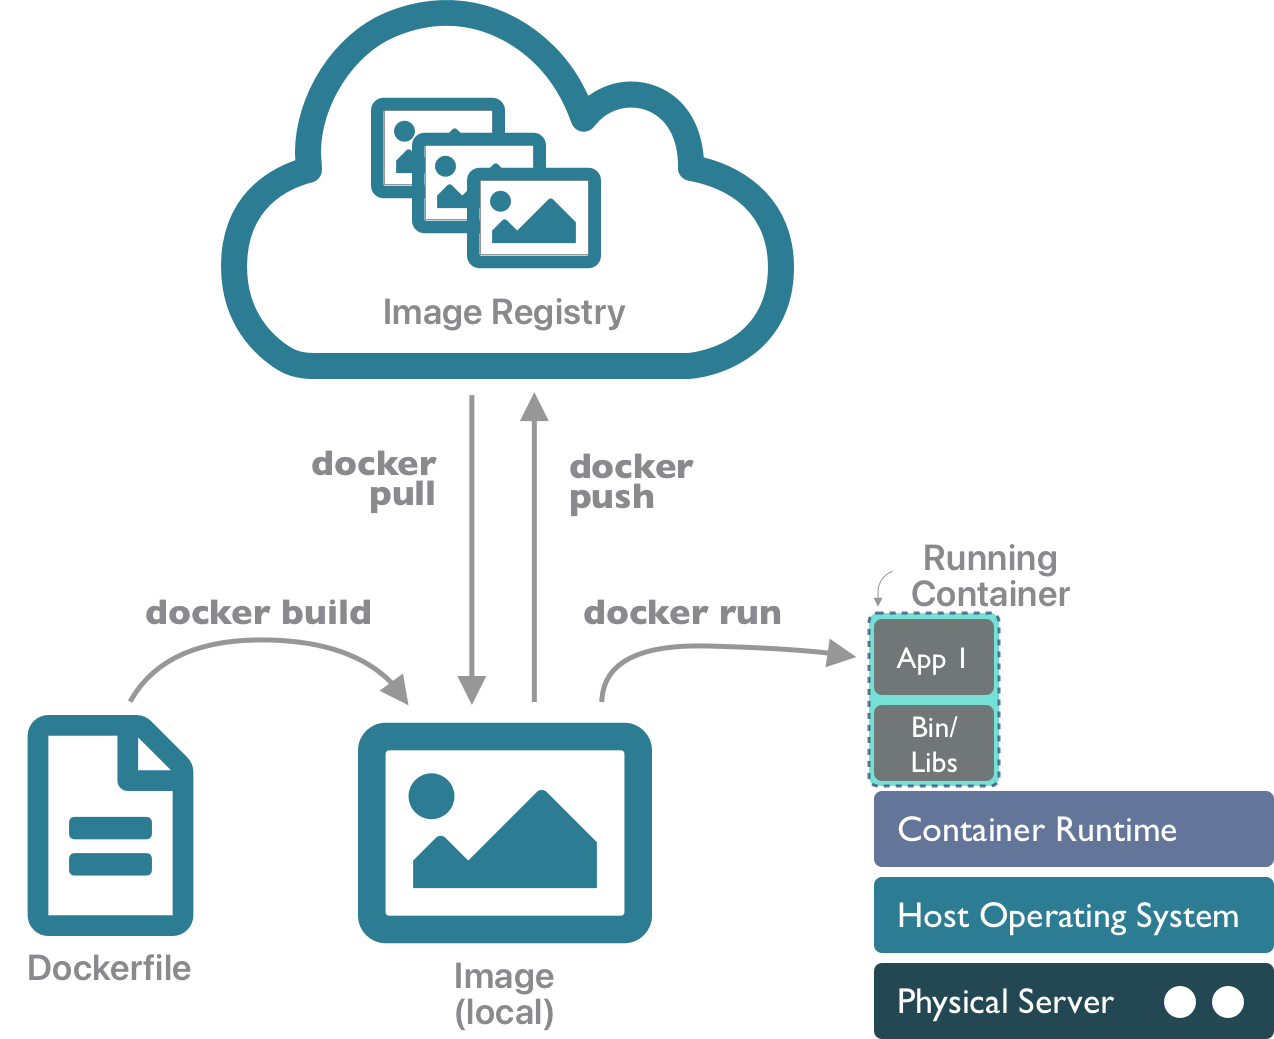
15.12 Container lifecycle
Putting it all together, you can use the docker client tool to build an image from a Dockerfile, then run it as a container, and you can push that image to an image registry, or pull one down that you want to run on a particular machine.
15.13 References
- Dockerfile reference
- Open Container Initiative Image Specification